Alla program behandlar data i en eller annan form, och många behöver kunna spara och hämta dessa data från en anrop till en annan. Python, SQLite och SQLAlchemy ger dina program databasfunktionalitet, så att du kan lagra data i en enda fil utan att behöva en databasserver.
Du kan uppnå liknande resultat med platta filer i valfritt antal format, inklusive CSV, JSON, XML och till och med anpassade format. Platta filer är ofta läsbara textfiler – även om de också kan vara binära data – med en struktur som kan tolkas av ett datorprogram. Nedan kommer du att utforska användningen av SQL-databaser och platta filer för datalagring och manipulering och lära dig hur du bestämmer vilken metod som är rätt för ditt program.
I den här självstudien får du lära dig hur du använder:
- Platta filer för datalagring
- SQL för att förbättra tillgången till beständiga data
- SQLite för datalagring
- SQLAlchemy att arbeta med data som Python-objekt
Du kan få all kod och all data som du ser i den här handledningen genom att klicka på länken nedan:
Ladda ned exempelkoden: Klicka här för att få koden du använder för att lära dig om datahantering med SQLite och SQLAlchemy i den här självstudien.
Använda platta filer för datalagring
En platt fil är en fil som innehåller data utan intern hierarki och vanligtvis inga referenser till externa filer. Platta filer innehåller läsbara tecken och är mycket användbara för att skapa och läsa data. Eftersom de inte behöver använda fasta fältbredder använder platta filer ofta andra strukturer för att göra det möjligt för ett program att tolka text.
Till exempel är CSV-filer (comma-separated value) rader med vanlig text där kommatecken separerar dataelementen. Varje textrad representerar en rad med data, och varje kommaavgränsat värde är ett fält inom den raden. Kommatecknets avgränsare anger gränsen mellan datavärden.
Python utmärker sig på att läsa från och spara till filer. Att kunna läsa datafiler med Python gör att du kan återställa ett program till ett användbart tillstånd när du kör det igen vid ett senare tillfälle. Genom att kunna spara data i en fil kan du dela information från programmet mellan användare och webbplatser där programmet körs.
Innan ett program kan läsa en datafil måste det kunna förstå data. Vanligtvis innebär detta att datafilen måste ha någon struktur som programmet kan använda för att läsa och tolka texten i filen.
Nedan finns en CSV-fil med namnet author_book_publisher.csv , som används av det första exempelprogrammet i denna handledning:
first_name,last_name,title,publisher
Isaac,Asimov,Foundation,Random House
Pearl,Buck,The Good Earth,Random House
Pearl,Buck,The Good Earth,Simon & Schuster
Tom,Clancy,The Hunt For Red October,Berkley
Tom,Clancy,Patriot Games,Simon & Schuster
Stephen,King,It,Random House
Stephen,King,It,Penguin Random House
Stephen,King,Dead Zone,Random House
Stephen,King,The Shining,Penguin Random House
John,Le Carre,"Tinker, Tailor, Soldier, Spy: A George Smiley Novel",Berkley
Alex,Michaelides,The Silent Patient,Simon & Schuster
Carol,Shaben,Into The Abyss,Simon & Schuster
Den första raden ger en kommaseparerad lista med fält, som är kolumnnamnen för de data som följer på de återstående raderna. Resten av raderna innehåller data, där varje rad representerar en enda post.
Obs! Även om författarna, böckerna och förlagen alla är verkliga, är relationerna mellan böcker och förlag fiktiva och skapades för syftet med denna handledning.
Därefter ska du ta en titt på några av fördelarna och nackdelarna med att använda platta filer som ovanstående CSV för att arbeta med dina data.
Fördelar med platta filer
Att arbeta med data i platta filer är hanterbart och enkelt att implementera. Att ha data i ett läsbart format är användbart inte bara för att skapa datafilen med en textredigerare utan också för att undersöka data och leta efter eventuella inkonsekvenser eller problem.
Många program kan exportera platt-filversioner av data som genereras av filen. Till exempel kan Excel importera eller exportera en CSV-fil till och från ett kalkylblad. Platta filer har också fördelen av att vara fristående och överförbara om du vill dela data.
Nästan alla programmeringsspråk har verktyg och bibliotek som gör det enklare att arbeta med CSV-filer. Python har den inbyggda csv modulen och den kraftfulla pandasmodulen som är tillgänglig, vilket gör arbetet med CSV-filer till en potent lösning.
Nackdelar med platta filer
Fördelarna med att arbeta med platta filer börjar minska i takt med att data blir större. Stora filer är fortfarande läsbara för människor, men att redigera dem för att skapa data eller leta efter problem blir en svårare uppgift. Om din applikation kommer att ändra data i filen, skulle en lösning vara att läsa in hela filen i minnet, göra ändringarna och skriva ut data till en annan fil.
Ett annat problem med att använda platta filer är att du uttryckligen måste skapa och underhålla alla relationer mellan delar av din data och applikationsprogrammet inom filsyntaxen. Dessutom måste du generera kod i din applikation för att använda dessa relationer.
En sista komplikation är att personer som du vill dela din datafil med också kommer att behöva känna till och agera utifrån de strukturer och relationer du har skapat i datan. För att få tillgång till informationen måste dessa användare inte bara förstå strukturen på datan utan också de programmeringsverktyg som krävs för att komma åt den.
Exempel på platt fil
Exempelprogrammet examples/example_1/main.py använder author_book_publisher.csv fil för att få data och relationer i den. Denna CSV-fil upprätthåller en lista över författare, böckerna de har publicerat och förlagen för var och en av böckerna.
Obs! Datafilerna som används i exemplen är tillgängliga i project/data katalog. Det finns också en programfil i project/build_data katalog som genererar data. Det programmet är användbart om du ändrar data och vill återgå till ett känt tillstånd.
För att få tillgång till datafilerna som används i det här avsnittet och genom hela handledningen, klicka på länken nedan:
Ladda ned exempelkoden: Klicka här för att få koden du använder för att lära dig om datahantering med SQLite och SQLAlchemy i den här självstudien.
CSV-filen som presenteras ovan är en ganska liten datafil som bara innehåller ett fåtal författare, böcker och förlag. Du bör också lägga märke till några saker om data:
-
Författarna Stephen King och Tom Clancy förekommer mer än en gång eftersom flera böcker de har publicerat finns representerade i data.
-
Författarna Stephen King och Pearl Buck har samma bok utgiven av mer än ett förlag.
Dessa duplicerade datafält skapar relationer mellan andra delar av datan. En författare kan skriva många böcker och ett förlag kan arbeta med flera författare. Författare och förläggare delar relationer med enskilda böcker.
Relationerna i author_book_publisher.csv fil representeras av fält som visas flera gånger i olika rader i datafilen. På grund av denna dataredundans representerar data mer än en enda tvådimensionell tabell. Du kommer att se mer av detta när du använder filen för att skapa en SQLite-databasfil.
Exempelprogrammet examples/example_1/main.py använder relationerna inbäddade i author_book_publisher.csv fil för att generera lite data. Den presenterar först en lista över författarna och antalet böcker som var och en har skrivit. Den visar sedan en lista över förlag och antalet författare som var och en har publicerat böcker för.
Den använder också treelib modul för att visa en trädhierarki över författarna, böckerna och förlagen.
Slutligen lägger den till en ny bok till data och visar trädhierarkin igen med den nya boken på plats. Här är main() ingångspunktsfunktion för detta program:
 1def main():
 2    """The main entry point of the program"""
 3    # Get the resources for the program
 4    with resources.path(
 5        "project.data", "author_book_publisher.csv"
 6    ) as filepath:
 7        data = get_data(filepath)
 8
 9    # Get the number of books printed by each publisher
10    books_by_publisher = get_books_by_publisher(data, ascending=False)
11    for publisher, total_books in books_by_publisher.items():
12        print(f"Publisher: {publisher}, total books: {total_books}")
13    print()
14
15    # Get the number of authors each publisher publishes
16    authors_by_publisher = get_authors_by_publisher(data, ascending=False)
17    for publisher, total_authors in authors_by_publisher.items():
18        print(f"Publisher: {publisher}, total authors: {total_authors}")
19    print()
20
21    # Output hierarchical authors data
22    output_author_hierarchy(data)
23
24    # Add a new book to the data structure
25    data = add_new_book(
26        data,
27        author_name="Stephen King",
28        book_title="The Stand",
29        publisher_name="Random House",
30    )
31
32    # Output the updated hierarchical authors data
33    output_author_hierarchy(data)
Python-koden ovan tar följande steg:
- Rad 4 till 7 läs
author_book_publisher.csvfil i en pandas DataFrame. - Rad 10 till 13 skriva ut antalet böcker utgivna av varje förlag.
- Rad 16 till 19 skriva ut antalet författare som är associerade med varje förlag.
- Rad 22 matar ut bokdata som en hierarki sorterad efter författare.
- Rad 25 till 30 lägg till en ny bok i minnesstrukturen.
- Rad 33 matar ut bokdata som en hierarki sorterad efter författare, inklusive den nyligen tillagda boken.
Att köra detta program genererar följande utdata:
$ python main.py
Publisher: Simon & Schuster, total books: 4
Publisher: Random House, total books: 4
Publisher: Penguin Random House, total books: 2
Publisher: Berkley, total books: 2

Publisher: Simon & Schuster, total authors: 4
Publisher: Random House, total authors: 3
Publisher: Berkley, total authors: 2
Publisher: Penguin Random House, total authors: 1

Authors
├── Alex Michaelides
│   └── The Silent Patient
│       └── Simon & Schuster
├── Carol Shaben
│   └── Into The Abyss
│       └── Simon & Schuster
├── Isaac Asimov
│   └── Foundation
│       └── Random House
├── John Le Carre
│   └── Tinker, Tailor, Soldier, Spy: A George Smiley Novel
│       └── Berkley
├── Pearl Buck
│   └── The Good Earth
│       ├── Random House
│       └── Simon & Schuster
├── Stephen King
│   ├── Dead Zone
│   │   └── Random House
│   ├── It
│   │   ├── Penguin Random House
│   │   └── Random House
│   └── The Shining
│       └── Penguin Random House
└── Tom Clancy
    ├── Patriot Games
    │   └── Simon & Schuster
    └── The Hunt For Red October
        └── Berkley
Författarhierarkin ovan presenteras två gånger i produktionen, med tillägg av Stephen Kings The Stand , utgiven av Random House. Den faktiska utgången ovan har redigerats och visar endast den första hierarkiutgången för att spara utrymme.
main() anropar andra funktioner för att utföra huvuddelen av arbetet. Den första funktionen den anropar är get_data() :
def get_data(filepath):
    """Get book data from the csv file"""
    return pd.read_csv(filepath)
Denna funktion tar in sökvägen till CSV-filen och använder pandor för att läsa in den i en pandas DataFrame, som den sedan skickar tillbaka till den som ringer. Returvärdet för denna funktion blir datastrukturen som skickas till de andra funktionerna som utgör programmet.
get_books_by_publisher() beräknar antalet böcker utgivna av varje förlag. Den resulterande pandasserien använder pandas GroupBy-funktionen för att gruppera efter utgivare och sedan sortera baserat på ascending flagga:
def get_books_by_publisher(data, ascending=True):
    """Return the number of books by each publisher as a pandas series"""
    return data.groupby("publisher").size().sort_values(ascending=ascending)
get_authors_by_publisher() gör i princip samma sak som den tidigare funktionen, men för författare:
def get_authors_by_publisher(data, ascending=True):
    """Returns the number of authors by each publisher as a pandas series"""
    return (
        data.assign(name=data.first_name.str.cat(data.last_name, sep=" "))
        .groupby("publisher")
        .nunique()
        .loc[:, "name"]
        .sort_values(ascending=ascending)
    )
add_new_book() skapar en ny bok i pandas DataFrame. Koden kontrollerar om författaren, boken eller förlaget redan finns. Om inte, skapar den en ny bok och lägger till den i pandas DataFrame:
def add_new_book(data, author_name, book_title, publisher_name):
    """Adds a new book to the system"""
    # Does the book exist?
    first_name, _, last_name = author_name.partition(" ")
    if any(
        (data.first_name == first_name)
        & (data.last_name == last_name)
        & (data.title == book_title)
        & (data.publisher == publisher_name)
    ):
        return data
    # Add the new book
    return data.append(
        {
            "first_name": first_name,
            "last_name": last_name,
            "title": book_title,
            "publisher": publisher_name,
        },
        ignore_index=True,
    )
output_author_hierarchy() använder kapslade for loopar för att iterera genom nivåerna i datastrukturen. Den använder sedan treelib modul för att mata ut en hierarkisk lista över författarna, de böcker de har publicerat och de förläggare som har publicerat dessa böcker:
def output_author_hierarchy(data):
    """Output the data as a hierarchy list of authors"""
    authors = data.assign(
        name=data.first_name.str.cat(data.last_name, sep=" ")
    )
    authors_tree = Tree()
    authors_tree.create_node("Authors", "authors")
    for author, books in authors.groupby("name"):
        authors_tree.create_node(author, author, parent="authors")
        for book, publishers in books.groupby("title")["publisher"]:
            book_id = f"{author}:{book}"
            authors_tree.create_node(book, book_id, parent=author)
            for publisher in publishers:
                authors_tree.create_node(publisher, parent=book_id)

    # Output the hierarchical authors data
    authors_tree.show()
Denna applikation fungerar bra och illustrerar kraften som är tillgänglig för dig med pandasmodulen. Modulen ger utmärkt funktionalitet för att läsa en CSV-fil och interagera med data.
Låt oss driva på och skapa ett identiskt fungerande program med Python, en SQLite-databasversion av författaren och publikationsdata, och SQLAlchemy för att interagera med dessa data.
Använda SQLite för att bevara data
Som du såg tidigare finns det redundanta data i author_book_publisher.csv fil. Till exempel all information om Pearl Bucks The Good Earth finns med två gånger eftersom två olika förlag har gett ut boken.
Föreställ dig om denna datafil innehöll mer relaterade data, som författarens adress och telefonnummer, publiceringsdatum och ISBN för böcker, eller adresser, telefonnummer och kanske årliga intäkter för förläggare. Dessa data skulle dupliceras för varje rotdataobjekt, som författare, bok eller utgivare.
Det är möjligt att skapa data på det här sättet, men det skulle vara exceptionellt krångligt. Tänk på problemen med att hålla denna datafil aktuell. Tänk om Stephen King ville byta namn? Du måste uppdatera flera poster som innehåller hans namn och se till att det inte fanns några stavfel.
Värre än datadupliceringen skulle vara komplexiteten att lägga till andra relationer till data. Tänk om du bestämde dig för att lägga till telefonnummer till författarna och de hade telefonnummer för hemmet, jobbet, mobilen och kanske mer? Varje ny relation som du vill lägga till för ett rotobjekt skulle multiplicera antalet poster med antalet objekt i den nya relationen.
Detta problem är en anledning till att det finns relationer i databassystem. Ett viktigt ämne inom databasteknik är databasnormalisering , eller processen att bryta isär data för att minska redundans och öka integriteten. När en databasstruktur utökas med nya typer av data, minimerar man ändringar av den befintliga strukturen genom att normalisera den i förväg.
SQLite-databasen är tillgänglig i Python, och enligt SQLite-hemsidan används den mer än alla andra databassystem tillsammans. Den erbjuder ett fullfjädrat relationsdatabashanteringssystem (RDBMS) som fungerar med en enda fil för att upprätthålla all databasfunktionalitet.
Det har också fördelen att det inte krävs en separat databasserver för att fungera. Databasfilformatet är plattformsoberoende och tillgängligt för alla programmeringsspråk som stöder SQLite.
Allt detta är intressant information, men hur är det relevant för användningen av platta filer för datalagring? Du får reda på det nedan!
Skapa en databasstruktur
Den brute force-metoden för att få author_book_publisher.csv data till en SQLite-databas skulle vara att skapa en enda tabell som matchar CSV-filens struktur. Att göra detta skulle ignorera en hel del av SQLites kraft.
Relationsdatabaser tillhandahålla ett sätt att lagra strukturerad data i tabeller och upprätta relationer mellan dessa tabeller. De använder vanligtvis Structured Query Language (SQL) som det primära sättet att interagera med data. Detta är en alltför förenkling av vad RDBMS tillhandahåller, men det är tillräckligt för syftet med denna handledning.
En SQLite-databas ger stöd för att interagera med datatabellen med SQL. En SQLite-databasfil innehåller inte bara data, utan den har också ett standardiserat sätt att interagera med data. Detta stöd är inbäddat i filen, vilket innebär att alla programmeringsspråk som kan använda en SQLite-fil också kan använda SQL för att arbeta med den.
Interagera med en databas med SQL
SQL är ett deklarativt språk används för att skapa, hantera och fråga efter data som finns i en databas. Ett deklarativt språk beskriver vad ska åstadkommas snarare än hur det bör genomföras. Du kommer att se exempel på SQL-satser senare när du kommer till att skapa databastabeller.
Strukturera en databas med SQL
För att dra fördel av kraften i SQL måste du tillämpa viss databasnormalisering på data i author_book_publisher.csv fil. För att göra detta delar du upp författarna, böckerna och förlagen i separata databastabeller.
Begreppsmässigt lagras data i databasen i tvådimensionella tabellstrukturer. Varje tabell består av rader med poster , och varje post består av kolumner eller fält , som innehåller data.
Data som finns i fälten är av fördefinierade typer, inklusive text, heltal, flytningar och mer. CSV-filer är olika eftersom alla fält är text och måste tolkas av ett program för att ha en datatyp tilldelad till dem.
Varje post i tabellen har en primär nyckel definieras för att ge en post en unik identifierare. Den primära nyckeln liknar nyckeln i en Python-ordbok. Databasmotorn själv genererar ofta primärnyckeln som ett ökande heltalsvärde för varje post som infogas i databastabellen.
Även om primärnyckeln ofta genereras automatiskt av databasmotorn, behöver den inte vara det. Om data som lagras i ett fält är unik för alla andra data i tabellen i det fältet, kan det vara den primära nyckeln. Till exempel kan en tabell som innehåller data om böcker använda bokens ISBN som primärnyckel.
Skapa tabeller med SQL
Så här kan du skapa de tre tabellerna som representerar författarna, böckerna och förlagen i CSV-filen med hjälp av SQL-satser:
CREATE TABLE author (
    author_id INTEGER NOT NULL PRIMARY KEY,
    first_name VARCHAR,
    last_name VARCHAR
);

CREATE TABLE book (
    book_id INTEGER NOT NULL PRIMARY KEY,
    author_id INTEGER REFERENCES author,
    title VARCHAR
);

CREATE TABLE publisher (
    publisher_id INTEGER NOT NULL PRIMARY KEY,
    name VARCHAR
);
Observera att det inte finns några filoperationer, inga variabler skapade och inga strukturer för att hålla dem. Påståendena beskriver endast det önskade resultatet:skapandet av en tabell med särskilda attribut. Databasmotorn bestämmer hur detta ska göras.
När du har skapat och fyllt i den här tabellen med författardata från author_book_publisher.csv fil kan du komma åt den med SQL-satser. Följande sats (även kallad en fråga ) använder jokertecken (* ) för att få all data i author tabell och mata ut den:
SELECT * FROM author;
Du kan använda sqlite3 kommandoradsverktyg för att interagera med author_book_publisher.db databasfil i project/data katalog:
$ sqlite3 author_book_publisher.db
När kommandoradsverktyget SQLite körs med databasen öppen kan du ange SQL-kommandon. Här är SQL-kommandot ovan och dess utdata, följt av .q kommando för att avsluta programmet:
sqlite> SELECT * FROM author;
1|Isaac|Asimov
2|Pearl|Buck
3|Tom|Clancy
4|Stephen|King
5|John|Le Carre
6|Alex|Michaelides
7|Carol|Shaben

sqlite> .q
Observera att varje författare bara finns en gång i tabellen. Till skillnad från CSV-filen, som hade flera poster för några av författarna, är här endast en unik post per författare nödvändig.
Underhålla en databas med SQL
SQL tillhandahåller sätt att arbeta med befintliga databaser och tabeller genom att infoga nya data och uppdatera eller ta bort befintliga data. Här är ett exempel på en SQL-sats för att infoga en ny författare i author tabell:
INSERT INTO author
    (first_name, last_name)
VALUES ('Paul', 'Mendez');
Denna SQL-sats infogar värdena 'Paul ' och 'Mendez ' i respektive kolumn first_name och last_name av author tabell.
Lägg märke till att author_id kolumnen är inte angiven. Eftersom den kolumnen är den primära nyckeln, genererar databasmotorn värdet och infogar det som en del av satskörningen.
Att uppdatera poster i en databastabell är en okomplicerad process. Anta till exempel att Stephen King ville bli känd under sitt pennnamn, Richard Bachman. Här är en SQL-sats för att uppdatera databasposten:
UPDATE author
SET first_name = 'Richard', last_name = 'Bachman'
WHERE first_name = 'Stephen' AND last_name = 'King';
SQL-satsen lokaliserar den enskilda posten för 'Stephen King' med villkorssatsen WHERE first_name = 'Stephen' AND last_name = 'King' och uppdaterar sedan first_name och last_name fält med de nya värdena. SQL använder likhetstecknet (= ) som både jämförelseoperatör och uppdragsoperatör.
Du kan också ta bort poster från en databas. Här är ett exempel på en SQL-sats för att radera en post från author tabell:
DELETE FROM author
WHERE first_name = 'Paul'
AND last_name = 'Mendez';
Denna SQL-sats tar bort en enda rad från author tabell där first_name är lika med 'Paul' och last_name är lika med 'Mendez' .
Var försiktig när du raderar poster! Villkoren du ställer måste vara så specifika som möjligt. Ett villkor som är för brett kan leda till att fler poster tas bort än du har tänkt. Till exempel, om villkoret endast baseras på raden first_name = 'Paul' , då skulle alla författare med förnamnet Paul raderas från databasen.
Obs! För att undvika oavsiktlig radering av poster tillåter många applikationer inte radering alls. Istället har posten en annan kolumn för att indikera om den används eller inte. Den här kolumnen kan heta active och innehåller ett värde som utvärderas till antingen True eller False, vilket indikerar om posten ska inkluderas när databasen frågas.
Till exempel skulle SQL-frågan nedan få alla kolumner för alla aktiva poster i some_table :
SELECT
  *
FROM some_table
WHERE active = 1;
SQLite har inte en boolesk datatyp, så den active kolumnen representeras av ett heltal med värdet 0 eller 1 för att ange status för posten. Andra databassystem kan ha inbyggda booleska datatyper eller inte.
Det är fullt möjligt att bygga databasapplikationer i Python med SQL-satser direkt i koden. Om du gör det returneras data till programmet som en lista med listor eller lista med ordböcker.
Att använda rå SQL är ett helt acceptabelt sätt att arbeta med data som returneras av frågor till databasen. Men istället för att göra det kommer du att gå direkt till att använda SQLAlchemy för att arbeta med databaser.
Bygga relationer
En annan funktion i databassystem som du kanske tycker är ännu mer kraftfull och användbar än databeständighet och hämtning är relationer . Databaser som stöder relationer låter dig dela upp data i flera tabeller och upprätta kopplingar mellan dem.
Data i author_book_publisher.csv fil representerar data och relationer genom att duplicera data. En databas hanterar detta genom att dela upp data i tre tabeller—author , book och publisher —och upprätta relationer mellan dem.
Efter att ha samlat all data du vill ha på ett ställe i CSV-filen, varför skulle du vilja dela upp den i flera tabeller? Skulle det inte vara mer jobb att skapa och sätta ihop igen? Det stämmer till viss del, men fördelarna med att bryta upp data och sätta ihop dem igen med SQL kan vinna dig över!
En-till-många-relationer
En en-till-många förhållandet är som att en kund beställer varor online. En kund kan ha många beställningar, men varje beställning tillhör en kund. author_book_publisher.db databasen har en en-till-många-relation i form av författare och böcker. Varje författare kan skriva många böcker, men varje bok är skriven av en författare.
Som du såg i tabellskapandet ovan är implementeringen av dessa separata enheter att placera var och en i en databastabell, en för författare och en för böcker. Men hur implementeras en-till-många-relationen mellan dessa två tabeller?
Kom ihåg att varje tabell i en databas har ett fält utsett som primärnyckel för den tabellen. Varje tabell ovan har ett primärnyckelfält som heter med detta mönster:<table name>_id .
book Tabellen som visas ovan innehåller ett fält, author_id , som refererar till author tabell. author_id fältet etablerar en en-till-många-relation mellan författare och böcker som ser ut så här:
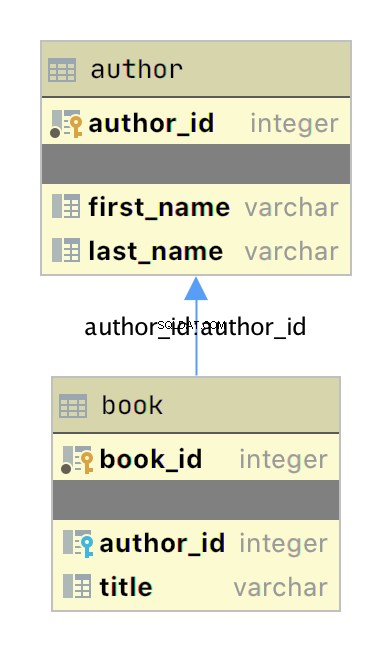
Diagrammet ovan är ett enkelt entity-relationship diagram (ERD) skapat med JetBrains DataGrip-applikation som visar tabellerna author och book som rutor med sina respektive primärnyckel och datafält. Två grafiska objekt lägger till information om förhållandet:
-
De små gula och blå nyckelikonerna ange primär- respektive främmande nycklar för tabellen.
-
Pilen som förbinder
booktillauthorindikerar förhållandet mellan tabellerna baserat påauthor_idfrämmande nyckel ibookbord.
När du lägger till en ny bok i book tabell, innehåller data ett author_id värde för en befintlig författare i author tabell. På så sätt har alla böcker skrivna av en författare en uppslagsrelation tillbaka till den unika författaren.
Nu när du har separata tabeller för författare och böcker, hur använder du relationen mellan dem? SQL stöder vad som kallas en JOIN operation, som du kan använda för att berätta för databasen hur man kopplar samman två eller flera tabeller.
SQL-frågan nedan ansluter till author och book tabell tillsammans med kommandoradsapplikationen SQLite:
sqlite> SELECT
   ...> a.first_name || ' ' || a.last_name AS author_name,
   ...> b.title AS book_title
   ...> FROM author a
   ...> JOIN book b ON b.author_id = a.author_id
   ...> ORDER BY a.last_name ASC;
Isaac Asimov|Foundation
Pearl Buck|The Good Earth
Tom Clancy|The Hunt For Red October
Tom Clancy|Patriot Games
Stephen King|It
Stephen King|Dead Zone
Stephen King|The Shining
John Le Carre|Tinker, Tailor, Soldier, Spy: A George Smiley Novel
Alex Michaelides|The Silent Patient
Carol Shaben|Into The Abyss
SQL-frågan ovan samlar information från både författar- och boktabellen genom att sammanfoga tabellerna med hjälp av relationen som upprättats mellan de två. SQL-strängsammansättning tilldelar författarens fullständiga namn till aliaset author_name . Data som samlas in av frågan sorteras i stigande ordning efter last_name fältet.
Det finns några saker att lägga märke till i SQL-satsen. Först presenteras författare med sina fullständiga namn i en enda kolumn och sorterade efter deras efternamn. Dessutom förekommer författare i produktionen flera gånger på grund av en-till-många-relationen. En författares namn dupliceras för varje bok de har skrivit i databasen.
Genom att skapa separata tabeller för författare och böcker och fastställa relationen mellan dem har du minskat redundansen i data. Nu behöver du bara redigera en författares data på ett ställe, och den ändringen visas i alla SQL-frågor som kommer åt data.
Många-till-många-relationer
Många-till-många relationer finns i author_book_publisher.db databas mellan författare och förlag samt mellan böcker och förlag. En författare kan arbeta med många förlag, och ett förlag kan arbeta med många författare. På samma sätt kan en bok ges ut av många förlag och ett förlag kan ge ut många böcker.
Att hantera denna situation i databasen är mer involverat än en en-till-många-relation eftersom relationen går åt båda hållen. Many-to-many relationships are created by an association table acting as a bridge between the two related tables.
The association table contains at least two foreign key fields, which are the primary keys of each of the two associated tables. This SQL statement creates the association table relating the author and publisher tables:
CREATE TABLE author_publisher (
    author_id INTEGER REFERENCES author,
    publisher_id INTEGER REFERENCES publisher
);
The SQL statements create a new author_publisher table referencing the primary keys of the existing author and publisher tabeller. The author_publisher table is an association table establishing relationships between an author and a publisher.
Because the relationship is between two primary keys, there’s no need to create a primary key for the association table itself. The combination of the two related keys creates a unique identifier for a row of data.
As before, you use the JOIN keyword to connect two tables together. Connecting the author table to the publisher table is a two-step process:
JOINtheauthortable with theauthor_publishertabell.JOINtheauthor_publishertable with thepublishertabell.
The author_publisher association table provides the bridge through which the JOIN connects the two tables. Here’s an example SQL query returning a list of authors and the publishers publishing their books:
 1sqlite> SELECT
 2   ...> a.first_name || ' ' || a.last_name AS author_name,
 3   ...> p.name AS publisher_name
 4   ...> FROM author a
 5   ...> JOIN author_publisher ap ON ap.author_id = a.author_id
 6   ...> JOIN publisher p ON p.publisher_id = ap.publisher_id
 7   ...> ORDER BY a.last_name ASC;
 8Isaac Asimov|Random House
 9Pearl Buck|Random House
10Pearl Buck|Simon & Schuster
11Tom Clancy|Berkley
12Tom Clancy|Simon & Schuster
13Stephen King|Random House
14Stephen King|Penguin Random House
15John Le Carre|Berkley
16Alex Michaelides|Simon & Schuster
17Carol Shaben|Simon & Schuster
The statements above perform the following actions:
-
Line 1 starts a
SELECTstatement to get data from the database. -
Line 2 selects the first and last name from the
authortable using theaalias for theauthortable and concatenates them together with a space character. -
Line 3 selects the publisher’s name aliased to
publisher_name. -
Line 4 uses the
authortable as the first source from which to retrieve data and assigns it to the aliasa. -
Line 5 is the first step of the process outlined above for connecting the
authortable to thepublishertabell. It uses the aliasapfor theauthor_publisherassociation table and performs aJOINoperation to connect theap.author_idforeign key reference to thea.author_idprimary key in theauthorbord. -
Line 6 is the second step in the two-step process mentioned above. It uses the alias
pfor thepublishertable and performs aJOINoperation to relate theap.publisher_idforeign key reference to thep.publisher_idprimary key in thepublisherbord. -
Line 7 sorts the data by the author’s last name in ascending alphabetical order and ends the SQL query.
-
Lines 8 to 17 are the output of the SQL query.
Note that the data in the source author and publisher tables are normalized, with no data duplication. Yet the returned results have duplicated data where necessary to answer the SQL query.
The SQL query above demonstrates how to make use of a relationship using the SQL JOIN keyword, but the resulting data is a partial re-creation of the author_book_publisher.csv CSV data. What’s the win for having done the work of creating a database to separate the data?
Here’s another SQL query to show a little bit of the power of SQL and the database engine:
 1sqlite> SELECT
 2   ...> a.first_name || ' ' || a.last_name AS author_name,
 3   ...> COUNT(b.title) AS total_books
 4   ...> FROM author a
 5   ...> JOIN book b ON b.author_id = a.author_id
 6   ...> GROUP BY author_name
 7   ...> ORDER BY total_books DESC, a.last_name ASC;
 8Stephen King|3
 9Tom Clancy|2
10Isaac Asimov|1
11Pearl Buck|1
12John Le Carre|1
13Alex Michaelides|1
14Carol Shaben|1
The SQL query above returns the list of authors and the number of books they’ve written. The list is sorted first by the number of books in descending order, then by the author’s name in alphabetical order:
-
Line 1 begins the SQL query with the
SELECTkeyword. -
Line 2 selects the author’s first and last names, separated by a space character, and creates the alias
author_name. -
Line 3 counts the number of books written by each author, which will be used later by the
ORDER BYclause to sort the list. -
Line 4 selects the
authortable to get data from and creates theaalias. -
Line 5 connects to the related
booktable through aJOINto theauthor_idand creates thebalias for thebookbord. -
Line 6 generates the aggregated author and total number of books data by using the
GROUP BYnyckelord.GROUP BYis what groups eachauthor_nameand controls what books are tallied byCOUNT()for that author. -
Line 7 sorts the output first by number of books in descending order, then by the author’s last name in ascending alphabetical order.
-
Lines 8 to 14 are the output of the SQL query.
In the above example, you take advantage of SQL to perform aggregation calculations and sort the results into a useful order. Having the database perform calculations based on its built-in data organization ability is usually faster than performing the same kinds of calculations on raw data sets in Python. SQL offers the advantages of using set theory embedded in RDBMS databases.
Entity Relationship Diagrams
An entity-relationship diagram (ERD) is a visual depiction of an entity-relationship model for a database or part of a database. The author_book_publisher.db SQLite database is small enough that the entire database can be visualized by the diagram shown below:
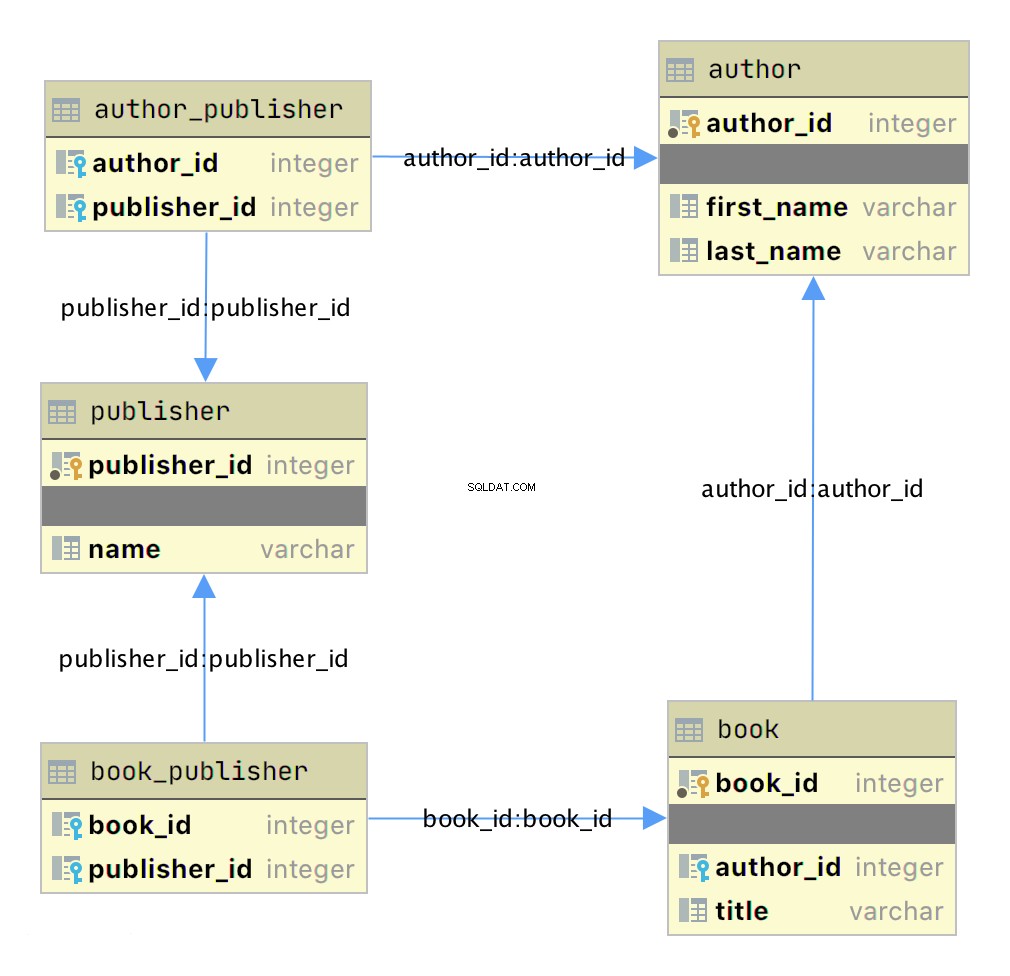
This diagram presents the table structures in the database and the relationships between them. Each box represents a table and contains the fields defined in the table, with the primary key indicated first if it exists.
The arrows show the relationships between the tables connecting a foreign key field in one table to a field, often the primary key, in another table. The table book_publisher has two arrows, one connecting it to the book table and another connecting it to the publisher tabell. The arrow indicates the many-to-many relationship between the book and publisher tabeller. The author_publisher table provides the same relationship between author and publisher .
Working With SQLAlchemy and Python Objects
SQLAlchemy is a powerful database access tool kit for Python, with its object-relational mapper (ORM) being one of its most famous components, and the one discussed and used here.
When you’re working in an object-oriented language like Python, it’s often useful to think in terms of objects. It’s possible to map the results returned by SQL queries to objects, but doing so works against the grain of how the database works. Sticking with the scalar results provided by SQL works against the grain of how Python developers work. This problem is known as object-relational impedance mismatch.
The ORM provided by SQLAlchemy sits between the SQLite database and your Python program and transforms the data flow between the database engine and Python objects. SQLAlchemy allows you to think in terms of objects and still retain the powerful features of a database engine.
The Model
One of the fundamental elements to enable connecting SQLAlchemy to a database is creating a model . The model is a Python class defining the data mapping between the Python objects returned as a result of a database query and the underlying database tables.
The entity-relationship diagram displayed earlier shows boxes connected with arrows. The boxes are the tables built with the SQL commands and are what the Python classes will model. The arrows are the relationships between the tables.
The models are Python classes inheriting from an SQLAlchemy Base class. The Base class provides the interface operations between instances of the model and the database table.
Below is the models.py file that creates the models to represent the author_book_publisher.db database:
 1from sqlalchemy import Column, Integer, String, ForeignKey, Table
 2from sqlalchemy.orm import relationship, backref
 3from sqlalchemy.ext.declarative import declarative_base
 4
 5Base = declarative_base()
 6
 7author_publisher = Table(
 8    "author_publisher",
 9    Base.metadata,
10    Column("author_id", Integer, ForeignKey("author.author_id")),
11    Column("publisher_id", Integer, ForeignKey("publisher.publisher_id")),
12)
13
14book_publisher = Table(
15    "book_publisher",
16    Base.metadata,
17    Column("book_id", Integer, ForeignKey("book.book_id")),
18    Column("publisher_id", Integer, ForeignKey("publisher.publisher_id")),
19)
20
21class Author(Base):
22    __tablename__ = "author"
23    author_id = Column(Integer, primary_key=True)
24    first_name = Column(String)
25    last_name = Column(String)
26    books = relationship("Book", backref=backref("author"))
27    publishers = relationship(
28        "Publisher", secondary=author_publisher, back_populates="authors"
29    )
30
31class Book(Base):
32    __tablename__ = "book"
33    book_id = Column(Integer, primary_key=True)
34    author_id = Column(Integer, ForeignKey("author.author_id"))
35    title = Column(String)
36    publishers = relationship(
37        "Publisher", secondary=book_publisher, back_populates="books"
38    )
39
40class Publisher(Base):
41    __tablename__ = "publisher"
42    publisher_id = Column(Integer, primary_key=True)
43    name = Column(String)
44    authors = relationship(
45        "Author", secondary=author_publisher, back_populates="publishers"
46    )
47    books = relationship(
48        "Book", secondary=book_publisher, back_populates="publishers"
49    )
Here’s what’s going on in this module:
-
Line 1 imports the
Column,Integer,String,ForeignKey, andTableclasses from SQLAlchemy, which are used to help define the model attributes. -
Line 2 imports the
relationship()andbackrefobjects, which are used to create the relationships between objects. -
Line 3 imports the
declarative_baseobject, which connects the database engine to the SQLAlchemy functionality of the models. -
Line 5 creates the
Baseclass, which is what all models inherit from and how they get SQLAlchemy ORM functionality. -
Lines 7 to 12 create the
author_publisherassociation table model. -
Lines 14 to 19 create the
book_publisherassociation table model. -
Lines 21 to 29 define the
Authorclass model to theauthordatabase table. -
Lines 31 to 38 define the
Bookclass model to thebookdatabase table. -
Lines 40 to 49 define the
Publisherclass model to thepublisherdatabase table.
The description above shows the mapping of the five tables in the author_book_publisher.db databas. But it glosses over some SQLAlchemy ORM features, including Table , ForeignKey , relationship() , and backref . Let’s get into those now.
Table Creates Associations
author_publisher and book_publisher are both instances of the Table class that create the many-to-many association tables used between the author and publisher tables and the book and publisher tables, respectively.
The SQLAlchemy Table class creates a unique instance of an ORM mapped table within the database. The first parameter is the table name as defined in the database, and the second is Base.metadata , which provides the connection between the SQLAlchemy functionality and the database engine.
The rest of the parameters are instances of the Column class defining the table fields by name, their type, and in the example above, an instance of a ForeignKey .
ForeignKey Creates a Connection
The SQLAlchemy ForeignKey class defines a dependency between two Column fields in different tables. A ForeignKey is how you make SQLAlchemy aware of the relationships between tables. For example, this line from the author_publisher instance creation establishes a foreign key relationship:
Column("author_id", Integer, ForeignKey("author.author_id"))
The statement above tells SQLAlchemy that there’s a column in the author_publisher table named author_id . The type of that column is Integer , and author_id is a foreign key related to the primary key in the author bord.
Having both author_id and publisher_id defined in the author_publisher Table instance creates the connection from the author table to the publisher table and vice versa, establishing a many-to-many relationship.
relationship() Establishes a Collection
Having a ForeignKey defines the existence of the relationship between tables but not the collection of books an author can have. Take a look at this line in the Author class definition:
books = relationship("Book", backref=backref("author"))
The code above defines a parent-child collection. The books attribute being plural (which is not a requirement, just a convention) is an indication that it’s a collection.
The first parameter to relationship() , the class name Book (which is not the table name book ), is the class to which the books attribute is related. The relationship informs SQLAlchemy that there’s a relationship between the Author and Book classes. SQLAlchemy will find the relationship in the Book class definition:
author_id = Column(Integer, ForeignKey("author.author_id"))
SQLAlchemy recognizes that this is the ForeignKey connection point between the two classes. You’ll get to the backref parameter in relationship() in a moment.
The other relationship in Author is to the Publisher class. This is created with the following statement in the Author class definition:
publishers = relationship(
    "Publisher", secondary=author_publisher, back_populates="authors"
)
Like books , the attribute publishers indicates a collection of publishers associated with an author. The first parameter, "Publisher" , informs SQLAlchemy what the related class is. The second and third parameters are secondary=author_publisher and back_populates="authors" :
-
secondarytells SQLAlchemy that the relationship to thePublisherclass is through a secondary table, which is theauthor_publisherassociation table created earlier inmodels.py. Thesecondaryparameter makes SQLAlchemy find thepublisher_idForeignKeydefined in theauthor_publisherassociation table. -
back_populatesis a convenience configuration telling SQLAlchemy that there’s a complementary collection in thePublisherclass calledauthors.
backref Mirrors Attributes
The backref parameter of the books collection relationship() creates an author attribute for each Book exempel. This attribute refers to the parent Author that the Book instance is related to.
For example, if you executed the following Python code, then a Book instance would be returned from the SQLAlchemy query. The Book instance has attributes that can be used to print out information about the book:
book = session.query(Book).filter_by(Book.title == "The Stand").one_or_none()
print(f"Authors name: {book.author.first_name} {book.author.last_name}")
The existence of the author attribute in the Book above is because of the backref definition. A backref can be very handy to have when you need to refer to the parent and all you have is a child instance.
Queries Answer Questions
You can make a basic query like SELECT * FROM author; in SQLAlchemy like this:
results = session.query(Author).all()
The session is an SQLAlchemy object used to communicate with SQLite in the Python example programs. Here, you tell the session you want to execute a query against the Author model and return all records.
At this point, the advantages of using SQLAlchemy instead of plain SQL might not be obvious, especially considering the setup required to create the models representing the database. The results returned by the query is where the magic happens. Instead of getting back a list of lists of scalar data, you’ll get back a list of instances of Author objects with attributes matching the column names you defined.
The books and publishers collections maintained by SQLAlchemy create a hierarchical list of authors and the books they’ve written as well as the publishers who’ve published them.
Behind the scenes, SQLAlchemy turns the object and method calls into SQL statements to execute against the SQLite database engine. SQLAlchemy transforms the data returned by SQL queries into Python objects.
With SQLAlchemy, you can perform the more complex aggregation query shown earlier for the list of authors and the number of books they’ve written like this:
author_book_totals = (
    session.query(
        Author.first_name,
        Author.last_name,
        func.count(Book.title).label("book_total")
    )
    .join(Book)
    .group_by(Author.last_name)
    .order_by(desc("book_total"))
    .all()
)
The query above gets the author’s first and last name, along with a count of the number of books that the author has written. The aggregating count used by the group_by clause is based on the author’s last name. Finally, the results are sorted in descending order based on the aggregated and aliased book_total .
Example Program
The example program examples/example_2/main.py has the same functionality as examples/example_1/main.py but uses SQLAlchemy exclusively to interface with the author_book_publisher.db SQLite database. The program is broken up into the main() function and the functions it calls:
 1def main():
 2    """Main entry point of program"""
 3    # Connect to the database using SQLAlchemy
 4    with resources.path(
 5        "project.data", "author_book_publisher.db"
 6    ) as sqlite_filepath:
 7        engine = create_engine(f"sqlite:///{sqlite_filepath}")
 8    Session = sessionmaker()
 9    Session.configure(bind=engine)
10    session = Session()
11
12    # Get the number of books printed by each publisher
13    books_by_publisher = get_books_by_publishers(session, ascending=False)
14    for row in books_by_publisher:
15        print(f"Publisher: {row.name}, total books: {row.total_books}")
16    print()
17
18    # Get the number of authors each publisher publishes
19    authors_by_publisher = get_authors_by_publishers(session)
20    for row in authors_by_publisher:
21        print(f"Publisher: {row.name}, total authors: {row.total_authors}")
22    print()
23
24    # Output hierarchical author data
25    authors = get_authors(session)
26    output_author_hierarchy(authors)
27
28    # Add a new book
29    add_new_book(
30        session,
31        author_name="Stephen King",
32        book_title="The Stand",
33        publisher_name="Random House",
34    )
35    # Output the updated hierarchical author data
36    authors = get_authors(session)
37    output_author_hierarchy(authors)
This program is a modified version of examples/example_1/main.py . Let’s go over the differences:
-
Lines 4 to 7 first initialize the
sqlite_filepathvariable to the database file path. Then they create theenginevariable to communicate with SQLite and theauthor_book_publisher.dbdatabase file, which is SQLAlchemy’s access point to the database. -
Line 8 creates the
Sessionclass from the SQLAlchemy’ssessionmaker(). -
Line 9 binds the
Sessionto the engine created in line 8. -
Line 10 creates the
sessioninstance, which is used by the program to communicate with SQLAlchemy.
The rest of the function is similar, except for the replacement of data with session as the first parameter to all the functions called by main() .
get_books_by_publisher() has been refactored to use SQLAlchemy and the models you defined earlier to get the data requested:
 1def get_books_by_publishers(session, ascending=True):
 2    """Get a list of publishers and the number of books they've published"""
 3    if not isinstance(ascending, bool):
 4        raise ValueError(f"Sorting value invalid: {ascending}")
 5
 6    direction = asc if ascending else desc
 7
 8    return (
 9        session.query(
10            Publisher.name, func.count(Book.title).label("total_books")
11        )
12        .join(Publisher.books)
13        .group_by(Publisher.name)
14        .order_by(direction("total_books"))
15    )
Here’s what the new function, get_books_by_publishers() , is doing:
-
Line 6 creates the
directionvariable and sets it equal to the SQLAlchemydescorascfunction depending on the value of theascendingparameter. -
Lines 9 to 11 query the
Publishertable for data to return, which in this case arePublisher.nameand the aggregate total ofBookobjects associated with an author, aliased tototal_books. -
Line 12 joins to the
Publisher.bookssamling. -
Line 13 aggregates the book counts by the
Publisher.nameattribute. -
Line 14 sorts the output by the book counts according to the operator defined by
direction. -
Line 15 closes the object, executes the query, and returns the results to the caller.
All the above code expresses what is wanted rather than how it’s to be retrieved. Now instead of using SQL to describe what’s wanted, you’re using Python objects and methods. What’s returned is a list of Python objects instead of a list of tuples of data.
get_authors_by_publisher() has also been modified to work exclusively with SQLAlchemy. Its functionality is very similar to the previous function, so a function description is omitted:
def get_authors_by_publishers(session, ascending=True):
    """Get a list of publishers and the number of authors they've published"""
    if not isinstance(ascending, bool):
        raise ValueError(f"Sorting value invalid: {ascending}")

    direction = asc if ascending else desc

    return (
        session.query(
            Publisher.name,
            func.count(Author.first_name).label("total_authors"),
        )
        .join(Publisher.authors)
        .group_by(Publisher.name)
        .order_by(direction("total_authors"))
    )
get_authors() has been added to get a list of authors sorted by their last names. The result of this query is a list of Author objects containing a collection of books. The Author objects already contain hierarchical data, so the results don’t have to be reformatted:
def get_authors(session):
    """Get a list of author objects sorted by last name"""
    return session.query(Author).order_by(Author.last_name).all()
Like its previous version, add_new_book() is relatively complex but straightforward to understand. It determines if a book with the same title, author, and publisher exists in the database already.
If the search query finds an exact match, then the function returns. If no book matches the exact search criteria, then it searches to see if the author has written a book using the passed in title. This code exists to prevent duplicate books from being created in the database.
If no matching book exists, and the author hasn’t written one with the same title, then a new book is created. The function then retrieves or creates an author and publisher. Once instances of the Book , Author and Publisher exist, the relationships between them are created, and the resulting information is saved to the database:
 1def add_new_book(session, author_name, book_title, publisher_name):
 2    """Adds a new book to the system"""
 3    # Get the author's first and last names
 4    first_name, _, last_name = author_name.partition(" ")
 5
 6    # Check if book exists
 7    book = (
 8        session.query(Book)
 9        .join(Author)
10        .filter(Book.title == book_title)
11        .filter(
12            and_(
13                Author.first_name == first_name, Author.last_name == last_name
14            )
15        )
16        .filter(Book.publishers.any(Publisher.name == publisher_name))
17        .one_or_none()
18    )
19    # Does the book by the author and publisher already exist?
20    if book is not None:
21        return
22
23    # Get the book by the author
24    book = (
25        session.query(Book)
26        .join(Author)
27        .filter(Book.title == book_title)
28        .filter(
29            and_(
30                Author.first_name == first_name, Author.last_name == last_name
31            )
32        )
33        .one_or_none()
34    )
35    # Create the new book if needed
36    if book is None:
37        book = Book(title=book_title)
38
39    # Get the author
40    author = (
41        session.query(Author)
42        .filter(
43            and_(
44                Author.first_name == first_name, Author.last_name == last_name
45            )
46        )
47        .one_or_none()
48    )
49    # Do we need to create the author?
50    if author is None:
51        author = Author(first_name=first_name, last_name=last_name)
52        session.add(author)
53
54    # Get the publisher
55    publisher = (
56        session.query(Publisher)
57        .filter(Publisher.name == publisher_name)
58        .one_or_none()
59    )
60    # Do we need to create the publisher?
61    if publisher is None:
62        publisher = Publisher(name=publisher_name)
63        session.add(publisher)
64
65    # Initialize the book relationships
66    book.author = author
67    book.publishers.append(publisher)
68    session.add(book)
69
70    # Commit to the database
71    session.commit()
The code above is relatively long. Let’s break the functionality down to manageable sections:
-
Lines 7 to 18 set the
bookvariable to an instance of aBookif a book with the same title, author, and publisher is found. Otherwise, they setbooktoNone. -
Lines 20 and 21 determine if the book already exists and return if it does.
-
Lines 24 to 37 set the
bookvariable to an instance of aBookif a book with the same title and author is found. Otherwise, they create a newBookinstans. -
Lines 40 to 52 set the
authorvariable to an existing author, if found, or create a newAuthorinstance based on the passed-in author name. -
Lines 55 to 63 set the
publishervariable to an existing publisher, if found, or create a newPublisherinstance based on the passed-in publisher name. -
Line 66 sets the
book.authorinstance to theauthorexempel. This creates the relationship between the author and the book, which SQLAlchemy will create in the database when the session is committed. -
Line 67 adds the
publisherinstance to thebook.publisherscollection. This creates the many-to-many relationship between thebookandpublishertabeller. SQLAlchemy will create references in the tables as well as in thebook_publisherassociation table that connects the two. -
Line 68 adds the
Bookinstance to the session, making it part of the session’s unit of work. -
Line 71 commits all the creations and updates to the database.
There are a few things to take note of here. First, there’s is no mention of the author_publisher or book_publisher association tables in either the queries or the creations and updates. Because of the work you did in models.py setting up the relationships, SQLAlchemy can handle connecting objects together and keeping those tables in sync during creations and updates.
Second, all the creations and updates happen within the context of the session objekt. None of that activity is touching the database. Only when the session.commit() statement executes does the session then go through its unit of work and commit that work to the database.
For example, if a new Book instance is created (as in line 37 above), then the book has its attributes initialized except for the book_id primary key and author_id foreign key. Because no database activity has happened yet, the book_id is unknown, and nothing was done in the instantiation of book to give it an author_id .
When session.commit() is executed, one of the things it will do is insert book into the database, at which point the database will create the book_id primary key. The session will then initialize the book.book_id value with the primary key value created by the database engine.
session.commit() is also aware of the insertion of the Book instance in the author.books collection. The author object’s author_id primary key will be added to the Book instance appended to the author.books collection as the author_id foreign key.
Providing Access to Multiple Users
To this point, you’ve seen how to use pandas, SQLite, and SQLAlchemy to access the same data in different ways. For the relatively straightforward use case of the author, book, and publisher data, it could still be a toss-up whether you should use a database.
One deciding factor when choosing between using a flat file or a database is data and relationship complexity. If the data for each entity is complicated and contains many relationships between the entities, then creating and maintaining it in a flat file might become more difficult.
Another factor to consider is whether you want to share the data between multiple users. The solution to this problem might be as simple as using a sneakernet to physically move data between users. Moving data files around this way has the advantage of ease of use, but the data can quickly get out of sync when changes are made.
The problem of keeping the data consistent for all users becomes even more difficult if the users are remote and want to access the data across networks. Even when you’re limited to a single language like Python and using pandas to access the data, network file locking isn’t sufficient to ensure the data doesn’t get corrupted.
Providing the data through a server application and a user interface alleviates this problem. The server is the only application that needs file-level access to the database. By using a database, the server can take advantage of SQL to access the data using a consistent interface no matter what programming language the server uses.
The last example program demonstrates this by providing a web application and user interface to the Chinook sample SQLite database. Peter Stark generously maintains the Chinook database as part of the SQLite Tutorial site. If you’d like to learn more about SQLite and SQL in general, then the site is a great resource.
The Chinook database provides artist, music, and playlist information along the lines of a simplified Spotify. The database is part of the example code project in the project/data mapp.
Using Flask With Python, SQLite, and SQLAlchemy
The examples/example_3/chinook_server.py program creates a Flask application that you can interact with using a browser. The application makes use of the following technologies:
-
Flask Blueprint is part of Flask and provides a good way to follow the separation of concerns design principle and create distinct modules to contain functionality.
-
Flask SQLAlchemy is an extension for Flask that adds support for SQLAlchemy in your web applications.
-
Flask_Bootstrap4 packages the Bootstrap front-end tool kit, integrating it with your Flask web applications.
-
Flask_WTF extends Flask with WTForms, giving your web applications a useful way to generate and validate web forms.
-
python_dotenv is a Python module that an application uses to read environment variables from a file and keep sensitive information out of program code.
Though not necessary for this example, a .env file holds the environment variables for the application. The .env file exists to contain sensitive information like passwords, which you should keep out of your code files. However, the content of the project .env file is shown below since it doesn’t contain any sensitive data:
SECRET_KEY = "you-will-never-guess"
SQLALCHEMY_TRACK_MODIFICATIONS = False
SQLAlCHEMY_ECHO = False
DEBUG = True
The example application is fairly large, and only some of it is relevant to this tutorial. For this reason, examining and learning from the code is left as an exercise for the reader. That said, you can take a look at an animated screen capture of the application below, followed by the HTML that renders the home page and the Python Flask route that provides the dynamic data.
Here’s the application in action, navigating through various menus and features:
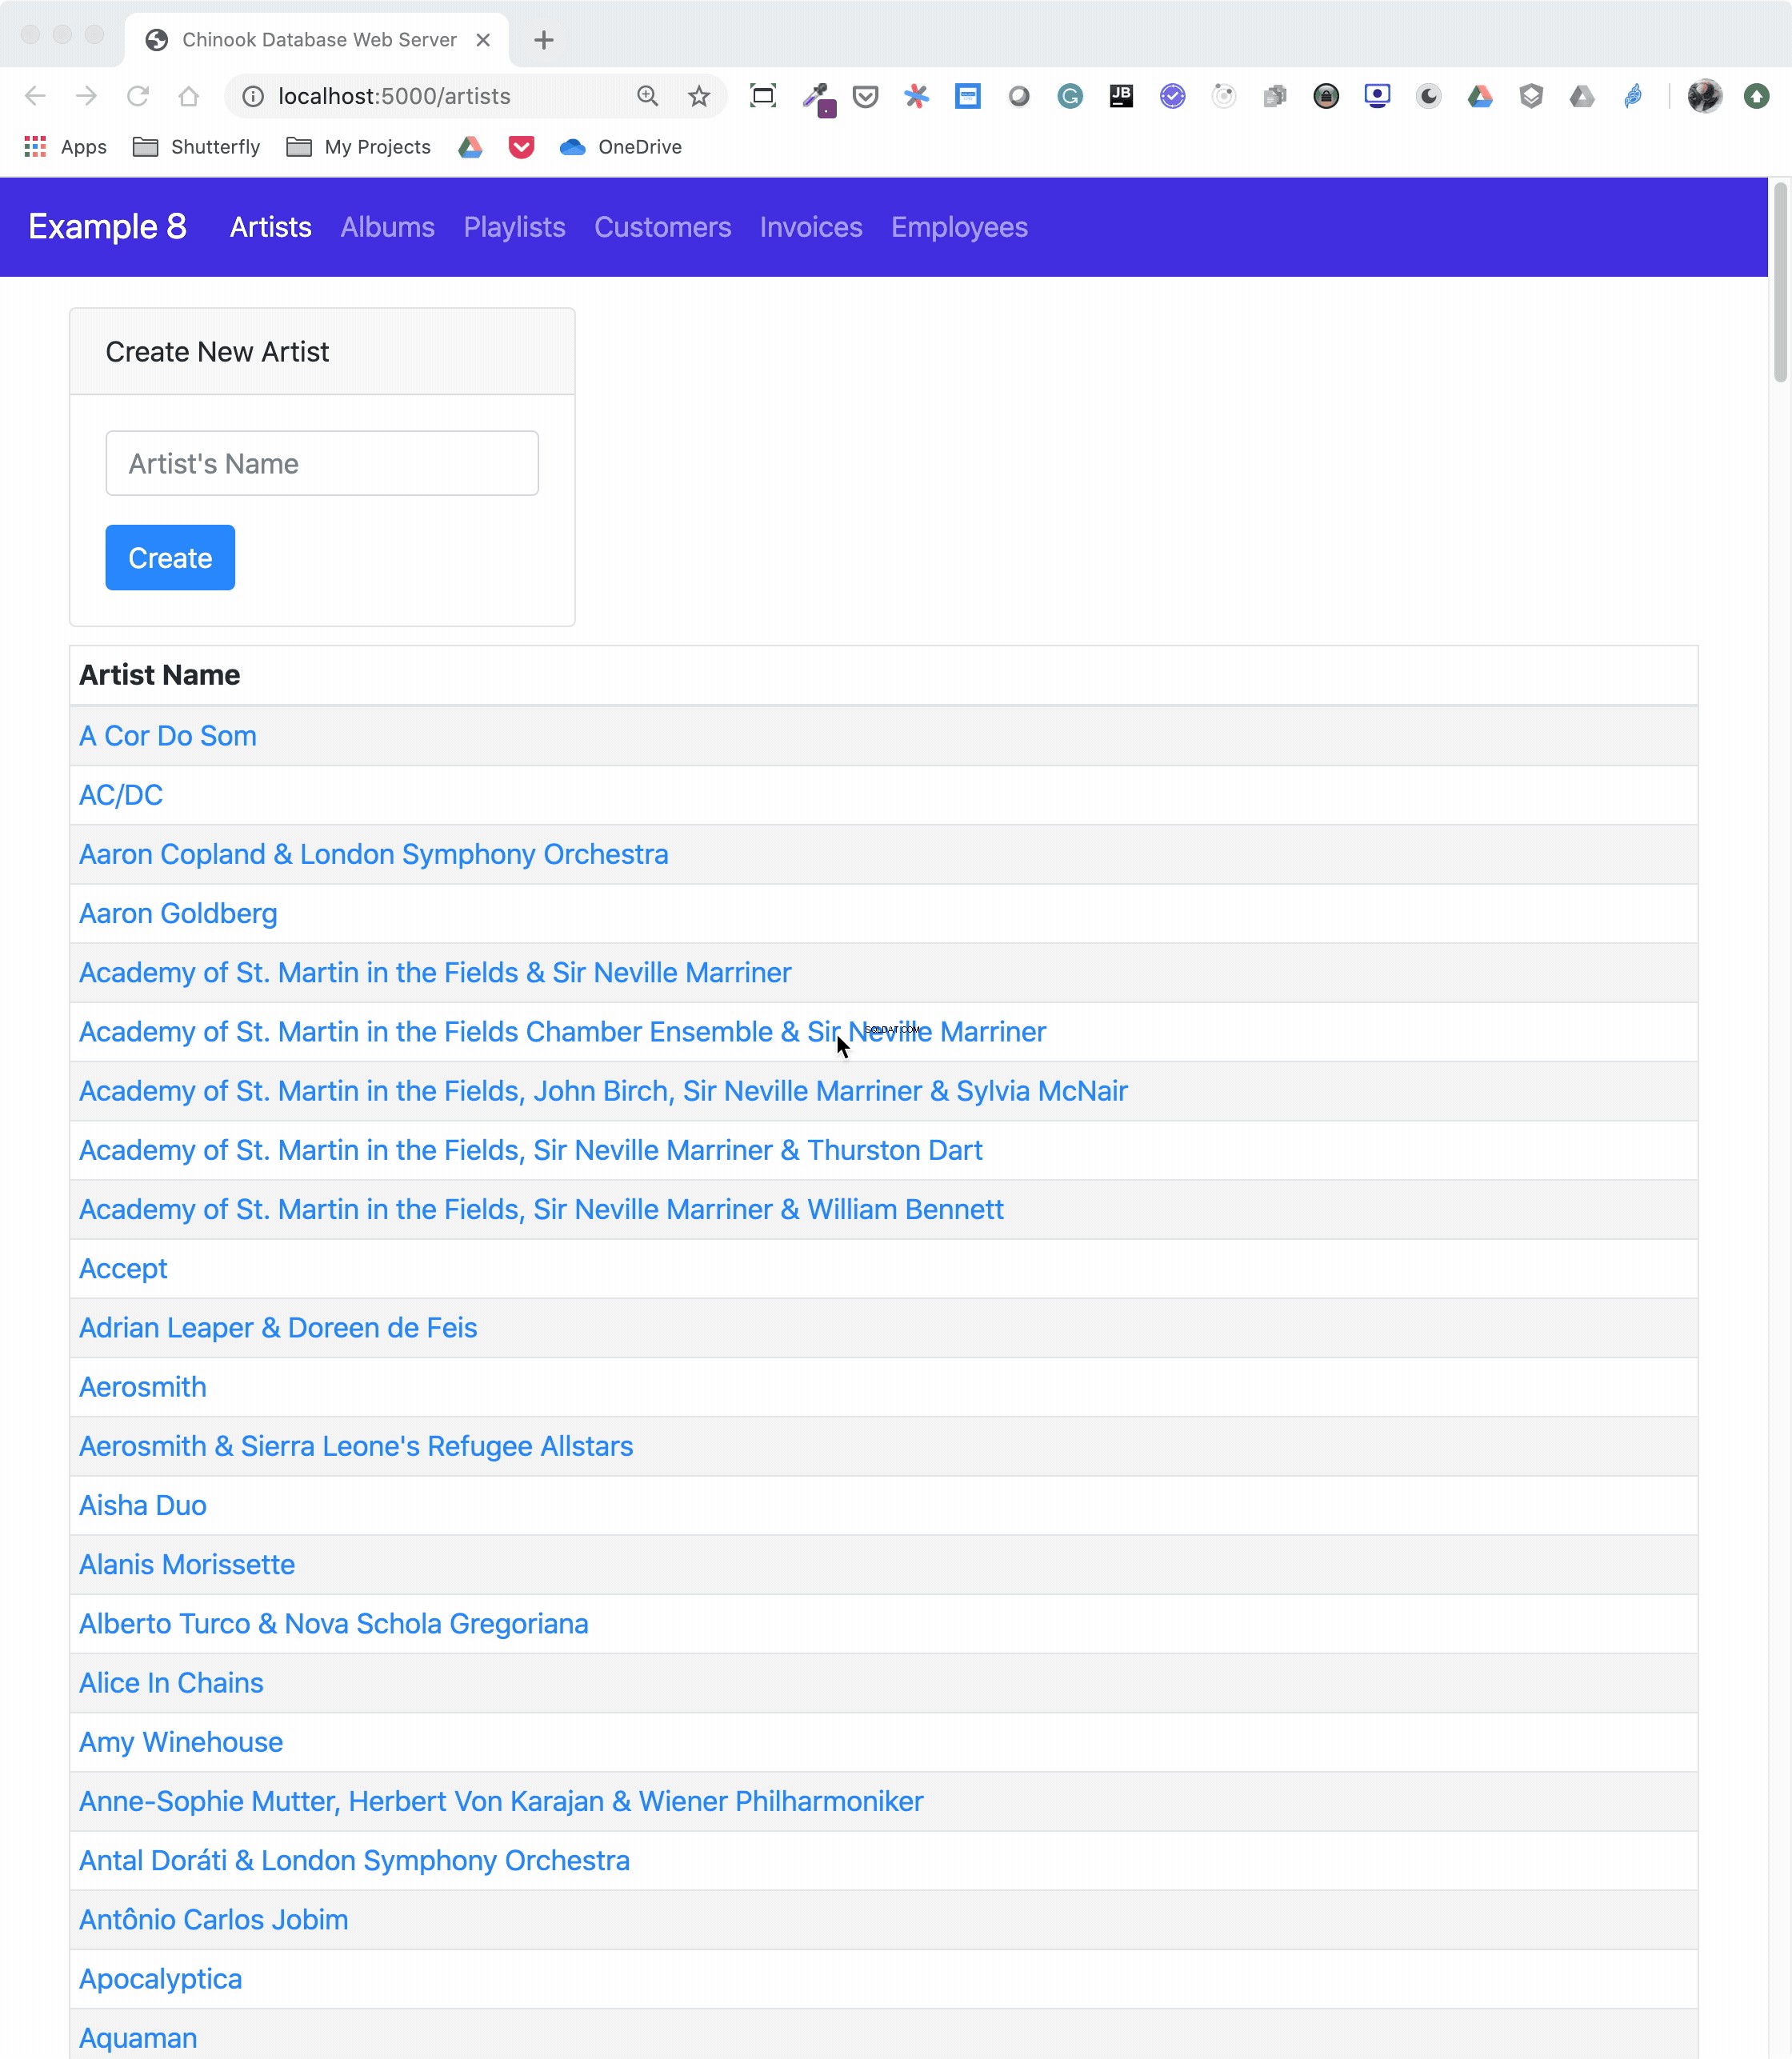
The animated screen capture starts on the application home page, styled using Bootstrap 4. The page displays the artists in the database, sorted in ascending order. The remainder of the screen capture presents the results of clicking on the displayed links or navigating around the application from the top-level menu.
Here’s the Jinja2 HTML template that generates the home page of the application:
 1{% extends "base.html" %}
 2
 3{% block content %}
 4<div class="container-fluid">
 5  <div class="m-4">
 6    <div class="card" style="width: 18rem;">
 7      <div class="card-header">Create New Artist</div>
 8      <div class="card-body">
 9        <form method="POST" action="{{url_for('artists_bp.artists')}}">
10          {{ form.csrf_token }}
11          {{ render_field(form.name, placeholder=form.name.label.text) }}
12          <button type="submit" class="btn btn-primary">Create</button>
13        </form>
14      </div>
15    </div>
16    <table class="table table-striped table-bordered table-hover table-sm">
17      <caption>List of Artists</caption>
18      <thead>
19        <tr>
20          <th>Artist Name</th>
21        </tr>
22      </thead>
23      <tbody>
24        {% for artist in artists %}
25        <tr>
26          <td>
27            <a href="{{url_for('albums_bp.albums', artist_id=artist.artist_id)}}">
28              {{ artist.name }}
29            </a>
30          </td>
31        </tr>
32        {% endfor %}
33      </tbody>
34    </table>
35  </div>
36</div>
37{% endblock %}
Here’s what’s going on in this Jinja2 template code:
-
Line 1 uses Jinja2 template inheritance to build this template from the
base.htmltemplate. Thebase.htmltemplate contains all the HTML5 boilerplate code as well as the Bootstrap navigation bar consistent across all pages of the site. -
Lines 3 to 37 contain the block content of the page, which is incorporated into the Jinja2 macro of the same name in the
base.htmlbase template. -
Lines 9 to 13 render the form to create a new artist. This uses the features of Flask-WTF to generate the form.
-
Lines 24 to 32 create a
forloop that renders the table of artist names. -
Lines 27 to 29 render the artist name as a link to the artist’s album page showing the songs associated with a particular artist.
Here’s the Python route that renders the page:
 1from flask import Blueprint, render_template, redirect, url_for
 2from flask_wtf import FlaskForm
 3from wtforms import StringField
 4from wtforms.validators import InputRequired, ValidationError
 5from app import db
 6from app.models import Artist
 7
 8# Set up the blueprint
 9artists_bp = Blueprint(
10    "artists_bp", __name__, template_folder="templates", static_folder="static"
11)
12
13def does_artist_exist(form, field):
14    artist = (
15        db.session.query(Artist)
16        .filter(Artist.name == field.data)
17        .one_or_none()
18    )
19    if artist is not None:
20        raise ValidationError("Artist already exists", field.data)
21
22class CreateArtistForm(FlaskForm):
23    name = StringField(
24        label="Artist's Name", validators=[InputRequired(), does_artist_exist]
25    )
26
27@artists_bp.route("/")
28@artists_bp.route("/artists", methods=["GET", "POST"])
29def artists():
30    form = CreateArtistForm()
31
32    # Is the form valid?
33    if form.validate_on_submit():
34        # Create new artist
35        artist = Artist(name=form.name.data)
36        db.session.add(artist)
37        db.session.commit()
38        return redirect(url_for("artists_bp.artists"))
39
40    artists = db.session.query(Artist).order_by(Artist.name).all()
41    return render_template("artists.html", artists=artists, form=form,)
Let’s go over what the above code is doing:
-
Lines 1 to 6 import all the modules necessary to render the page and initialize forms with data from the database.
-
Lines 9 to 11 create the blueprint for the artists page.
-
Lines 13 to 20 create a custom validator function for the Flask-WTF forms to make sure a request to create a new artist doesn’t conflict with an already existing artist.
-
Lines 22 to 25 create the form class to handle the artist form rendered in the browser and provide validation of the form field inputs.
-
Lines 27 to 28 connect two routes to the
artists()function they decorate. -
Line 30 creates an instance of the
CreateArtistForm()class. -
Line 33 determines if the page was requested through the HTTP methods GET or POST (submit). If it was a POST, then it also validates the fields of the form and informs the user if the fields are invalid.
-
Lines 35 to 37 create a new artist object, add it to the SQLAlchemy session, and commit the artist object to the database, persisting it.
-
Line 38 redirects back to the artists page, which will be rerendered with the newly created artist.
-
Line 40 runs an SQLAlchemy query to get all the artists in the database and sort them by
Artist.name. -
Line 41 renders the artists page if the HTTP request method was a GET.
You can see that a great deal of functionality is created by a reasonably small amount of code.
Creating a REST API Server
You can also create a web server providing a REST API. This kind of server offers URL endpoints responding with data, often in JSON format. A server providing REST API endpoints can be used by JavaScript single-page web applications through the use of AJAX HTTP requests.
Flask is an excellent tool for creating REST applications. For a multi-part series of tutorials about using Flask, Connexion, and SQLAlchemy to create REST applications, check out Python REST APIs With Flask, Connexion, and SQLAlchemy.
If you’re a fan of Django and are interested in creating REST APIs, then check out Django Rest Framework – An Introduction and Create a Super Basic REST API with Django Tastypie.
Obs! It’s reasonable to ask if SQLite is the right choice as the database backend to a web application. The SQLite website states that SQLite is a good choice for sites that serve around 100,000 hits per day. If your site gets more daily hits, the first thing to say is congratulations!
Beyond that, if you’ve implemented your website with SQLAlchemy, then it’s possible to move the data from SQLite to another database such as MySQL or PostgreSQL. For a comparison of SQLite, MySQL, and PostgreSQL that will help you make decisions about which one will serve your application best, check out Introduction to Python SQL Libraries.
It’s well worth considering SQLite for your Python application, no matter what it is. Using a database gives your application versatility, and it might create surprising opportunities to add additional features.
Conclusion
You’ve covered a lot of ground in this tutorial about databases, SQLite, SQL, and SQLAlchemy! You’ve used these tools to move data contained in flat files to an SQLite database, access the data with SQL and SQLAlchemy, and provide that data through a web server.
In this tutorial, you’ve learned:
- Why an SQLite database can be a compelling alternative to flat-file data storage
- How to normalize data to reduce data redundancy and increase data integrity
- How to use SQLAlchemy to work with databases in an object-oriented manner
- How to build a web application to serve a database to multiple users
Working with databases is a powerful abstraction for working with data that adds significant functionality to your Python programs and allows you to ask interesting questions of your data.
You can get all of the code and data you saw in this tutorial at the link below:
Download the sample code: Click here to get the code you’ll use to learn about data management with SQLite and SQLAlchemy in this tutorial.
Further Reading
This tutorial is an introduction to using databases, SQL, and SQLAlchemy, but there’s much more to learn about these subjects. These are powerful, sophisticated tools that no single tutorial can cover adequately. Here are some resources for additional information to expand your skills:
-
If your application will expose the database to users, then avoiding SQL injection attacks is an important skill. For more information, check out Preventing SQL Injection Attacks With Python.
-
Providing web access to a database is common in web-based single-page applications. To learn how, check out Python REST APIs With Flask, Connexion, and SQLAlchemy – Part 2.
-
Preparing for data engineering job interviews gives you a leg up in your career. To get started, check out Data Engineer Interview Questions With Python.
-
Migrating data and being able to roll back using Flask with Postgres and SQLAlchemy is an integral part of the Software Development Life Cycle (SDLC). You can learn more about it by checking out Flask by Example – Setting up Postgres, SQLAlchemy, and Alembic.