Byggprojekt är utan tvekan ett av de mer lättillgängliga och effektiva sätten att lära sig programmera. Verkliga projekt kräver att du tillämpar olika och varierande kodningsfärdigheter. De uppmuntrar dig också att undersöka ämnen som dyker upp när du löser problem i utvecklingsprocessen. I den här handledningen skapar du en kontaktbokapplikation med Python, PyQt och SQLite.
I den här självstudien får du lära dig hur du:
- Skapa ett grafiskt användargränssnitt (GUI) för din kontaktbokapplikation med Python och PyQt
- Anslut programmet till en SQLite-databas med PyQts SQL-stöd
- Hantera kontaktdata med PyQts Model-View-arkitektur
I slutet av det här projektet har du en funktionell kontaktbokapplikation som låter dig lagra och hantera din kontaktinformation.
För att få den fullständiga källkoden för applikationen samt koden för varje steg du ska gå igenom i den här handledningen, klicka på länken nedan:
Hämta källkoden: Klicka här för att få källkoden du använder för att bygga en kontaktbok med Python, PyQt och SQLite i den här handledningen.
Demo:En kontaktbok med Python
Kontaktböcker är en användbar och allmänt använd typ av applikation. De finns överallt. Du har förmodligen en kontaktbok på din telefon och på din dator. Med en kontaktbok kan du lagra och hantera kontaktinformation för dina familjemedlemmar, vänner, kollegor och så vidare.
I den här handledningen kommer du att koda en kontaktbok GUI-applikation med Python, SQLite och PyQt. Här är en demonstration av hur din kontaktbok kommer att se ut och fungera efter att du har följt stegen i den här handledningen:
Din kontaktbok kommer att tillhandahålla den minsta nödvändiga uppsättningen funktioner för denna typ av applikation. Du kommer att kunna visa, skapa, uppdatera och ta bort informationen i din kontaktlista.
Projektöversikt
För att bygga din kontaktboksapplikation måste du organisera koden i moduler och paket och ge ditt projekt en sammanhängande struktur. I den här handledningen kommer du att använda följande kataloger och filstruktur:
rpcontacts_project/
│
├── rpcontacts/
│   ├── __init__.py
│   ├── views.py
│   ├── database.py
│   ├── main.py
│   └── model.py
│
├── requirements.txt
├── README.md
└── rpcontacts.py
Här är en kort sammanfattning av innehållet i din projektkatalog:
rpcontacts_project/är projektets rotkatalog. Den kommer att innehålla följande filer:requirements.txttillhandahåller projektets kravlista.README.mdger allmän information om projektet.rpcontacts.pytillhandahåller startpunktsskriptet för att köra programmet.
rpcontacts/är en underkatalog som tillhandahåller programmets huvudpaket. Den tillhandahåller följande moduler:__init__.pyviews.pydatabase.pymain.pymodel.py
Du kommer att täcka var och en av dessa filer steg för steg i den här handledningen. Namnet på varje fil ger en uppfattning om dess roll i applikationen. Till exempel views.py kommer att innehålla koden för att generera GUI för fönster och dialogrutor, database.py kommer att innehålla kod för att fungera med databasen och main.py kommer att vara värd för själva applikationen. Slutligen, model.py kommer att implementera modellen för att hantera data i applikationens databas.
I allmänhet kommer programmet att ha ett huvudfönster för att visa, lägga till, ta bort och uppdatera kontakter. Det kommer också att ha en dialogruta för att lägga till nya kontakter till databasen.
Förutsättningar
För att få ut det mesta av det här projektet skulle vissa tidigare kunskaper om GUI-programmering med Python och PyQt hjälpa. I detta avseende måste du känna till grunderna för hur du:
- Skapa GUI-applikationer med PyQt och Python
- Bygg och lägg ut GUI med PyQt
- Hantera SQL-databaser med Python och PyQt
- Arbeta med SQLite-databaser
För att friska upp dessa ämnen kan du kolla in följande resurser:
- Python och PyQt:Bygga en GUI-skrivbordskalkylator
- Python och PyQt:Skapa menyer, verktygsfält och statusfält
- PyQt-layouter:Skapa professionellt utseende GUI-applikationer
- Hantera SQL-databaser med PyQt:Grunderna
- Introduktion till Python SQL-bibliotek
- Datahantering med Python, SQLite och SQLAlchemy
Oroa dig inte om du inte är expert på dessa områden innan du börjar med den här handledningen. Du lär dig genom processen att smutsa ner händerna på ett riktigt projekt. Om du fastnar, ta dig tid och granska resurserna som är länkade ovan. Gå sedan tillbaka till koden.
Kontaktboksapplikationen som du ska bygga i den här handledningen har ett enda externt beroende:PyQt.
Obs! I den här handledningen kommer du att använda PyQt version 5.15.2 för att bygga din kontaktboksapplikation. Version 5.15.2 krävs för att projektet ska fungera på macOS Big Sur.
PyQt version 6.0 släpptes den 4 januari 2021. Detta är den första versionen av biblioteket som binder till Qt version 6. Projektet i denna handledning har dock inte testats med PyQt 6.0.
Om du känner ett behov av att köra projektet med den här nya versionen av PyQt, försök då. Som ett tips bör du pip install PyQt6 och uppdatera sedan importerna för att använda PyQt6 istället för PyQt5 .
För att följa bästa praxis i din utvecklingsprocess kan du börja med att skapa en virtuell miljö och sedan installera PyQt med pip . När du har installerat PyQt är du redo att börja koda!
Steg 1:Skapa kontaktbokens skelettapp med PyQt
I det här första steget skapar du en minimal men funktionell PyQt GUI-applikation för att ge grunden på vilken du ska börja bygga kontaktboken. Du kommer också att skapa den minsta nödvändiga projektstrukturen, inklusive projektets huvudpaket och ett ingångsskript för att köra programmet.
All kod och alla filer du lägger till i kontaktboksprojektet i det här avsnittet samlas under source_code_step_1/ katalog. Du kan ladda ner dem genom att klicka på länken nedan:
Hämta källkoden: Klicka här för att få källkoden du använder för att bygga en kontaktbok med Python, PyQt och SQLite i den här handledningen.
I slutet av det här avsnittet kommer du att kunna köra skeleton GUI-applikationen för din kontaktbok för första gången.
Strukturera kontaktbokprojektet
För att börja koda programmet, fortsätt och skapa en ny katalog som heter rpcontacts_project/ . Detta kommer att vara projektets rotkatalog. Skapa nu en ny underkatalog som heter rpcontacts/ inuti rpcontacts_project/ . Denna underkatalog kommer att innehålla programmets huvudpaket. Slutligen, starta upp din kodredigerare eller IDE i rotkatalogen.
För att förvandla en katalog till ett paket behöver Python en __init__.py modul för att initiera paketet. Skapa den här filen i rpcontacts/ och lägg till följande kod till den:
# -*- coding: utf-8 -*-

"""This module provides the rpcontacts package."""

__version__ = "0.1.0"
Den här filen talar om för Python att rpcontacts är ett paket. Koden i filen körs när du importerar paketet eller några av dess moduler.
Du behöver inte lägga in någon kod i en __init__.py fil för att initiera paketet. En tom __init__.py filen kommer att göra jobbet. Men i det här fallet definierar du en konstant på modulnivå som heter __version__ för att hålla versionsnumret för din applikation.
Skapa programmets huvudfönster
Nu är det dags att skapa huvudfönstret för din kontaktbok. För att göra det, skapa en modul som heter views.py i dina rpcontacts paket. Lägg sedan till följande kod i modulen och spara den:
# -*- coding: utf-8 -*-

"""This module provides views to manage the contacts table."""

from PyQt5.QtWidgets import (
    QHBoxLayout,
    QMainWindow,
    QWidget,
)

class Window(QMainWindow):
    """Main Window."""
    def __init__(self, parent=None):
        """Initializer."""
        super().__init__(parent)
        self.setWindowTitle("RP Contacts")
        self.resize(550, 250)
        self.centralWidget = QWidget()
        self.setCentralWidget(self.centralWidget)
        self.layout = QHBoxLayout()
        self.centralWidget.setLayout(self.layout)
Först importerar du de obligatoriska klasserna från PyQt5.QtWidgets . Sedan skapar du Window . Den här klassen ärver från QMainWindow och tillhandahåller koden för att generera programmets huvudfönster. I initialiseringsmetoden ställer du in fönstrets titel till "RP Contacts" , ändra storlek på fönstret till 550 med 250 pixlar, definiera och ställ in den centrala widgeten med QWidget , och definiera slutligen en layout för den centrala widgeten med hjälp av en horisontell boxlayout.
Koda och köra programmet
Eftersom du redan har ett huvudfönster för kontaktboken är det dags att skriva koden för att skapa en funktionell PyQt-applikation med QApplication . För att göra det, skapa en ny modul som heter main.py i dina rpcontacts paket och lägg till följande kod:
# -*- coding: utf-8 -*-
# rpcontacts/main.py

"""This module provides RP Contacts application."""

import sys

from PyQt5.QtWidgets import QApplication

from .views import Window

def main():
    """RP Contacts main function."""
    # Create the application
    app = QApplication(sys.argv)
    # Create the main window
    win = Window()
    win.show()
    # Run the event loop
    sys.exit(app.exec())
I den här modulen importerar du sys för att få tillgång till exit() , som låter dig avsluta programmet när användaren stänger huvudfönstret. Sedan importerar du QApplication från PyQt5.QtWidgets och Window från views . Det sista steget är att definiera main() som din applikations huvudfunktion.
Inuti main() , instansierar du QApplication och Window . Sedan anropar du .show() på Window , och slutligen kör du programmets huvudslinga , eller event loop , med .exec() .
Flytta nu upp till projektets rotkatalog rpcontacts_project/ och skapa en fil som heter rpcontacts.py . Den här filen tillhandahåller startpunktsskriptet för att köra programmet. Lägg till följande kod i filen och spara den:
#!/usr/bin/env python3
# -*- coding: utf-8 -*-
# rpcontacts_project/rpcontacts.py

"""This module provides RP Contacts entry point script."""

from rpcontacts.main import main

if __name__ == "__main__":
    main()
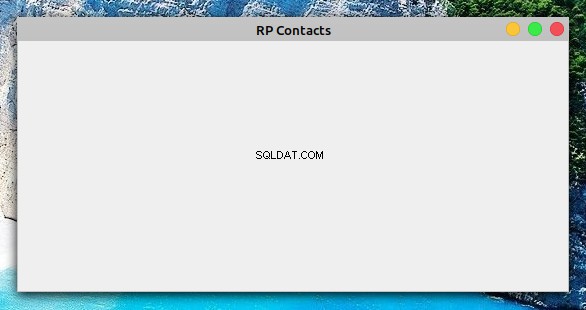
Den här filen importerar main() från din main.py modul. Sedan implementerar du den traditionella villkorssatsen som anropar main() om användaren kör den här modulen som ett Python-skript. Starta nu programmet genom att köra kommandot python rpcontacts.py i din Python-miljö. Du får följande fönster på skärmen:
Det är allt! Du har skapat en minimal men funktionell PyQt GUI-applikation som du kan använda som utgångspunkt för att bygga din kontaktbok. Vid det här laget bör ditt projekt ha följande struktur:
./rpcontacts_project/
│
├── rpcontacts/
│   ├── __init__.py
│   ├── views.py
│   └── main.py
│
└── rpcontacts.py
I det här avsnittet har du skapat den minsta nödvändiga strukturen för ditt kontaktboksprojekt med hjälp av Python-moduler och -paket. Du har byggt programmets huvudfönster och satt ihop koden för att skapa en PyQt GUI-applikation. Du har också kört applikationen för första gången. Därefter börjar du lägga till funktioner i ditt GUI.
Steg 2:Bygg kontaktbokens GUI med Python
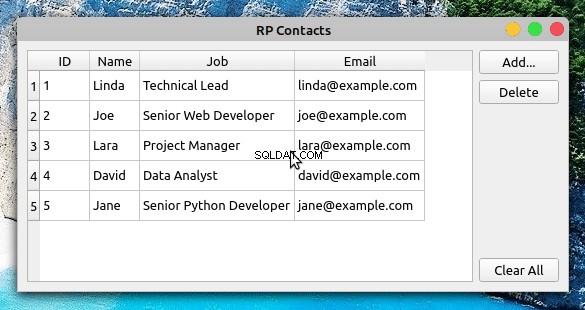
Nu när du har byggt skelettet för din kontaktbokapplikation kan du börja koda huvudfönstrets GUI. I slutet av det här avsnittet har du slutfört de nödvändiga stegen för att skapa gränssnittet för din kontaktbok med Python och PyQt. GUI:n kommer att se ut så här:
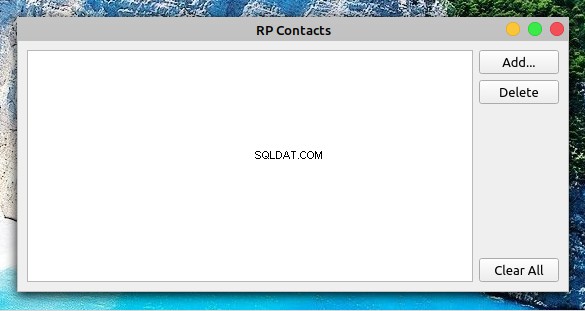
I mitten av fönstret har du en tabellvy för att visa din kontaktlista. Till höger i formuläret har du tre knappar:
- Lägg till för att lägga till en ny kontakt i listan
- Ta bort för att ta bort en vald kontakt från listan
- Rensa alla för att ta bort alla kontakter från listan
All kod och alla filer som du lägger till eller ändrar i det här avsnittet samlas under source_code_step_2/ katalog. Du kan ladda ner dem genom att klicka på länken nedan:
Hämta källkoden: Klicka här för att få källkoden du använder för att bygga en kontaktbok med Python, PyQt och SQLite i den här handledningen.
Gå tillbaka till views.py modul och uppdatera koden för Window för att generera ovanstående GUI:
 1# -*- coding: utf-8 -*-
 2# rpcontacts/views.py
 3
 4"""This module provides views to manage the contacts table."""
 5
 6from PyQt5.QtWidgets import (
 7    QAbstractItemView,
 8    QHBoxLayout,
 9    QMainWindow,
10    QPushButton,
11    QTableView,
12    QVBoxLayout,
13    QWidget,
14)
15
16class Window(QMainWindow):
17    """Main Window."""
18    def __init__(self, parent=None):
19        """Initializer."""
20        # Snip...
21
22        self.setupUI()
23
24    def setupUI(self):
25        """Setup the main window's GUI."""
26        # Create the table view widget
27        self.table = QTableView()
28        self.table.setSelectionBehavior(QAbstractItemView.SelectRows)
29        self.table.resizeColumnsToContents()
30        # Create buttons
31        self.addButton = QPushButton("Add...")
32        self.deleteButton = QPushButton("Delete")
33        self.clearAllButton = QPushButton("Clear All")
34        # Lay out the GUI
35        layout = QVBoxLayout()
36        layout.addWidget(self.addButton)
37        layout.addWidget(self.deleteButton)
38        layout.addStretch()
39        layout.addWidget(self.clearAllButton)
40        self.layout.addWidget(self.table)
41        self.layout.addLayout(layout)
Du importerar först några extra PyQt-klasser för att använda i GUI. Här är några av de mer relevanta:
QPushButtonför att skapa Lägg till , Ta bort och Rensa alla knapparQTableViewför att tillhandahålla den tabellliknande vy som visar kontaktlistanQAbstractItemViewför att ge åtkomst till policyn för val av tabellvy
I den här koden, det första tillägget till Window är ett anrop till .setupUI() i slutet av __init__() . Detta anrop genererar huvudfönstrets GUI när du kör programmet.
Här är vad koden inuti .setupUI() gör:
- Rad 27 skapar en
QTableViewinstans för att visa kontaktlistan. - Rad 28 ställer in
.selectionBehavioregenskapen tillQAbstractItemView.SelectRows. Detta säkerställer att när en användare klickar på någon cell i tabellvyn kommer hela raden att väljas. Raderna i tabellvyn innehåller all information som är relaterad till en enskild kontakt i listan med kontakter. - Rad 31 till 33 lägg till de tre knapparna i GUI:Lägg till , Ta bort och Rensa alla . Dessa knappar utför inga åtgärder än.
- Rad 35 till 41 skapa och ställ in en sammanhängande layout för alla widgets i GUI.
Med dessa tillägg till Window , kan du köra programmet igen. Fönstret på din skärm kommer att se ut som det fönster du såg i början av avsnittet.
Obs! Radnumren i ovanstående kod och i resten av kodexemplen i denna handledning är avsedda att underlätta förklaringen. De matchar inte ordningen på raderna i den sista modulen eller skriptet.
I det här avsnittet har du kört alla nödvändiga steg för att skapa GUI för din kontaktboks huvudfönster. Du är nu redo att börja arbeta med hur din applikation kommer att hantera och lagra dina kontaktuppgifter.
Steg 3:Konfigurera kontaktbokens databas
Vid det här laget har du skapat en PyQt-applikation och dess huvudfönsters GUI för att bygga ditt kontaktboksprojekt. I det här avsnittet skriver du kod för att definiera hur applikationen ansluter till kontaktdatabasen. För att slutföra det här steget använder du SQLite för att hantera databasen och PyQts SQL-stöd för att ansluta applikationen till databasen och för att arbeta med din kontaktdata.
Källkoden och filerna som du lägger till eller ändrar i det här avsnittet lagras under source_code_step_3/ katalog. Du kan ladda ner dem genom att klicka på länken nedan:
Hämta källkoden: Klicka här för att få källkoden du använder för att bygga en kontaktbok med Python, PyQt och SQLite i den här handledningen.
Gå först tillbaka till main.py i rpcontacts/ katalogen och uppdatera koden för att skapa anslutningen till databasen:
# -*- coding: utf-8 -*-
# rpcontacts/main.py

"""This module provides RP Contacts application."""

import sys

from PyQt5.QtWidgets import QApplication

from .database import createConnection
from .views import Window

def main():
    """RP Contacts main function."""
    # Create the application
    app = QApplication(sys.argv)
    # Connect to the database before creating any window
    if not createConnection("contacts.sqlite"):
        sys.exit(1)
    # Create the main window if the connection succeeded
    win = Window()
    win.show()
    # Run the event loop
    sys.exit(app.exec_())
I det här fallet importerar du först createConnection() från database.py . Denna funktion kommer att innehålla kod för att skapa och öppna en anslutning till kontaktdatabasen. Du skapar database.py och skriv createConnection() i nästa avsnitt.
Inuti main() , är den första markerade raden ett försök att skapa en anslutning till databasen med createConnection() . Om applikationen av någon anledning inte kan skapa en anslutning, anropet till sys.exit(1) kommer att stänga programmet utan att skapa ett grafiskt element och kommer att indikera att ett fel har inträffat.
Du måste hantera anslutningen på detta sätt eftersom applikationen är beroende av att databasen fungerar korrekt. Om du inte har en fungerande anslutning kommer din applikation inte att fungera alls.
Denna praxis låter dig hantera fel och stänga applikationen rent om ett problem uppstår. Du kommer också att kunna ge användaren relevant information om felet som applikationen stötte på när den försökte ansluta till databasen.
Med dessa tillägg på plats är det dags att dyka in i koden för createConnection() .
Ansluta till databasen med PyQt och SQLite
Att ansluta din kontaktboksapplikation till dess tillhörande databas är ett grundläggande steg i utvecklingen av applikationen. För att göra detta, kodar du en funktion som heter createConnection() , som skapar och öppnar en anslutning till databasen. Om anslutningen lyckas kommer funktionen att returnera True . Annars kommer den att ge information om orsaken till anslutningsfelet.
Gå tillbaka till rpcontacts/ katalog och skapa en ny modul som heter database.py inom det. Lägg sedan till följande kod till den modulen:
 1# -*- coding: utf-8 -*-
 2# rpcontacts/database.py
 3
 4"""This module provides a database connection."""
 5
 6from PyQt5.QtWidgets import QMessageBox
 7from PyQt5.QtSql import QSqlDatabase
 8
 9def createConnection(databaseName):
10    """Create and open a database connection."""
11    connection = QSqlDatabase.addDatabase("QSQLITE")
12    connection.setDatabaseName(databaseName)
13
14    if not connection.open():
15        QMessageBox.warning(
16            None,
17            "RP Contact",
18            f"Database Error: {connection.lastError().text()}",
19        )
20        return False
21
22    return True
Här importerar du först några obligatoriska PyQt-klasser. Sedan definierar du createConnection() . Den här funktionen tar ett argument:databaseName innehåller namnet eller sökvägen till den fysiska SQLite-databasfilen i ditt filsystem.
Här är vad koden inuti createConnection() gör:
- Rad 11 skapar databasanslutningen med
QSQLITEförare. - Rad 12 anger filnamnet eller sökvägen till databasen.
- Rad 14 försöker öppna anslutningen. Om ett problem uppstår under anropet till
.open(), sedanifkodblock visar ett felmeddelande och returnerar sedanFalseför att indikera att anslutningsförsöket misslyckades. - Rad 22 returnerar
Trueom anslutningsförsöket lyckas.
Du har redan kodat createConnection() . Nu kan du skriva koden för att skapa contacts tabeller i databasen.
Skapa contacts Tabell
Med funktionen som skapar och öppnar anslutningen till databasen på plats, kan du fortsätta med att koda en hjälpfunktion för att skapa contacts tabell. Du kommer att använda den här tabellen för att lagra information om dina kontakter.
Här är koden som implementerar _createContactsTable() :
# -*- coding: utf-8 -*-
# rpcontacts/database.py

# Snip...
from PyQt5.QtSql import QSqlDatabase, QSqlQuery

def _createContactsTable():
    """Create the contacts table in the database."""
    createTableQuery = QSqlQuery()
    return createTableQuery.exec(
        """
        CREATE TABLE IF NOT EXISTS contacts (
            id INTEGER PRIMARY KEY AUTOINCREMENT UNIQUE NOT NULL,
            name VARCHAR(40) NOT NULL,
            job VARCHAR(50),
            email VARCHAR(40) NOT NULL
        )
        """
    )

def createConnection(databaseName):
    # Snip...
    _createContactsTable()
    return True
Här lägger du först till en ny import. Du importerar QSqlQuery för att exekvera och manipulera SQL-satser.
Inuti _createContactsTable() skapar du en QSqlQuery exempel. Sedan anropar du .exec() på frågeobjektet med en strängbaserad SQL CREATE TABLE uttalande som argument. Detta uttalande skapar en ny tabell som heter contacts i din databas. Tabellen har följande kolumner:
| Kolumn | Innehåll |
|---|---|
id | Ett heltal med tabellens primärnyckel |
name | En sträng med namnet på en kontakt |
job | En sträng med jobbtiteln för en kontakt |
email | En sträng med e-postadressen för en kontakt |
contacts tabell i din databas kommer att lagra relevant information om dina kontakter.
Det sista steget för att slutföra kodningen av database.py är att lägga till ett anrop till _createContactsTable() inifrån createConnection() , precis före den sista return påstående. Detta säkerställer att applikationen skapar contacts tabell innan du gör några operationer på databasen.
När du har skapat contacts tabell kan du köra några tester på databasen och även lägga till några exempeldata för ytterligare testning.
Testa kontaktbokens databas
Hittills har du skrivit klart den nödvändiga koden för att hantera anslutningen till kontaktbokens databas. I det här avsnittet kommer du att utföra några tester för att se till att den här koden och själva databasen fungerar korrekt. Du kommer också att lägga till några exempeldata till databasen för att utföra ytterligare tester senare i denna handledning.
Öppna nu en terminal eller kommandorad och flytta till projektets rotkatalog, rpcontacts_project/ . Väl där, starta en Python interaktiv session och skriv in följande kod:
>>> from rpcontacts.database import createConnection

>>> # Create a connection
>>> createConnection("contacts.sqlite")
True

>>> # Confirm that contacts table exists
>>> from PyQt5.QtSql import QSqlDatabase
>>> db = QSqlDatabase.database()
>>> db.tables()
['contacts', 'sqlite_sequence']
Här importerar du först createConnection() från database.py modul. Sedan anropar du denna funktion för att skapa och öppna en anslutning till kontaktdatabasen. Databasfilnamnet är contacts.sqlite . Eftersom den här filen inte finns i projektets rotkatalog, skapar SQLite den åt dig. Du kan kontrollera detta genom att ta en titt på din nuvarande katalog.
Därefter bekräftar du att databasen innehåller en tabell som heter contacts . För att göra det, anropar du .database() på QSqlDatabase . Denna klassmetod returnerar en pekare till den aktuella databasanslutningen. Med denna referens till anslutningen kan du anropa .tables() för att få listan över tabeller i databasen. Observera att den första tabellen i listan är contacts , så nu är du säker på att allt fungerar bra.
Nu kan du förbereda en SQL-fråga för att infoga exempeldata i contacts tabell:
>>> # Prepare a query to insert sample data
>>> from PyQt5.QtSql import QSqlQuery

>>> insertDataQuery = QSqlQuery()
>>> insertDataQuery.prepare(
...     """
...     INSERT INTO contacts (
...         name,
...         job,
...         email
...     )
...     VALUES (?, ?, ?)
...     """
... )
True
Ovanstående fråga låter dig infoga specifika värden i name , job och email attribut och för att spara dessa värden i databasen. Nedan är ett exempel på hur du gör detta:
>>> # Sample data
>>> data = [
...     ("Linda", "Technical Lead", "linda@example.com"),
...     ("Joe", "Senior Web Developer", "joe@example.com"),
...     ("Lara", "Project Manager", "lara@example.com"),
...     ("David", "Data Analyst", "david@example.com"),
...     ("Jane", "Senior Python Developer", "jane@example.com"),
... ]

>>> # Insert sample data
>>> for name, job, email in data:
...     insertDataQuery.addBindValue(name)
...     insertDataQuery.addBindValue(job)
...     insertDataQuery.addBindValue(email)
...     insertDataQuery.exec()
...
True
True
True
True
True
I den här kodbiten definierar du först data för att hålla kontaktinformationen för en lista med personer. Därefter använder du en for loop för att infoga data genom att anropa .addBindValue() . Sedan anropar du .exec() på frågeobjektet för att effektivt köra SQL-frågan på databasen.
Eftersom alla anrop till .exec() returnera True , kan du dra slutsatsen att data har infogats i databasen. Om du vill bekräfta detta, kör sedan följande kod:
>>> query = QSqlQuery()
>>> query.exec("SELECT name, job, email FROM contacts")
True

>>> while query.next():
...     print(query.value(0), query.value(1), query.value(2))
...
Linda Technical Lead linda@example.com
Joe Senior Web Developer joe@example.com
Lara Project Manager lara@example.com
David Data Analyst david@example.com
Jane Senior Python Developer jane@example.com
Det är allt! Din databas fungerar bra! Nu har du några exempeldata att testa applikationen med, och du kan fokusera på hur du laddar och visar kontaktinformationen i din kontaktboks huvudfönster.
Steg 4:Visa och uppdatera befintliga kontakter
För att visa dina kontaktuppgifter i programmets huvudfönster kan du använda QTableView . Den här klassen är en del av PyQts Model-View-arkitektur och ger ett robust och effektivt sätt att visa objekt från ett PyQt-modellobjekt.
Filerna och koden som du lägger till eller ändrar i det här avsnittet lagras under source_code_step_4/ katalog. För att ladda ner dem, klicka på länken nedan:
Hämta källkoden: Klicka här för att få källkoden du använder för att bygga en kontaktbok med Python, PyQt och SQLite i den här handledningen.
När du har slutfört det här steget kommer din kontaktbok att se ut så här:
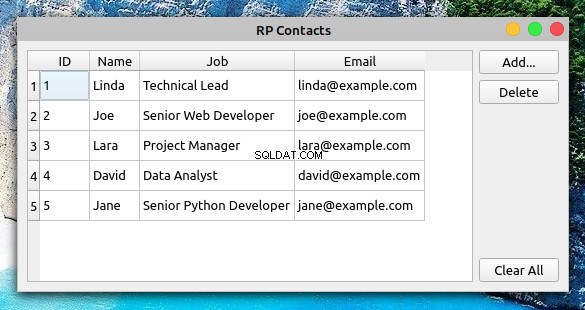
Tabellvyobjektet i huvudfönstret tillhandahåller den funktionalitet som krävs för att du snabbt ska kunna ändra och uppdatera kontaktinformationen.
För att till exempel uppdatera namnet på en kontakt kan du dubbelklicka på cellen som innehåller namnet, uppdatera namnet och sedan trycka på Retur för att automatiskt spara ändringarna i databasen. Men innan du kan göra detta måste du skapa en modell och koppla den till tabellvyn.
Skapa en modell för att hantera kontaktdata
PyQt tillhandahåller en rik uppsättning klasser för att arbeta med SQL-databaser. För din kontaktbokapplikation använder du QSqlTableModel , som tillhandahåller en redigerbar datamodell för en enda databastabell. Den är perfekt för jobbet eftersom din databas har en enda tabell, contacts .
Gå tillbaka till din kodredigerare och skapa en ny modul som heter model.py inuti rpcontacts/ katalog. Lägg till följande kod i filen och spara den:
 1# -*- coding: utf-8 -*-
 2# rpcontacts/model.py
 3
 4"""This module provides a model to manage the contacts table."""
 5
 6from PyQt5.QtCore import Qt
 7from PyQt5.QtSql import QSqlTableModel
 8
 9class ContactsModel:
10    def __init__(self):
11        self.model = self._createModel()
12
13    @staticmethod
14    def _createModel():
15        """Create and set up the model."""
16        tableModel = QSqlTableModel()
17        tableModel.setTable("contacts")
18        tableModel.setEditStrategy(QSqlTableModel.OnFieldChange)
19        tableModel.select()
20        headers = ("ID", "Name", "Job", "Email")
21        for columnIndex, header in enumerate(headers):
22            tableModel.setHeaderData(columnIndex, Qt.Horizontal, header)
23        return tableModel
I den här koden gör du först några nödvändiga importer, sedan skapar du ContactsModel . I klassinitieraren definierar du ett instansattribut som heter .model för att hålla datamodellen.
Därefter lägger du till en statisk metod för att skapa och ställa in modellobjektet. Here’s what the code in ._createModel() does:
- Line 16 creates an instance of
QSqlTableModel()calledtableModel. - Line 17 associates the model object with the
contactstable in your database. - Line 18 sets the
.editStrategyproperty of the model toQSqlTableModel.OnFieldChange. With this, you ensure that the changes on the model get saved into the database immediately. - Line 19 loads the table into the model by calling
.select(). - Lines 20 to 22 define and set user-friendly headers for the
contactstable’s columns. - Line 23 returns the newly created model.
At this point, you have your data model ready to use. Now you need to connect the table view widget to the model so you can present your users with the contact information.
Connecting the Model to the View
To display contact data in your contact book’s main window, you need to connect the table view with the data model. To perform this connection, you need to call .setModel() on the table view object and pass the model as an argument:
# -*- coding: utf-8 -*-
# rpcontacts/views.py

# Snip...
from .model import ContactsModel

class Window(QMainWindow):
    """Main Window."""
    def __init__(self, parent=None):
        # Snip...
        self.contactsModel = ContactsModel()
        self.setupUI()

    def setupUI(self):
        """Setup the main window's GUI."""
        # Create the table view widget
        self.table = QTableView()
        self.table.setModel(self.contactsModel.model)
        self.table.setSelectionBehavior(QAbstractItemView.SelectRows)
        # Snip...
In this code, you first import ContactsModel from model.py . This class provides the model that manages the data in your contact database.
In the initializer of Window , you create an instance of ContactsModel . Then inside .setupUI() , you call .setModel() on .table to connect the model with the table view. If you run the application after this update, then you’ll get the window you saw at the beginning of step 4.
Displaying and Updating Contacts
PyQt’s Model-View architecture provides a robust and user-friendly way to create GUI applications that manage databases. Models communicate with and access the data in the database. Any change in a model updates the database immediately. Views are responsible for displaying the data to the user and also for providing editable widgets to allow the user to modify the data directly in the view.
If the user modifies the data through the view, then the view internally communicates with and updates the model, which saves the changes to the physical database:
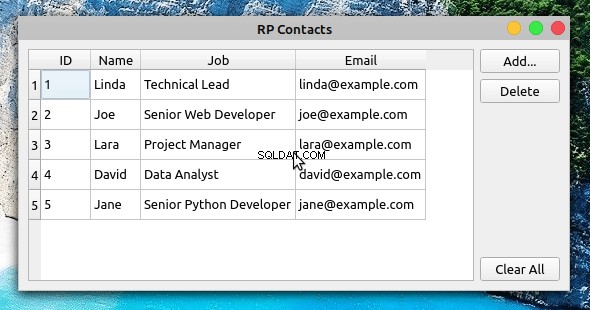
In this example, you double-click Joe’s Job fält. This gives you access to an editable widget that allows you to modify the value in the cell. Then you update the job description from Senior Web Developer to Web Developer . When you hit Enter , the table view communicates the change to the model, and the model saves the change to the database immediately.
To confirm that the changes were successfully saved into the database, you can close the application and run it again. The table view should reflect your updates.
Step 5:Creating New Contacts
At this step, your contact book application provides functionality to load, display, and update the information about your contacts. Even though you’re able to modify and update the contact information, you can neither add nor remove contacts from the list.
All the files and the code you’ll add or modify in this section are collected in the source_code_step_5/ katalog. To download them, click the link below:
Get the Source Code: Click here to get the source code you’ll use to build a contact book with Python, PyQt, and SQLite in this tutorial.
In this section, you’ll provide the required functionality to add new contacts to the database, using a pop-up dialog to enter the new information. The first step is to create the Add Contact dialog.
Creating the Add Contact Dialog
Dialogs are small windows that you can use to communicate with your users. In this section, you’ll code the contact book’s Add Contact dialog to allow your users add new contacts to their current list of contacts.
To code the Add Contact dialog, you’ll subclass QDialog . This class provides a blueprint to build dialogs for your GUI applications.
Now open the views.py module and update the import section like this:
# -*- coding: utf-8 -*-
# rpcontacts/views.py

# Snip...
from PyQt5.QtCore import Qt
from PyQt5.QtWidgets import (
    QAbstractItemView,
    QDialog,
    QDialogButtonBox,
    QFormLayout,
    QHBoxLayout,
    QLineEdit,
    QMainWindow,
    QMessageBox,
    QPushButton,
    QTableView,
    QVBoxLayout,
    QWidget,
)
The highlighted lines in the above code import the required classes to build the Add Contact dialog. With these classes in your namespace, add the following class at the end of views.py :
 1# -*- coding: utf-8 -*-
 2# rpcontacts/views.py
 3
 4# Snip...
 5class AddDialog(QDialog):
 6    """Add Contact dialog."""
 7    def __init__(self, parent=None):
 8        """Initializer."""
 9        super().__init__(parent=parent)
10        self.setWindowTitle("Add Contact")
11        self.layout = QVBoxLayout()
12        self.setLayout(self.layout)
13        self.data = None
14
15        self.setupUI()
16
17    def setupUI(self):
18        """Setup the Add Contact dialog's GUI."""
19        # Create line edits for data fields
20        self.nameField = QLineEdit()
21        self.nameField.setObjectName("Name")
22        self.jobField = QLineEdit()
23        self.jobField.setObjectName("Job")
24        self.emailField = QLineEdit()
25        self.emailField.setObjectName("Email")
26        # Lay out the data fields
27        layout = QFormLayout()
28        layout.addRow("Name:", self.nameField)
29        layout.addRow("Job:", self.jobField)
30        layout.addRow("Email:", self.emailField)
31        self.layout.addLayout(layout)
32        # Add standard buttons to the dialog and connect them
33        self.buttonsBox = QDialogButtonBox(self)
34        self.buttonsBox.setOrientation(Qt.Horizontal)
35        self.buttonsBox.setStandardButtons(
36            QDialogButtonBox.Ok | QDialogButtonBox.Cancel
37        )
38        self.buttonsBox.accepted.connect(self.accept)
39        self.buttonsBox.rejected.connect(self.reject)
40        self.layout.addWidget(self.buttonsBox)
There are a lot of things happening in this code. Here’s a summary:
- Line 5 defines a new class that inherits from
QDialog. - Lines 7 to 15 define the class initializer. In this case, the most relevant addition is
.data, which is an instance attribute that you’ll use to hold the data your users provide.
In .setupUI() , you define the dialog’s GUI:
- Lines 20 to 25 add three
QLineEditobjects:name,job, andemail. You’ll use these line edits to take the user’s input for the name, job description, and email of the contact to add. They represent the corresponding fields in the database. - Lines 27 to 30 create a
QFormLayoutinstance that arranges the line edits in a form. This layout manager also provides user-friendly labels for each line edit or field. - Lines 33 to 37 add a
QDialogButtonBoxobject that provides two standard buttons:OK and Cancel . The OK button accepts the user’s input and the Cancel button rejects it. - Lines 38 and 39 connect the dialog’s built-in
.accepted()and.rejected()signals with the.accept()andreject()slots, respectively. In this case, you’ll rely on the dialog’s built-in.reject()slot, which closes the dialog without processing the input. Other than that, you just need to code the.accept()slot.
To code the dialog’s .accept() slot, you need to consider that any user input needs validation to make sure that it’s correct and safe. This is especially true when you’re working with SQL databases because of the risk of an SQL injection attack.
In this example, you’ll add a minimal validation rule just to make sure that the user provides data for each input field in the dialog. However, adding your own, more robust validation rules would be a good exercise.
Without further ado, get back to AddDialog and add the following code for its .accept() slot:
 1# -*- coding: utf-8 -*-
 2# rpcontacts/views.py
 3
 4# Snip...
 5class AddDialog(QDialog):
 6    def __init__(self, parent=None):
 7        # Snip...
 8
 9    def setupUI(self):
10        # Snip...
11
12    def accept(self):
13        """Accept the data provided through the dialog."""
14        self.data = []
15        for field in (self.nameField, self.jobField, self.emailField):
16            if not field.text():
17                QMessageBox.critical(
18                    self,
19                    "Error!",
20                    f"You must provide a contact's {field.objectName()}",
21                )
22                self.data = None  # Reset .data
23                return
24
25            self.data.append(field.text())
26
27        if not self.data:
28            return
29
30        super().accept()
The code within .accept() does the following:
- Line 14 initializes
.datato an empty list ([]). This list will store the user’s input data. - Line 15 defines a
forloop that iterates over the three line edits, or fields, in the dialog. - Lines 16 to 23 define a conditional statement that checks if the user has provided data for each field in the dialog. If not, then the dialog shows an error message that warns the user about the missing data.
- Line 25 adds the user’s input for each field to
.data. - Line 30 calls the superclass’s
.accept()slot to provide the standard behavior that closes the dialog after the user clicks OK .
With this code, you’re ready to add a new slot to the contact book’s main window. This slot will launch the dialog, and if the user provides valid input, then the slot will use the model to save the newly added contact to the database.
Launching the Add Contact Dialog
Now that you’ve coded the Add Contact dialog, it’s time to add a new slot to Window so you can launch the dialog by clicking Add and process the user’s input once they click OK .
Go to the definition of Window and add the following code:
 1# -*- coding: utf-8 -*-
 2# rpcontacts/views.py
 3
 4# Snip...
 5class Window(QMainWindow):
 6    # Snip...
 7
 8    def setupUI(self):
 9        # Snip...
10        self.addButton = QPushButton("Add...")
11        self.addButton.clicked.connect(self.openAddDialog)
12        # Snip...
13
14    def openAddDialog(self):
15        """Open the Add Contact dialog."""
16        dialog = AddDialog(self)
17        if dialog.exec() == QDialog.Accepted:
18            self.contactsModel.addContact(dialog.data)
19            self.table.resizeColumnsToContents()
Here’s a summary of what’s happening in the above code:
- Line 11 connects the
.clicked()signal of the Add button to the newly created slot,.openAddDialog(). This way, a click on the button will automatically call the slot. - Line 14 defines the
.openAddDialog()slot. - Line 16 creates an instance of
AddDialog. - Lines 17 to 19 define a conditional statement to check if the dialog was accepted. If so, then line 14 calls
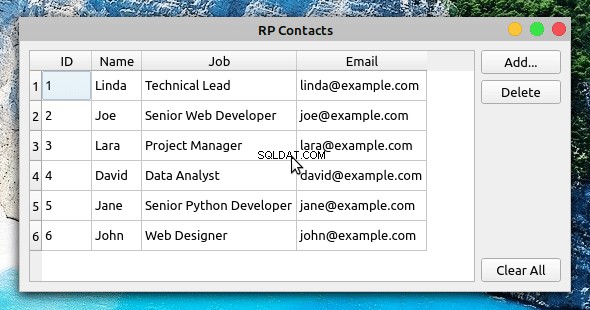
.addContact()on the data model with the dialog’s.dataattribute as an argument. The final statement in theifcode block resizes the table view to fit the size of its updated content.
Now that you have a way to launch the Add Contact dialog and to process its data, you need to provide the code for .addContact() in your data model. That’s a topic for the next section.
Processing the Add Dialog’s Data in the Model
In this section, you’ll add a method called .addContact() to your data model, ContactsModel . Open model.py in your code editor, go to the definition of ContactsModel , and add the following code:
 1# -*- coding: utf-8 -*-
 2# rpcontacts/model.py
 3
 4# Snip...
 5class ContactsModel:
 6    # Snip...
 7
 8    def addContact(self, data):
 9        """Add a contact to the database."""
10        rows = self.model.rowCount()
11        self.model.insertRows(rows, 1)
12        for column, field in enumerate(data):
13            self.model.setData(self.model.index(rows, column + 1), field)
14        self.model.submitAll()
15        self.model.select()
Inside .addContact() , the code does the following:
- Line 10 gets the current number of rows in the data model.
- Line 11 inserts a new row at the end of the data model.
- Lines 12 and 13 run a
forloop that inserts every item indatainto the corresponding cell in the data model. To do this, line 9 calls.setData()on the model, with the index of the cell and the current datafieldas arguments. - Line 14 submits the changes to the database by calling
.submitAll()on the model. - Line 15 reloads the data from the database into the model.
If you run the application with these new additions, then you’ll get the following behavior:
Now when you click Add , the Add Contact dialog appears on your screen. You can use the dialog to provide the required information for a new contact and to add the contact to the database by clicking OK .
Step 6:Deleting Existing Contacts
The final feature you’ll add to the contact book application is the ability to remove contacts from the database using the GUI.
Again, you’ll find all the files and the code added or modified in this section under the source_code_step_6/ katalog. You can download them by clicking the link below:
Get the Source Code: Click here to get the source code you’ll use to build a contact book with Python, PyQt, and SQLite in this tutorial.
In this section, you’ll first add the capability to delete a single contact at a time. Then you’ll add code to remove all the contacts from the database.
Deleting Selected Contacts
To remove a single contact from the contact database, you need to select the desired contact in the table view on the contact book’s main window. Once you’ve selected the contact, you can click Delete to perform the operation on the database.
Go to the model.py module and add the following code to implement .deleteContact() inside ContactsModel :
# -*- coding: utf-8 -*-
# rpcontacts/model.py

# Snip...
class ContactsModel:
    # Snip...

    def deleteContact(self, row):
        """Remove a contact from the database."""
        self.model.removeRow(row)
        self.model.submitAll()
        self.model.select()
This method has three lines of code. The first line removes the selected row . The second line submits the change to the database. Finally, the third line reloads the data into the model.
Next, get back to the views.py module and add the code behind the Delete button in Window :
# -*- coding: utf-8 -*-
# rpcontacts/views.py

# Snip...
class Window(QMainWindow):
    # Snip...

    def setupUI(self):
        """Setup the main window's GUI."""
        # Snip...
        self.deleteButton = QPushButton("Delete")
        self.deleteButton.clicked.connect(self.deleteContact)
        # Snip...

    def deleteContact(self):
        """Delete the selected contact from the database."""
        row = self.table.currentIndex().row()
        if row < 0:
            return

        messageBox = QMessageBox.warning(
            self,
            "Warning!",
            "Do you want to remove the selected contact?",
            QMessageBox.Ok | QMessageBox.Cancel,
        )

        if messageBox == QMessageBox.Ok:
            self.contactsModel.deleteContact(row)
In the first highlighted line, you connect the .clicked() signal of the Delete button to the .deleteContact() slot. This connection triggers a call to .deleteContact() every time the user clicks the button.
In .deleteContact() , you first get the index of the currently selected row in the table view. The if statement checks if the index is lower than 0 , which would mean that there are no contacts in the table view. If so, then the method returns immediately without performing any further actions.
Then the method shows a warning message confirming that the user wants to delete the selected contact. If the user accepts the operation, then .deleteContact(row) gets called. In this case, row represents the index of the currently selected row in the table.
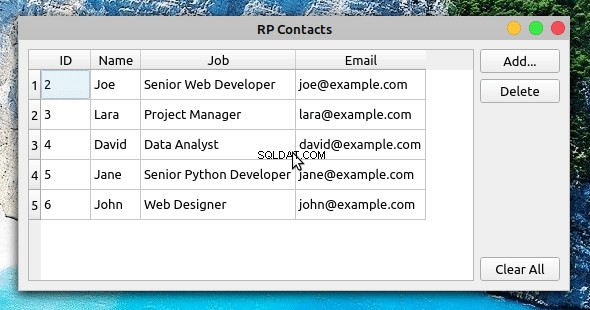
After these additions, you can run the application again to get the following behavior:
Now when you select a contact from the table view and click Delete , you’re presented with a warning message. If you click the message dialog’s OK button, then the application removes the selected contact from the database, updating the table view accordingly.
Clearing the Contact Database
To remove all the contacts from the database, you’ll start by adding a method called .clearContacts() to ContactsModel . Open your model.py module and add the following method at the end of the class:
 1# -*- coding: utf-8 -*-
 2# rpcontacts/model.py
 3
 4# Snip...
 5class ContactsModel:
 6    # Snip...
 7
 8    def clearContacts(self):
 9        """Remove all contacts in the database."""
10        self.model.setEditStrategy(QSqlTableModel.OnManualSubmit)
11        self.model.removeRows(0, self.model.rowCount())
12        self.model.submitAll()
13        self.model.setEditStrategy(QSqlTableModel.OnFieldChange)
14        self.model.select()
Here’s what each line of code does:
- Line 10 sets the data model’s
.editStrategyproperty toQSqlTableModel.OnManualSubmit. This allows you to cache all the changes until you call.submitAll()later on. You need to do this because you’re changing several rows at the same time. - Line 11 removes all the rows from the model.
- Line 12 saves changes to the database.
- Line 13 resets the model’s
.editStrategyproperty to its original value,QSqlTableModel.OnFieldChange. If you don’t reset this property to its original value, then you won’t be able to update the contacts directly in the table view. - Line 14 reloads the data into the model.
Once you’ve coded .clearContacts() , you can get back to the views.py file and update Window with the following code:
# -*- coding: utf-8 -*-
# rpcontacts/views.py

# Snip...
class Window(QMainWindow):
    # Snip...

    def setupUI(self):
        """Setup the main window's GUI."""
        # Snip...
        self.clearAllButton = QPushButton("Clear All")
        self.clearAllButton.clicked.connect(self.clearContacts)
        # Snip...

    def clearContacts(self):
        """Remove all contacts from the database."""
        messageBox = QMessageBox.warning(
            self,
            "Warning!",
            "Do you want to remove all your contacts?",
            QMessageBox.Ok | QMessageBox.Cancel,
        )

        if messageBox == QMessageBox.Ok:
            self.contactsModel.clearContacts()
The first highlighted line in this code connects the .clicked() signal of the Clear All button to the .clearContacts() slot below.
In .clearContacts() , you first create a message dialog, messageBox , to ask the user to confirm the removing operation. If the user confirms the operation by clicking OK , then .clearContacts() gets called on the model to remove all the contacts from the database:
Det är allt! With this last piece of code, your contact book application is complete. The application provides features that allow your users to display, add, update, and remove contacts from the database.
Conclusion
Building a contact book GUI application with Python, PyQt, and SQLite is an excellent exercise for you to expand your skills with these tools and as a developer in general. Coding projects like this allows you to apply the knowledge and skills you already have and also pushes you to research and learn about new topics every time you encounter a new programming problem.
In this tutorial, you learned how to:
- Build the GUI for a contact book application using PyQt
- Use PyQt’s SQL support to connect the application to an SQLite database
- Use PyQt’s Model-View architecture to work with the application’s database
You can download the complete source code for the contact book application and also the code to complete each step in this tutorial by clicking the link below:
Get the Source Code: Click here to get the source code you’ll use to build a contact book with Python, PyQt, and SQLite in this tutorial.
Next Steps
At this point, you’ve completed a fully functional contact book project. The application provides minimal functionality, but it’s a good starting point to continue adding features and take your Python and PyQt skills to the next level. Here are some next step ideas that you can implement:
-
Add new data fields: Adding new data fields to store more information about your contacts would be great. For example, you can add the contact’s photo, phone number, web page, Twitter handle, and so on. To do this, you might need to create new tables and set up relations between them. PyQt provides the
QSqlRelationalTableModel, which defines an editable data model for a single table and provides foreign key support. -
Provide search capability: Giving your users a way to search for a contact in the database is arguably a must-have feature in this kind of application. To implement it, you can use PyQt’s
QSqlQueryandQSqlQueryModel. -
Add back-up capability: Providing a way of backing up contact information is another interesting feature. Users might face problems with their computers and lose their data. You can provide options to upload the data to a cloud service or to back it up to an external disk.
These are just a few ideas for how you can continue adding features to your contact book. Take the challenge and build something amazing on top of this!