MySQL är ett av de mest populära databashanteringssystem (DBMS) på marknaden idag. Den rankades bara på andra plats efter Oracle DBMS i årets DB-Engines Ranking. Eftersom de flesta programvaror behöver interagera med data i någon form, tillhandahåller programmeringsspråk som Python verktyg för att lagra och komma åt dessa datakällor.
Med hjälp av teknikerna som diskuteras i den här handledningen kommer du att effektivt kunna integrera en MySQL-databas med en Python-applikation. Du kommer att utveckla en liten MySQL-databas för ett filmvärderingssystem och lära dig hur du frågar den direkt från din Python-kod.
I slutet av den här självstudien kommer du att kunna:
- Identifiera unika funktioner i MySQL
- Anslut din app till en MySQL-databas
- Fråga databasen för att hämta nödvändig data
- Hantera undantag som inträffar vid åtkomst till databasen
- Använd bästa metoder samtidigt som du bygger databasapplikationer
För att få ut det mesta av den här handledningen bör du ha praktisk kunskap om Python-koncept som for loopar, funktioner, undantagshantering och installation av Python-paket med pip . Du bör också ha en grundläggande förståelse för relationsdatabashanteringssystem och SQL-frågor som SELECT , DROP , CREATE och JOIN .
Gratis nedladdning: Få ett exempelkapitel från Python Tricks:The Book som visar dig Pythons bästa metoder med enkla exempel som du kan använda direkt för att skriva vackrare + Pythonisk kod.
Jämföra MySQL med andra SQL-databaser
SQL står för Structured Query Language och är ett flitigt använt programmeringsspråk för att hantera relationsdatabaser. Du kanske har hört talas om de olika varianterna av SQL-baserade DBMS. De mest populära inkluderar MySQL, PostgreSQL, SQLite och SQL Server. Alla dessa databaser är kompatibla med SQL-standarderna men med varierande grad av efterlevnad.
Att vara öppen källkod Sedan starten 1995 har MySQL snabbt blivit marknadsledare bland SQL-lösningar. MySQL är också en del av Oracles ekosystem. Medan dess kärnfunktionalitet är helt gratis, finns det också några betalda tillägg. För närvarande används MySQL av alla större teknikföretag, inklusive Google, LinkedIn, Uber, Netflix, Twitter och andra.
Förutom en stor öppen källkodsgemenskap för support, finns det många andra anledningar till MySQL:s framgång:
-
Enkel installation: MySQL designades för att vara användarvänlig. Det är ganska enkelt att sätta upp en MySQL-databas, och flera allmänt tillgängliga tredjepartsverktyg, som phpMyAdmin, effektiviserar installationsprocessen ytterligare. MySQL är tillgängligt för alla större operativsystem, inklusive Windows, macOS, Linux och Solaris.
-
Hastighet: MySQL har ett rykte om sig att vara en oerhört snabb databaslösning. Den har ett relativt mindre fotavtryck och är extremt skalbar på lång sikt.
-
Användarbehörigheter och säkerhet: MySQL kommer med ett skript som låter dig ställa in lösenordssäkerhetsnivån, tilldela administratörslösenord och lägga till och ta bort användarkontoprivilegier. Det här skriptet förenklar adminprocessen för ett webbhotell för användarhanteringsportal. Andra DBMS, som PostgreSQL, använder konfigurationsfiler som är mer komplicerade att använda.
Medan MySQL är känt för sin snabbhet och användarvänlighet kan du få mer avancerade funktioner med PostgreSQL. Dessutom är MySQL inte helt SQL-kompatibel och har vissa funktionella begränsningar, som inget stöd för FULL JOIN klausuler.
Du kan också stöta på vissa problem med samtidig läsning och skrivning i MySQL. Om din programvara har många användare som skriver data till den samtidigt, kan PostgreSQL vara ett lämpligare val.
Obs! För en mer djupgående jämförelse av MySQL och PostgreSQL i verkliga sammanhang, kolla in Varför Uber Engineering bytte från Postgres till MySQL.
SQL Server är också ett mycket populärt DBMS och är känt för sin tillförlitlighet, effektivitet och säkerhet. Det föredras av företag, särskilt inom bankdomänen, som regelbundet hanterar stora trafikbelastningar. Det är en kommersiell lösning och är ett av de system som är mest kompatibla med Windows-tjänster.
2010, när Oracle förvärvade Sun Microsystems och MySQL, var många oroliga för MySQL:s framtid. På den tiden var Oracle MySQL:s största konkurrent. Utvecklare fruktade att detta var ett fientligt övertagande från Oracle i syfte att förstöra MySQL.
Flera utvecklare ledda av Michael Widenius, den ursprungliga författaren till MySQL, skapade en gaffel av MySQL-kodbasen och lade grunden till MariaDB. Syftet var att säkra åtkomst till MySQL och hålla det gratis för alltid.
Hittills förblir MariaDB helt GPL-licensierad, och håller den helt i det offentliga området. Vissa funktioner i MySQL är å andra sidan endast tillgängliga med betalda licenser. MariaDB tillhandahåller också flera extremt användbara funktioner som inte stöds av MySQL-servern, som distribuerad SQL och kolumnlagring. Du kan hitta fler skillnader mellan MySQL och MariaDB listade på MariaDBs webbplats.
MySQL använder en syntax som liknar Standard SQL. Det finns dock några anmärkningsvärda skillnader som nämns i den officiella dokumentationen.
Installera MySQL Server och MySQL Connector/Python
Nu, för att börja arbeta igenom den här handledningen, måste du ställa in två saker:en MySQL-server och en MySQL-anslutning . MySQL-servern kommer att tillhandahålla alla tjänster som krävs för att hantera din databas. När servern är igång kan du ansluta din Python-applikation till den med MySQL Connector/Python.
Installera MySQL Server
Den officiella dokumentationen beskriver det rekommenderade sättet att ladda ner och installera MySQL-servern. Du hittar instruktioner för alla populära operativsystem, inklusive Windows, macOS, Solaris, Linux och många fler.
För Windows är det bästa sättet att ladda ner MySQL Installer och låta det ta hand om hela processen. Installationshanteraren hjälper dig också att konfigurera säkerhetsinställningarna för MySQL-servern. På sidan Konton och roller måste du ange ett lösenord för roten (admin) konto och även eventuellt lägga till andra användare med olika privilegier:
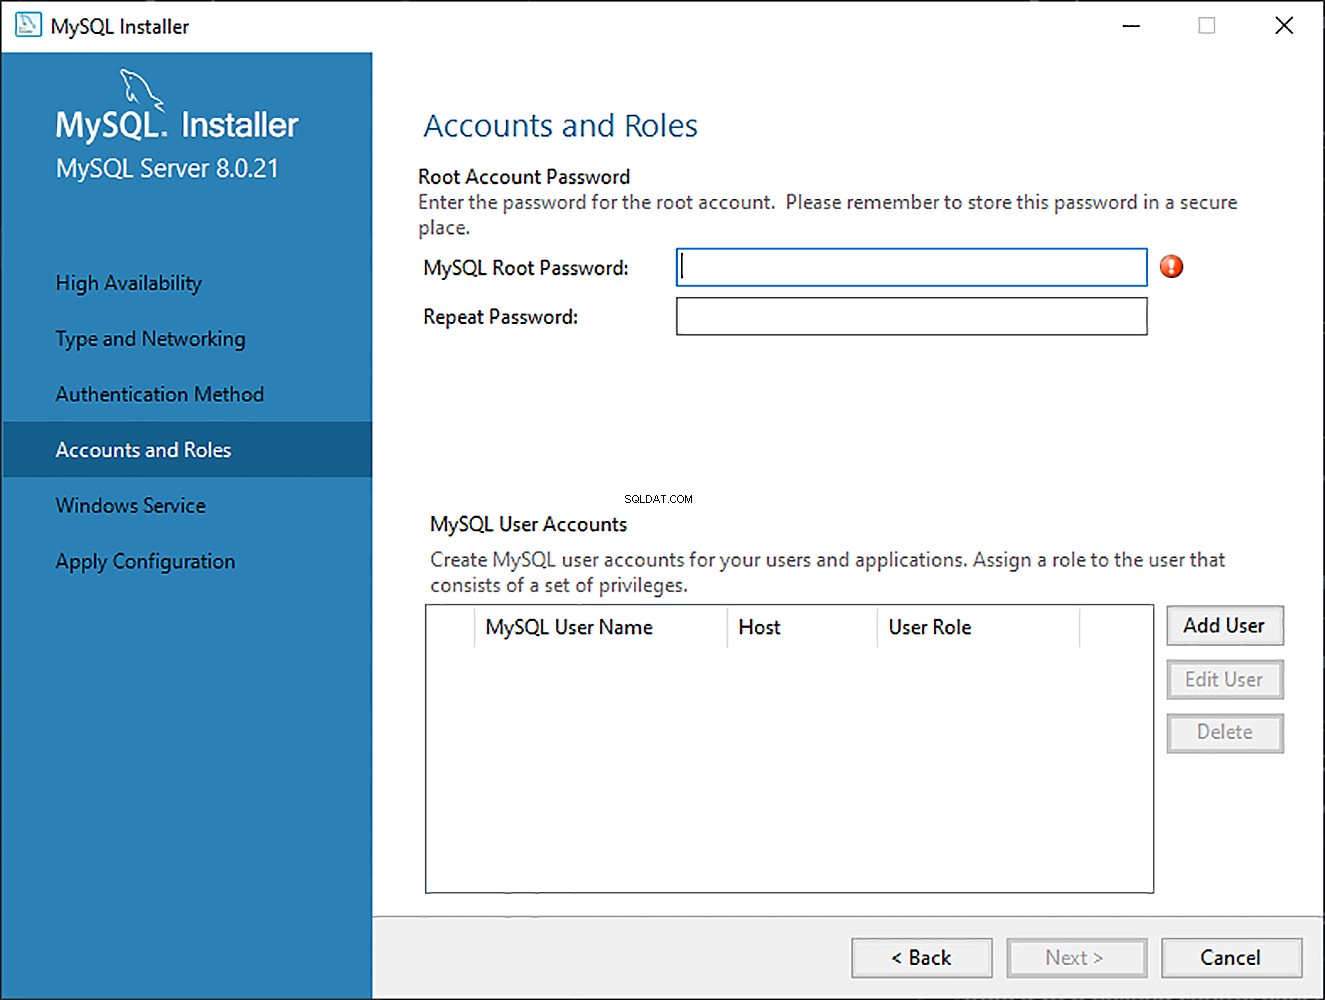
Även om du måste ange autentiseringsuppgifter för root-kontot under installationen, kan du ändra dessa inställningar senare.
Obs! Kom ihåg värdnamnet, användarnamnet och lösenordet eftersom dessa kommer att krävas för att upprätta en anslutning till MySQL-servern senare.
Även om du bara behöver MySQL-servern för den här handledningen, kan du också ställa in andra användbara verktyg som MySQL Workbench med dessa installationsprogram. Om du inte vill installera MySQL direkt i ditt operativsystem är det ett bekvämt alternativ att distribuera MySQL på Linux med Docker.
Installera MySQL Connector/Python
En databasdrivrutin är en mjukvara som gör att en applikation kan ansluta och interagera med ett databassystem. Programmeringsspråk som Python behöver en speciell drivrutin innan de kan prata med en databas från en specifik leverantör.
Dessa drivrutiner erhålls vanligtvis som tredjepartsmoduler. Python Database API (DB-API) definierar standardgränssnittet som alla Python-databasdrivrutiner måste följa. Dessa detaljer finns dokumenterade i PEP 249. Alla Python-databasdrivrutiner, såsom sqlite3 för SQLite, psycopg för PostgreSQL och MySQL Connector/Python för MySQL, följer dessa implementeringsregler.
Obs! MySQL:s officiella dokumentation använder termen anslutare istället för förare . Tekniskt sett är kopplingar endast associerade med att ansluta till en databas, inte att interagera med den. Emellertid används termen ofta för hela databasåtkomstmodulen som består av anslutningen och föraren.
För att bibehålla överensstämmelse med dokumentationen ser du termen anslutare när MySQL nämns.
Många populära programmeringsspråk har sin egen databas API. Java har till exempel Java Database Connectivity (JDBC) API. Om du behöver ansluta en Java-applikation till en MySQL-databas, måste du använda MySQL JDBC-anslutningen, som följer JDBC API.
På samma sätt måste du i Python installera en Python MySQL-kontakt för att interagera med en MySQL-databas. Många paket följer DB-API-standarderna, men det mest populära bland dem är MySQL Connector/Python. Du kan få det med pip :
$ pip install mysql-connector-python
pip installerar kontakten som en tredjepartsmodul i den för närvarande aktiva virtuella miljön. Det rekommenderas att du skapar en isolerad virtuell miljö för projektet tillsammans med alla beroenden.
För att testa om installationen lyckades, skriv följande kommando på din Python-terminal:
>>>>>> import mysql.connector
Om ovanstående kod körs utan fel, då mysql.connector är installerad och redo att användas. Om du stöter på några fel, se till att du är i rätt virtuell miljö och att du använder rätt Python-tolk.
Se till att du installerar rätt mysql-connector-python paket, som är en ren Python-implementering. Se upp för liknande namngivna men nu avskrivna kontakter som mysql-connector .
Etablera en anslutning med MySQL Server
MySQL är en serverbaserad databashanteringssystem. En server kan innehålla flera databaser. För att interagera med en databas måste du först upprätta en anslutning till servern. Det allmänna arbetsflödet för ett Python-program som interagerar med en MySQL-baserad databas är följande:
- Anslut till MySQL-servern.
- Skapa en ny databas.
- Anslut till den nyskapade eller en befintlig databas.
- Kör en SQL-fråga och hämta resultat.
- Informera databasen om några ändringar görs i en tabell.
- Stäng anslutningen till MySQL-servern.
Detta är ett allmänt arbetsflöde som kan variera beroende på den individuella applikationen. Men oavsett applikationen är det första steget att koppla din databas med din applikation.
Etablera en anslutning
Det första steget i att interagera med en MySQL-server är att upprätta en anslutning. För att göra detta behöver du connect() från mysql.connector modul. Denna funktion tar in parametrar som host , user och password och returnerar en MySQLConnection objekt. Du kan ta emot dessa referenser som input från användaren och skicka dem till connect() :
from getpass import getpass
from mysql.connector import connect, Error

try:
    with connect(
        host="localhost",
        user=input("Enter username: "),
        password=getpass("Enter password: "),
    ) as connection:
        print(connection)
except Error as e:
    print(e)
Koden ovan använder de angivna inloggningsuppgifterna för att upprätta en anslutning till din MySQL-server. I gengäld får du en MySQLConnection objekt, som lagras i connection variabel. Från och med nu kommer du att använda den här variabeln för att komma åt din MySQL-server.
Det finns flera viktiga saker att lägga märke till i koden ovan:
-
Du bör alltid ta itu med de undantag som kan uppstå när du upprättar en anslutning till MySQL-servern. Det är därför du använder en
try…exceptblockera för att fånga och skriva ut eventuella undantag som du kan stöta på. -
Du bör alltid stänga anslutningen efter att du är klar med att komma åt databasen. Att lämna oanvända öppna anslutningar kan leda till flera oväntade fel och prestandaproblem. Ovanstående kod drar fördel av en kontexthanterare som använder
with, som abstraherar bort anslutningsrensningsprocessen. -
Du bör aldrig hårdkoda dina inloggningsuppgifter , det vill säga ditt användarnamn och lösenord, direkt i ett Python-skript. Detta är en dålig praxis för distribution och utgör ett allvarligt säkerhetshot. Koden ovan uppmanar användaren att ange inloggningsuppgifter. Den använder den inbyggda
getpassmodul för att dölja lösenordet. Även om detta är bättre än hårdkodning, finns det andra, säkrare sätt att lagra känslig information, som att använda miljövariabler.
Du har nu upprättat en anslutning mellan ditt program och din MySQL-server, men du måste fortfarande antingen skapa en ny databas eller ansluta till en befintlig databas inuti servern.
Skapa en ny databas
I det sista avsnittet upprättade du en anslutning till din MySQL-server. För att skapa en ny databas måste du köra en SQL-sats:
CREATE DATABASE books_db;
Ovanstående sats kommer att skapa en ny databas med namnet books_db .
Obs! I MySQL är det obligatoriskt att sätta ett semikolon (; ) i slutet av en sats, som anger avslutningen av en fråga. MySQL Connector/Python lägger dock automatiskt till ett semikolon i slutet av dina frågor, så det finns inget behov av att använda det i din Python-kod.
För att köra en SQL-fråga i Python måste du använda en markör som abstraherar åtkomsten till databasposter. MySQL Connector/Python förser dig med MySQLCursor klass, som instansierar objekt som kan köra MySQL-frågor i Python. En instans av MySQLCursor klass kallas också en cursor .
cursor objekt använder en MySQLConnection objekt för att interagera med din MySQL-server. För att skapa en cursor , använd .cursor() metod för din connection variabel:
cursor = connection.cursor()
Ovanstående kod ger dig en instans av MySQLCursor klass.
En fråga som behöver köras skickas till cursor.execute() i strängformat. Vid det här speciella tillfället skickar du CREATE DATABASE fråga till cursor.execute() :
from getpass import getpass
from mysql.connector import connect, Error

try:
    with connect(
        host="localhost",
        user=input("Enter username: "),
        password=getpass("Enter password: "),
    ) as connection:
        create_db_query = "CREATE DATABASE online_movie_rating"
        with connection.cursor() as cursor:
            cursor.execute(create_db_query)
except Error as e:
    print(e)
Efter exekvering av koden ovan har du en ny databas som heter online_movie_rating i din MySQL-server.
CREATE DATABASE fråga lagras som en sträng i create_db_query variabel och skickas sedan till cursor.execute() för utförande. Koden använder en kontexthanterare med cursor objekt för att hantera saneringsprocessen.
Du kan få ett felmeddelande här om en databas med samma namn redan finns på din server. För att bekräfta detta kan du visa namnet på alla databaser på din server. Använder samma MySQLConnection objekt från tidigare, kör SHOW DATABASES uttalande:
>>> show_db_query = "SHOW DATABASES"
>>> with connection.cursor() as cursor:
...     cursor.execute(show_db_query)
...     for db in cursor:
...         print(db)
...
('information_schema',)
('mysql',)
('online_movie_rating',)
('performance_schema',)
('sys',)
Ovanstående kod skriver ut namnen på alla databaser som för närvarande finns på din MySQL-server. SHOW DATABASES kommandot matar också ut några databaser som du inte skapade på din server, som information_schema , performance_schema , och så vidare. Dessa databaser genereras automatiskt av MySQL-servern och ger åtkomst till en mängd olika databasmetadata och MySQL-serverinställningar.
Du skapade en ny databas i det här avsnittet genom att köra CREATE DATABASE påstående. I nästa avsnitt kommer du att se hur du ansluter till en databas som redan finns.
Ansluta till en befintlig databas
I det sista avsnittet skapade du en ny databas som heter online_movie_rating . Men du har fortfarande inte anslutit till den. I många situationer har du redan en MySQL-databas som du vill koppla till din Python-applikation.
Du kan göra detta med samma connect() funktion som du använde tidigare genom att skicka en extra parameter som heter database :
from getpass import getpass
from mysql.connector import connect, Error

try:
    with connect(
        host="localhost",
        user=input("Enter username: "),
        password=getpass("Enter password: "),
        database="online_movie_rating",
    ) as connection:
        print(connection)
except Error as e:
    print(e)
Ovanstående kod är mycket lik anslutningsskriptet som du använde tidigare. Den enda ändringen här är en extra database parameter, där namnet på din databas skickas till connect() . När du har kört det här skriptet ansluts du till online_movie_rating databas.
Skapa, ändra och släppa en tabell
I det här avsnittet lär du dig hur du utför några grundläggande DDL-frågor som CREATE , DROP och ALTER med Python. Du får en snabb titt på MySQL-databasen som du kommer att använda i resten av denna handledning. Du kommer också att skapa alla tabeller som krävs för databasen och lära dig hur du utför ändringar av dessa tabeller senare.
Definiera databasschemat
Du kan börja med att skapa ett databasschema för ett filmklassificeringssystem online. Databasen kommer att bestå av tre tabeller:
moviesinnehåller allmän information om filmer och har följande attribut:idtitlerelease_yeargenrecollection_in_mil
reviewersinnehåller information om personer som har skrivit recensioner eller betyg och har följande attribut:idfirst_namelast_name
ratingsinnehåller information om betyg som har publicerats och har följande attribut:movie_id(främmande nyckel)reviewer_id(främmande nyckel)ratings
Ett filmvärderingssystem i verkligheten, som IMDb, skulle behöva lagra en massa andra attribut, som e-postmeddelanden, filmrollslistor och så vidare. Om du vill kan du lägga till fler tabeller och attribut till denna databas. Men dessa tre tabeller kommer att räcka för syftet med denna handledning.
Bilden nedan visar databasschemat:
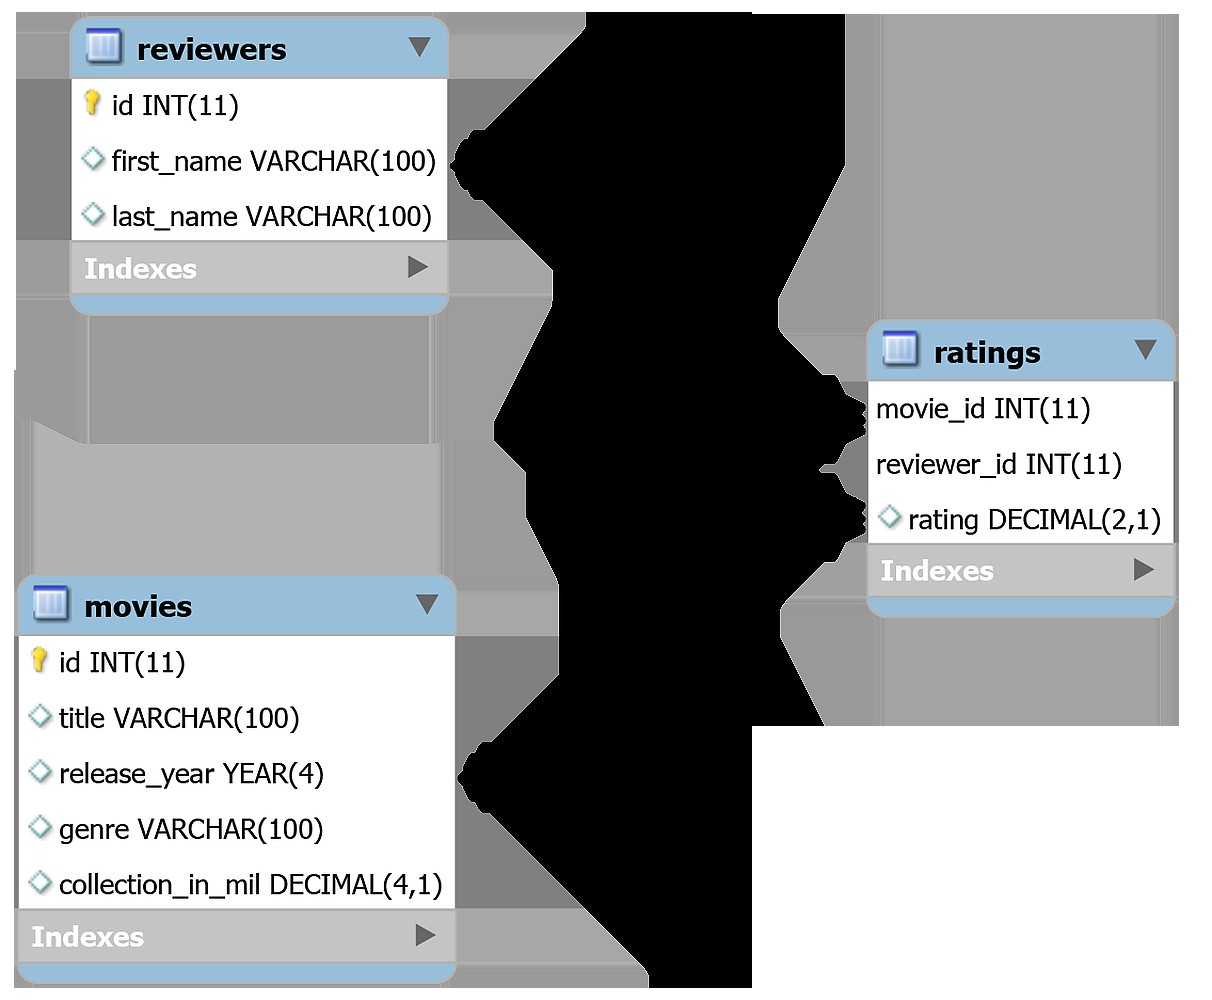
Tabellerna i denna databas är relaterade till varandra. movies och reviewers kommer att ha en många-till-många förhållande eftersom en film kan recenseras av flera recensenter och en recensent kan recensera flera filmer. ratings tabellen ansluter movies tabell med reviewers bord.
Skapa tabeller med CREATE TABLE Uttalande
Nu, för att skapa en ny tabell i MySQL, måste du använda CREATE TABLE påstående. Följande MySQL-fråga kommer att skapa movies tabell för din online_movie_rating databas:
CREATE TABLE movies(
    id INT AUTO_INCREMENT PRIMARY KEY,
    title VARCHAR(100),
    release_year YEAR(4),
    genre VARCHAR(100),
    collection_in_mil INT
);
Om du har tittat på SQL-satser tidigare, kan det mesta av ovanstående fråga vara vettigt. Men det finns vissa skillnader i MySQL-syntaxen som du bör vara medveten om.
Till exempel har MySQL ett brett utbud av datatyper för din granskning, inklusive YEAR , INT , BIGINT , och så vidare. MySQL använder också AUTO_INCREMENT nyckelord när ett kolumnvärde måste ökas automatiskt vid infogning av nya poster.
För att skapa en ny tabell måste du skicka denna fråga till cursor.execute() , som accepterar en MySQL-fråga och kör frågan på den anslutna MySQL-databasen:
create_movies_table_query = """
CREATE TABLE movies(
    id INT AUTO_INCREMENT PRIMARY KEY,
    title VARCHAR(100),
    release_year YEAR(4),
    genre VARCHAR(100),
    collection_in_mil INT
)
"""
with connection.cursor() as cursor:
    cursor.execute(create_movies_table_query)
    connection.commit()
Nu har du movies tabell i din databas. Du skickar create_movies_table_query till cursor.execute() , som utför den nödvändiga körningen.
Obs! connection variabeln refererar till MySQLConnection objekt som returnerades när du anslöt till din databas.
Lägg också märke till connection.commit() uttalande i slutet av koden. Som standard gör din MySQL-anslutare inte transaktioner automatiskt. I MySQL sker ändringar som nämns i en transaktion endast när du använder en COMMIT kommandot till slut. Anropa alltid denna metod efter varje transaktion för att utföra ändringar i den faktiska tabellen.
Som du gjorde med movies tabell, kör följande skript för att skapa reviewers tabell:
create_reviewers_table_query = """
CREATE TABLE reviewers (
    id INT AUTO_INCREMENT PRIMARY KEY,
    first_name VARCHAR(100),
    last_name VARCHAR(100)
)
"""
with connection.cursor() as cursor:
    cursor.execute(create_reviewers_table_query)
    connection.commit()
Om det behövs kan du lägga till mer information om en granskare, till exempel deras e-post-ID eller demografisk information. Men first_name och last_name kommer att tjäna ditt syfte för nu.
Slutligen kan du skapa ratings tabell med följande skript:
create_ratings_table_query = """
CREATE TABLE ratings (
    movie_id INT,
    reviewer_id INT,
    rating DECIMAL(2,1),
    FOREIGN KEY(movie_id) REFERENCES movies(id),
    FOREIGN KEY(reviewer_id) REFERENCES reviewers(id),
    PRIMARY KEY(movie_id, reviewer_id)
)
"""
with connection.cursor() as cursor:
    cursor.execute(create_ratings_table_query)
    connection.commit()
Implementeringen av främmande nyckelrelationer i MySQL är något annorlunda och begränsad jämfört med standard SQL. I MySQL måste både föräldern och barnet i den främmande nyckelbegränsningen använda samma lagringsmotor .
En lagringsmotor är den underliggande programvarukomponenten som ett databashanteringssystem använder för att utföra SQL-operationer. I MySQL finns lagringsmotorer i två olika smaker:
-
Transaktionslagringsmotorer är transaktionssäkra och låter dig återställa transaktioner med enkla kommandon som
rollback. Många populära MySQL-motorer, inklusive InnoDB och NDB, tillhör denna kategori. -
Icke-transaktionella lagringsmotorer beroende av utarbetad manuell kod för att ångra uttalanden som begåtts i en databas. MyISAM, MEMORY och många andra MySQL-motorer är icke-transaktionella.
InnoDB är standard och mest populära lagringsmotor. Det hjälper till att upprätthålla dataintegriteten genom att stödja begränsningar för främmande nyckel. Detta innebär att all CRUD-operation på en främmande nyckel kontrolleras för att säkerställa att den inte leder till inkonsekvenser mellan olika tabeller.
Observera också att ratings Tabellen använder kolumnerna movie_id och reviewer_id , båda främmande nycklar, tillsammans som den primära nyckeln . Det här steget säkerställer att en recensent inte kan betygsätta samma film två gånger.
Du kan välja att återanvända samma markör för flera körningar. I så fall skulle alla avrättningar bli en atomär transaktion snarare än flera separata transaktioner. Till exempel kan du köra alla CREATE TABLE uttalanden med en markör och utför sedan din transaktion endast en gång:
with connection.cursor() as cursor:
    cursor.execute(create_movies_table_query)
    cursor.execute(create_reviewers_table_query)
    cursor.execute(create_ratings_table_query)
    connection.commit()
Ovanstående kod kommer först att exekvera alla tre CREATE uttalanden. Sedan skickar den en COMMIT kommandot till MySQL-servern som utför din transaktion. Du kan också använda .rollback() för att skicka en ROLLBACK kommandot till MySQL-servern och ta bort alla dataändringar från transaktionen.
Visa ett tabellschema med DESCRIBE Uttalande
Nu när du har skapat alla tre tabellerna kan du titta på deras schema med följande SQL-sats:
DESCRIBE <table_name>;
För att få tillbaka några resultat från cursor objekt måste du använda cursor.fetchall() . Denna metod hämtar alla rader från den senast körda satsen. Förutsatt att du redan har MySQLConnection objekt i connection variabel kan du skriva ut alla resultat hämtade av cursor.fetchall() :
>>> show_table_query = "DESCRIBE movies"
>>> with connection.cursor() as cursor:
...     cursor.execute(show_table_query)
...     # Fetch rows from last executed query
...     result = cursor.fetchall()
...     for row in result:
...         print(row)
...
('id', 'int(11)', 'NO', 'PRI', None, 'auto_increment')
('title', 'varchar(100)', 'YES', '', None, '')
('release_year', 'year(4)', 'YES', '', None, '')
('genre', 'varchar(100)', 'YES', '', None, '')
('collection_in_mil', 'int(11)', 'YES', '', None, '')
När du kört ovanstående kod bör du få en tabell som innehåller information om alla kolumner i movies tabell. För varje kolumn får du information som kolumnens datatyp, om kolumnen är en primärnyckel och så vidare.
Ändra ett tabellschema med ALTER Uttalande
I movies tabell, har du en kolumn som heter collection_in_mil , som innehåller en films kassasamling i miljoner dollar. Du kan skriva följande MySQL-sats för att ändra datatypen för collection_in_mil attribut från INT till DECIMAL :
ALTER TABLE movies MODIFY COLUMN collection_in_mil DECIMAL(4,1);
DECIMAL(4,1) betyder ett decimaltal som maximalt kan ha 4 siffror, varav 1 är decimal, till exempel 120.1 , 3.4 , 38.0 , och så vidare. Efter att ha kört ALTER TABLE kan du visa det uppdaterade tabellschemat med DESCRIBE :
>>> alter_table_query = """
... ALTER TABLE movies
... MODIFY COLUMN collection_in_mil DECIMAL(4,1)
... """
>>> show_table_query = "DESCRIBE movies"
>>> with connection.cursor() as cursor:
...     cursor.execute(alter_table_query)
...     cursor.execute(show_table_query)
...     # Fetch rows from last executed query
...     result = cursor.fetchall()
...     print("Movie Table Schema after alteration:")
...     for row in result:
...         print(row)
...
Movie Table Schema after alteration
('id', 'int(11)', 'NO', 'PRI', None, 'auto_increment')
('title', 'varchar(100)', 'YES', '', None, '')
('release_year', 'year(4)', 'YES', '', None, '')
('genre', 'varchar(100)', 'YES', '', None, '')
('collection_in_mil', 'decimal(4,1)', 'YES', '', None, '')
Som visas i utgången, collection_in_mil attribut är nu av typen DECIMAL(4,1) . Observera också att du i koden ovan anropar cursor.execute() dubbelt. Men cursor.fetchall() hämtar rader från endast den senast körda frågan, som är show_table_query .
Ta bort tabeller med DROP Uttalande
För att ta bort en tabell måste du köra DROP TABLE uttalande i MySQL. Att ta bort en tabell är oåterkallelig bearbeta. Om du kör koden nedan måste du anropa CREATE TABLE fråga igen för att använda ratings tabell i de kommande avsnitten.
För att radera ratings tabell, skicka drop_table_query till cursor.execute() :
drop_table_query = "DROP TABLE ratings"
with connection.cursor() as cursor:
    cursor.execute(drop_table_query)
Om du kör ovanstående kod har du raderat ratings bord.
Infoga poster i tabeller
I det sista avsnittet skapade du tre tabeller i din databas:movies , reviewers och ratings . Nu måste du fylla i dessa tabeller med data. Det här avsnittet kommer att täcka två olika sätt att infoga poster i MySQL Connector för Python.
Den första metoden, .execute() , fungerar bra när antalet poster är litet och posterna kan hårdkodas. Den andra metoden, .executemany() , är mer populär och lämpar sig bättre för verkliga scenarier.
Med .execute()
Den första metoden använder samma cursor.execute() metod som du har använt fram till nu. Du skriver INSERT INTO fråga i en sträng och skicka den till cursor.execute() . Du kan använda den här metoden för att infoga data i movies bord.
Som referens, movies tabellen har fem attribut:
idtitlerelease_yeargenrecollection_in_mil
Du behöver inte lägga till data för id som AUTO_INCREMENT beräknar automatiskt id till dig. Följande skript infogar poster i movies tabell:
insert_movies_query = """
INSERT INTO movies (title, release_year, genre, collection_in_mil)
VALUES
    ("Forrest Gump", 1994, "Drama", 330.2),
    ("3 Idiots", 2009, "Drama", 2.4),
    ("Eternal Sunshine of the Spotless Mind", 2004, "Drama", 34.5),
    ("Good Will Hunting", 1997, "Drama", 138.1),
    ("Skyfall", 2012, "Action", 304.6),
    ("Gladiator", 2000, "Action", 188.7),
    ("Black", 2005, "Drama", 3.0),
    ("Titanic", 1997, "Romance", 659.2),
    ("The Shawshank Redemption", 1994, "Drama",28.4),
    ("Udaan", 2010, "Drama", 1.5),
    ("Home Alone", 1990, "Comedy", 286.9),
    ("Casablanca", 1942, "Romance", 1.0),
    ("Avengers: Endgame", 2019, "Action", 858.8),
    ("Night of the Living Dead", 1968, "Horror", 2.5),
    ("The Godfather", 1972, "Crime", 135.6),
    ("Haider", 2014, "Action", 4.2),
    ("Inception", 2010, "Adventure", 293.7),
    ("Evil", 2003, "Horror", 1.3),
    ("Toy Story 4", 2019, "Animation", 434.9),
    ("Air Force One", 1997, "Drama", 138.1),
    ("The Dark Knight", 2008, "Action",535.4),
    ("Bhaag Milkha Bhaag", 2013, "Sport", 4.1),
    ("The Lion King", 1994, "Animation", 423.6),
    ("Pulp Fiction", 1994, "Crime", 108.8),
    ("Kai Po Che", 2013, "Sport", 6.0),
    ("Beasts of No Nation", 2015, "War", 1.4),
    ("Andadhun", 2018, "Thriller", 2.9),
    ("The Silence of the Lambs", 1991, "Crime", 68.2),
    ("Deadpool", 2016, "Action", 363.6),
    ("Drishyam", 2015, "Mystery", 3.0)
"""
with connection.cursor() as cursor:
    cursor.execute(insert_movies_query)
    connection.commit()
The movies table is now loaded with thirty records. The code calls connection.commit() at the end. It’s crucial to call .commit() after preforming any modifications to a table.
Using .executemany()
The previous approach is more suitable when the number of records is fairly small and you can write these records directly into the code. But this is rarely true. You’ll often have this data stored in some other file, or the data will be generated by a different script and will need to be added to the MySQL database.
This is where .executemany() comes in handy. It accepts two parameters:
- A query that contains placeholders for the records that need to be inserted
- A list that contains all records that you wish to insert
The following example inserts records for the reviewers table:
insert_reviewers_query = """
INSERT INTO reviewers
(first_name, last_name)
VALUES ( %s, %s )
"""
reviewers_records = [
    ("Chaitanya", "Baweja"),
    ("Mary", "Cooper"),
    ("John", "Wayne"),
    ("Thomas", "Stoneman"),
    ("Penny", "Hofstadter"),
    ("Mitchell", "Marsh"),
    ("Wyatt", "Skaggs"),
    ("Andre", "Veiga"),
    ("Sheldon", "Cooper"),
    ("Kimbra", "Masters"),
    ("Kat", "Dennings"),
    ("Bruce", "Wayne"),
    ("Domingo", "Cortes"),
    ("Rajesh", "Koothrappali"),
    ("Ben", "Glocker"),
    ("Mahinder", "Dhoni"),
    ("Akbar", "Khan"),
    ("Howard", "Wolowitz"),
    ("Pinkie", "Petit"),
    ("Gurkaran", "Singh"),
    ("Amy", "Farah Fowler"),
    ("Marlon", "Crafford"),
]
with connection.cursor() as cursor:
    cursor.executemany(insert_reviewers_query, reviewers_records)
    connection.commit()
In the script above, you pass both the query and the list of records as arguments to .executemany() . These records could have been fetched from a file or from the user and stored in the reviewers_records list.
The code uses %s as a placeholder for the two strings that had to be inserted in the insert_reviewers_query . Placeholders act as format specifiers and help reserve a spot for a variable inside a string. The specified variable is then added to this spot during execution.
You can similarly use .executemany() to insert records in the ratings table:
insert_ratings_query = """
INSERT INTO ratings
(rating, movie_id, reviewer_id)
VALUES ( %s, %s, %s)
"""
ratings_records = [
    (6.4, 17, 5), (5.6, 19, 1), (6.3, 22, 14), (5.1, 21, 17),
    (5.0, 5, 5), (6.5, 21, 5), (8.5, 30, 13), (9.7, 6, 4),
    (8.5, 24, 12), (9.9, 14, 9), (8.7, 26, 14), (9.9, 6, 10),
    (5.1, 30, 6), (5.4, 18, 16), (6.2, 6, 20), (7.3, 21, 19),
    (8.1, 17, 18), (5.0, 7, 2), (9.8, 23, 3), (8.0, 22, 9),
    (8.5, 11, 13), (5.0, 5, 11), (5.7, 8, 2), (7.6, 25, 19),
    (5.2, 18, 15), (9.7, 13, 3), (5.8, 18, 8), (5.8, 30, 15),
    (8.4, 21, 18), (6.2, 23, 16), (7.0, 10, 18), (9.5, 30, 20),
    (8.9, 3, 19), (6.4, 12, 2), (7.8, 12, 22), (9.9, 15, 13),
    (7.5, 20, 17), (9.0, 25, 6), (8.5, 23, 2), (5.3, 30, 17),
    (6.4, 5, 10), (8.1, 5, 21), (5.7, 22, 1), (6.3, 28, 4),
    (9.8, 13, 1)
]
with connection.cursor() as cursor:
    cursor.executemany(insert_ratings_query, ratings_records)
    connection.commit()
All three tables are now populated with data. You now have a fully functional online movie rating database. The next step is to understand how to interact with this database.
Reading Records From the Database
Until now, you’ve been building your database. Now it’s time to perform some queries on it and find some interesting properties from this dataset. In this section, you’ll learn how to read records from database tables using the SELECT statement.
Reading Records Using the SELECT Statement
To retrieve records, you need to send a SELECT query to cursor.execute() . Then you use cursor.fetchall() to extract the retrieved table in the form of a list of rows or records.
Try writing a MySQL query to select all records from the movies table and send it to .execute() :
>>> select_movies_query = "SELECT * FROM movies LIMIT 5"
>>> with connection.cursor() as cursor:
...     cursor.execute(select_movies_query)
...     result = cursor.fetchall()
...     for row in result:
...         print(row)
...
(1, 'Forrest Gump', 1994, 'Drama', Decimal('330.2'))
(2, '3 Idiots', 2009, 'Drama', Decimal('2.4'))
(3, 'Eternal Sunshine of the Spotless Mind', 2004, 'Drama', Decimal('34.5'))
(4, 'Good Will Hunting', 1997, 'Drama', Decimal('138.1'))
(5, 'Skyfall', 2012, 'Action', Decimal('304.6'))
The result variable holds the records returned from using .fetchall() . It’s a list of tuples representing individual records from the table.
In the query above, you use the LIMIT clause to constrain the number of rows that are received from the SELECT statement. Developers often use LIMIT to perform pagination when handling large volumes of data.
In MySQL, the LIMIT clause takes one or two nonnegative numeric arguments. When using one argument, you specify the maximum number of rows to return. Since your query includes LIMIT 5 , only the first 5 records are fetched. When using both arguments, you can also specify the offset of the first row to return:
SELECT * FROM movies LIMIT 2,5;
The first argument specifies an offset of 2 , and the second argument constrains the number of returned rows to 5 . The above query will return rows 3 to 7.
You can also query for selected columns:
>>>>>> select_movies_query = "SELECT title, release_year FROM movies LIMIT 5"
>>> with connection.cursor() as cursor:
... cursor.execute(select_movies_query)
... for row in cursor.fetchall():
... print(row)
...
('Forrest Gump', 1994)
('3 Idiots', 2009)
('Eternal Sunshine of the Spotless Mind', 2004)
('Good Will Hunting', 1997)
('Skyfall', 2012)
Now, the code outputs values only from the two specified columns:title and release_year .
Filtering Results Using the WHERE Clause
You can filter table records by specific criteria using the WHERE clause. For example, to retrieve all movies with a box office collection greater than $300 million, you could run the following query:
SELECT title, collection_in_mil
FROM movies
WHERE collection_in_mil > 300;
You can also use ORDER BY clause in the last query to sort the results from the highest to the lowest earner:
>>> select_movies_query = """
... SELECT title, collection_in_mil
... FROM movies
... WHERE collection_in_mil > 300
... ORDER BY collection_in_mil DESC
... """
>>> with connection.cursor() as cursor:
...     cursor.execute(select_movies_query)
...     for movie in cursor.fetchall():
...         print(movie)
...
('Avengers: Endgame', Decimal('858.8'))
('Titanic', Decimal('659.2'))
('The Dark Knight', Decimal('535.4'))
('Toy Story 4', Decimal('434.9'))
('The Lion King', Decimal('423.6'))
('Deadpool', Decimal('363.6'))
('Forrest Gump', Decimal('330.2'))
('Skyfall', Decimal('304.6'))
MySQL offers a plethora of string formatting operations like CONCAT for concatenating strings. Often, websites will show the movie title along with its release year to avoid confusion. To retrieve the titles of the top five grossing movies, concatenated with their release years, you can write the following query:
>>> select_movies_query = """
... SELECT CONCAT(title, " (", release_year, ")"),
...       collection_in_mil
... FROM movies
... ORDER BY collection_in_mil DESC
... LIMIT 5
... """
>>> with connection.cursor() as cursor:
...     cursor.execute(select_movies_query)
...     for movie in cursor.fetchall():
...         print(movie)
...
('Avengers: Endgame (2019)', Decimal('858.8'))
('Titanic (1997)', Decimal('659.2'))
('The Dark Knight (2008)', Decimal('535.4'))
('Toy Story 4 (2019)', Decimal('434.9'))
('The Lion King (1994)', Decimal('423.6'))
If you don’t want to use the LIMIT clause and you don’t need to fetch all the records, then the cursor object has .fetchone() and .fetchmany() methods as well:
.fetchone()retrieves either the next row of the result, as a tuple, orNoneif no more rows are available..fetchmany()retrieves the next set of rows from the result as a list of tuples. It has asizeargument, which defaults to1, that you can use to specify the number of rows you need to fetch. If no more rows are available, then the method returns an empty list.
Try retrieving the titles of the five highest-grossing movies concatenated with their release years again, but this time use .fetchmany() :
>>> select_movies_query = """
... SELECT CONCAT(title, " (", release_year, ")"),
...       collection_in_mil
... FROM movies
... ORDER BY collection_in_mil DESC
... """
>>> with connection.cursor() as cursor:
...     cursor.execute(select_movies_query)
...     for movie in cursor.fetchmany(size=5):
...         print(movie)
...     cursor.fetchall()
...
('Avengers: Endgame (2019)', Decimal('858.8'))
('Titanic (1997)', Decimal('659.2'))
('The Dark Knight (2008)', Decimal('535.4'))
('Toy Story 4 (2019)', Decimal('434.9'))
('The Lion King (1994)', Decimal('423.6'))
The output with .fetchmany() is similar to what you received when you used the LIMIT clause. You might have noticed the additional cursor.fetchall() call at the end. You do this to clean all the remaining results that weren’t read by .fetchmany() .
It’s necessary to clean all unread results before executing any other statements on the same connection. Otherwise, an InternalError: Unread result found exception will be raised.
Handling Multiple Tables Using the JOIN Statement
If you found the queries in the last section to be quite straightforward, don’t worry. You can make your SELECT queries as complex as you want using the same methods from the last section.
Let’s look at some slightly more complex JOIN queries. If you want to find out the name of the top five highest-rated movies in your database, then you can run the following query:
>>> select_movies_query = """
... SELECT title, AVG(rating) as average_rating
... FROM ratings
... INNER JOIN movies
...     ON movies.id = ratings.movie_id
... GROUP BY movie_id
... ORDER BY average_rating DESC
... LIMIT 5
... """
>>> with connection.cursor() as cursor:
...     cursor.execute(select_movies_query)
...     for movie in cursor.fetchall():
...         print(movie)
...
('Night of the Living Dead', Decimal('9.90000'))
('The Godfather', Decimal('9.90000'))
('Avengers: Endgame', Decimal('9.75000'))
('Eternal Sunshine of the Spotless Mind', Decimal('8.90000'))
('Beasts of No Nation', Decimal('8.70000'))
As shown above, Night of the Living Dead and The Godfather are tied as the highest-rated movies in your online_movie_rating database.
To find the name of the reviewer who gave the most ratings, write the following query:
>>>>>> select_movies_query = """
... SELECT CONCAT(first_name, " ", last_name), COUNT(*) as num
... FROM reviewers
... INNER JOIN ratings
... ON reviewers.id = ratings.reviewer_id
... GROUP BY reviewer_id
... ORDER BY num DESC
... LIMIT 1
... """
>>> with connection.cursor() as cursor:
... cursor.execute(select_movies_query)
... for movie in cursor.fetchall():
... print(movie)
...
('Mary Cooper', 4)
Mary Cooper is the most frequent reviewer in this database. As seen above, it doesn’t matter how complicated the query is because it’s ultimately handled by the MySQL server. Your process for executing a query will always remain the same:pass the query to cursor.execute() and fetch the results using .fetchall() .
Updating and Deleting Records From the Database
In this section, you’ll be updating and deleting records from the database. Both of these operations can be performed on either a single record or multiple records in the table. You’ll select the rows that need to be modified using the WHERE clause.
UPDATE Command
One of the reviewers in your database, Amy Farah Fowler , is now married to Sheldon Cooper . Her last name has now changed to Cooper , so you need to update your database accordingly. For updating records, MySQL uses the UPDATE statement:
update_query = """
UPDATE
    reviewers
SET
    last_name = "Cooper"
WHERE
    first_name = "Amy"
"""
with connection.cursor() as cursor:
    cursor.execute(update_query)
    connection.commit()
The code passes the update query to cursor.execute() , and .commit() brings the required changes to the reviewers table.
Obs! In the UPDATE query, the WHERE clause helps specify the records that need to be updated. If you don’t use WHERE , then all records will be updated!
Suppose you need to provide an option that allows reviewers to modify ratings. A reviewer will provide three values, movie_id , reviewer_id , and the new rating . The code will display the record after performing the specified modification.
Assuming that movie_id = 18 , reviewer_id = 15 , and the new rating = 5.0 , you can use the following MySQL queries to perform the required modification:
UPDATE
    ratings
SET
    rating = 5.0
WHERE
    movie_id = 18 AND reviewer_id = 15;

SELECT *
FROM ratings
WHERE
    movie_id = 18 AND reviewer_id = 15;
The above queries first update the rating and then display it. You can create a complete Python script that establises a connection with the database and allows the reviewer to modify a rating:
from getpass import getpass
from mysql.connector import connect, Error

movie_id = input("Enter movie id: ")
reviewer_id = input("Enter reviewer id: ")
new_rating = input("Enter new rating: ")
update_query = """
UPDATE
    ratings
SET
    rating = "%s"
WHERE
    movie_id = "%s" AND reviewer_id = "%s";

SELECT *
FROM ratings
WHERE
    movie_id = "%s" AND reviewer_id = "%s"
""" % (
    new_rating,
    movie_id,
    reviewer_id,
    movie_id,
    reviewer_id,
)

try:
    with connect(
        host="localhost",
        user=input("Enter username: "),
        password=getpass("Enter password: "),
        database="online_movie_rating",
    ) as connection:
        with connection.cursor() as cursor:
            for result in cursor.execute(update_query, multi=True):
                if result.with_rows:
                    print(result.fetchall())
            connection.commit()
except Error as e:
    print(e)
Save this code to a file named modify_ratings.py . The above code uses %s placeholders to insert the received input in the update_query string. For the first time in this tutorial, you have multiple queries inside a single string. To pass multiple queries to a single cursor.execute() , you need to set the method’s multi argument to True .
If multi is True , then cursor.execute() returns an iterator. Each item in the iterator corresponds to a cursor object that executes a statement passed in the query. The above code runs a for loop on this iterator and then calls .fetchall() on each cursor object.
Obs! Running .fetchall() on all cursor objects is important. To execute a new statement on the same connection, you must ensure that there are no unread results from previous executions. If there are unread results, then you’ll receive an exception.
If no result set is fetched on an operation, then .fetchall() raises an exception. To avoid this error, in the code above you use the cursor.with_rows property, which indicates whether the most recently executed operation produced rows.
While this code should solve your purpose, the WHERE clause is a prime target for web hackers in its current state. It’s vulnerable to what is called a SQL injection attack, which can allow malicious actors to either corrupt or misuse your database.
Warning :Don’t try the below inputs on your database! They will corrupt your table and you’ll need to recreate it.
For example, if a user sends movie_id=18 , reviewer_id=15 , and the new rating=5.0 as input, then the output looks like this:
$ python modify_ratings.py
Enter movie id: 18
Enter reviewer id: 15
Enter new rating: 5.0
Enter username: <user_name>
Enter password:
[(18, 15, Decimal('5.0'))]
The rating with movie_id=18 and reviewer_id=15 has been changed to 5.0 . But if you were hacker, then you might send a hidden command in your input:
$ python modify_ratings.py
Enter movie id: 18
Enter reviewer id: 15"; UPDATE reviewers SET last_name = "A
Enter new rating: 5.0
Enter username: <user_name>
Enter password:
[(18, 15, Decimal('5.0'))]
Again, the output shows that the specified rating has been changed to 5.0 . What’s changed?
The hacker sneaked in an update query while entering the reviewer_id . The update query, update reviewers set last_name = "A , changes the last_name of all records in the reviewers table to "A" . You can see this change if you print out the reviewers table:
>>> select_query = """
... SELECT first_name, last_name
... FROM reviewers
... """
>>> with connection.cursor() as cursor:
...     cursor.execute(select_query)
...     for reviewer in cursor.fetchall():
...         print(reviewer)
...
('Chaitanya', 'A')
('Mary', 'A')
('John', 'A')
('Thomas', 'A')
('Penny', 'A')
('Mitchell', 'A')
('Wyatt', 'A')
('Andre', 'A')
('Sheldon', 'A')
('Kimbra', 'A')
('Kat', 'A')
('Bruce', 'A')
('Domingo', 'A')
('Rajesh', 'A')
('Ben', 'A')
('Mahinder', 'A')
('Akbar', 'A')
('Howard', 'A')
('Pinkie', 'A')
('Gurkaran', 'A')
('Amy', 'A')
('Marlon', 'A')
The above code displays the first_name and last_name for all records in the reviewers tabell. The SQL injection attack corrupted this table by changing the last_name of all records to "A" .
There’s a quick fix to prevent such attacks. Don’t add the query values provided by the user directly to your query string. Instead, update the modify_ratings.py script to send these query values as arguments to .execute() :
from getpass import getpass
from mysql.connector import connect, Error

movie_id = input("Enter movie id: ")
reviewer_id = input("Enter reviewer id: ")
new_rating = input("Enter new rating: ")
update_query = """
UPDATE
    ratings
SET
    rating = %s
WHERE
    movie_id = %s AND reviewer_id = %s;

SELECT *
FROM ratings
WHERE
    movie_id = %s AND reviewer_id = %s
"""
val_tuple = (
    new_rating,
    movie_id,
    reviewer_id,
    movie_id,
    reviewer_id,
)

try:
    with connect(
        host="localhost",
        user=input("Enter username: "),
        password=getpass("Enter password: "),
        database="online_movie_rating",
    ) as connection:
        with connection.cursor() as cursor:
            for result in cursor.execute(update_query, val_tuple, multi=True):
                if result.with_rows:
                    print(result.fetchall())
            connection.commit()
except Error as e:
    print(e)
Notice that the %s placeholders are no longer in string quotes. Strings passed to the placeholders might contain some special characters. If necessary, these can be correctly escaped by the underlying library.
cursor.execute() makes sure that the values in the tuple received as argument are of the required data type. If a user tries to sneak in some problematic characters, then the code will raise an exception:
$ python modify_ratings.py
Enter movie id: 18
Enter reviewer id: 15"; UPDATE reviewers SET last_name = "A
Enter new rating: 5.0
Enter username: <user_name>
Enter password:
1292 (22007): Truncated incorrect DOUBLE value: '15";
UPDATE reviewers SET last_name = "A'
cursor.execute() will raise an exception if it finds any unwanted characters in the user input. You should use this approach whenever you incorporate user input in a query. There are other ways of preventing SQL injection attacks as well.
DELETE Command
Deleting records works very similarly to updating records. You use the DELETE statement to remove selected records.
Obs! Deleting is an irreversible process. If you don’t use the WHERE clause, then all records from the specified table will be deleted. You’ll need to run the INSERT INTO query again to get back the deleted records.
It’s recommended that you first run a SELECT query with the same filter to make sure that you’re deleting the right records. For example, to remove all ratings given by reviewer_id = 2 , you should first run the corresponding SELECT query:
>>> select_movies_query = """
... SELECT reviewer_id, movie_id FROM ratings
... WHERE reviewer_id = 2
... """
>>> with connection.cursor() as cursor:
...     cursor.execute(select_movies_query)
...     for movie in cursor.fetchall():
...         print(movie)
...
(2, 7)
(2, 8)
(2, 12)
(2, 23)
The above code snippet outputs the reviewer_id and movie_id for records in the ratings table where reviewer_id = 2 . Once you’ve confirmed that these are the records that you need to delete, you can run a DELETE query with the same filter:
delete_query = "DELETE FROM ratings WHERE reviewer_id = 2"
with connection.cursor() as cursor:
    cursor.execute(delete_query)
    connection.commit()
With this query, you remove all ratings given by the reviewer with reviewer_id = 2 from the ratings table.
Other Ways to Connect Python and MySQL
In this tutorial, you saw MySQL Connector/Python, which is the officially recommended means of interacting with a MySQL database from a Python application. There are two other popular connectors:
-
mysqlclient is a library that is a close competitor to the official connector and is actively updated with new features. Because its core is written in C, it has better performance than the pure-Python official connector. A big drawback is that it’s fairly difficult to set up and install, especially on Windows.
-
MySQLdb is a legacy software that’s still used in commercial applications. It’s written in C and is faster than MySQL Connector/Python but is available only for Python 2.
These connectors act as interfaces between your program and a MySQL database, and you send your SQL queries through them. But many developers prefer using an object-oriented paradigm rather than SQL queries to manipulate data.
Object-relational mapping (ORM) is a technique that allows you to query and manipulate data from a database directly using an object-oriented language. An ORM library encapsulates the code needed to manipulate data, which eliminates the need to use even a tiny bit of SQL. Here are the most popular Python ORMs for SQL-based databases:
-
SQLAlchemy is an ORM that facilitates communication between Python and other SQL databases. You can create different engines for different databases like MySQL, PostgreSQL, SQLite, and so on. SQLAlchemy is commonly used alongside the pandas library to provide complete data-handling functionality.
-
peewee is a lightweight and fast ORM that’s quick to set up. This is quite useful when your interaction with the database is limited to extracting a few records. For example, if you need to copy selected records from a MySQL database into a CSV file, then peewee might be your best choice.
-
Django ORM is one of the most powerful features of Django and is supplied alongside the Django web framework. It can interact with a variety of databases such as SQLite, PostgreSQL, and MySQL. Many Django-based applications use the Django ORM for data modeling and basic queries but often switch to SQLAlchemy for more complex requirements.
You might find one of these approaches to be more suitable for your application. If you’re not sure which one to use, then it’s best to go with the officially recommended MySQL Connector/Python that you saw in action in this tutorial.
Conclusion
In this tutorial, you saw how to use MySQL Connector/Python to integrate a MySQL database with your Python application. You also saw some unique features of a MySQL database that differentiate it from other SQL databases.
Along the way, you learned some programming best practices that are worth considering when it comes to establishing a connection, creating tables, and inserting and updating records in a database application. You also developed a sample MySQL database for an online movie rating system and interacted with it directly from your Python application.
In this tutorial, you learned how to:
- Connect your Python app with a MySQL database
- Bring data from a MySQL database into Python for further analysis
- Execute SQL queries from your Python application
- Handle exceptions while accessing the database
- Prevent SQL injection attacks on your application
If you’re interested, Python also has connectors for other DBMSs like MongoDB and PostgreSQL. For more information, check out Python Database Tutorials.