1. Introduktion till Oracle 9i / 10g / 11g Developer Suite Handledning för formulär och rapporter
Denna handledning introducerar Oracle 9i, Oracle 10g och Oracle 11g Developer Suite Release 2 som inkluderar Oracle Forms och Oracle Reports. Huvudmålen är att demonstrera och tillhandahålla praktiska instruktioner för att skapa och ändra datainmatning och frågeformulär i olika konfigurationer, rapporter och grafik.
Varningar:Jag har arbetat med den här handledningen i över 15 år och har följt utvecklingen från version 2.0 upp till nuvarande 11g. Observera att Oracle tenderar att ändra saker som menyalternativ, uppmaningar och andra små saker mellan varje större (förvisso) och ofta mindre version. Beroende på den exakta versionen av Oracle 9i, 10g eller 11g Developer Suite du har, kan du hitta några små skillnader mellan vad som visas i den här handledningen och vad du ser på din skärm.
Använd gärna dessa handledningar för ditt eget personliga bruk, utbildning, avancemang, träning, etc. Jag ber dig dock att respektera den tid och den ansträngning jag har lagt ner på detta arbete genom att inte distribuera kopior, varken helt eller delvis , för din personliga vinning. Du får inte under några omständigheter ladda ner, cache eller lagra kopior av dessa handledningar på dina egna servrar. Användning av dessa handledningar för kommersiell utbildning kräver ett särskilt avtal med författaren eller författarna.
Oracle Forms självstudieinnehåll
- 1. Inledning
- 2. Förutsättningar
- 3. Utvecklarverktyg
- 3.1 Starta utvecklarverktyg under Windows
- 4. Oracle Forms Builders huvudskärm
- 4.1 Oracle Forms Object Navigator
- 4.2 Ansluta till databasen
- 5. Oracle Forms Design
- 6. Skapa och köra ett Oracle-formulär med ett enda block
- 6.1 Skapa ett nytt block
- 6.2 Layoutredigeraren
- 6.3 Visa egenskaper
- 6.4 Spara, generera och köra formulär
- 6.4.1 Spara ett formulär
- 6.4.2 Sammanställa/bygga ett formulär
- 6.4.3 Köra ett formulär
- 6.4.4 Köra ett Oracle-formulär under 9iDS
- 6.4.5 Köra ett Oracle Form under 11g
- 6.4.6 Fråga efter exempel
- 6.5 Övning:Skapa ett enda blockformulär
- 7. Skapa ett huvud-/detaljformulär
- 7.1 Huvud-/detaljrelationen
- 7.2 Steg för att skapa ett huvud-/detaljformulär
- 7.2.1 Skapa masterblocket
- 7.2.2 Skapa detaljblocket
- 7.3 Relationsegenskaper för ett huvud-/detaljformulär
- 7.4 Programenheter i ett master-/detaljformulär
- 7.5 Utöka huvud-/detaljformulär
- 7.6 Övning:Skapa ett huvud-/detaljformulär
- 8. Lista över värden (LOV) och icke-bastabellfält
- 8.1 Skapa en värdelista
- 8.2 Icke-bastabellfält
- 8.2.1 Lägga till ett nytt objekt i ett befintligt datablock
- 8.2.2 Skapa en utlösare
- 8.2.3 Skapa en ny värdelista
- 8.3 Övning:Skapa ett LOV och icke-bastabellfält
- 9. Oracle Forms-programenheter och lagrade programenheter
- 9.1 Skapa procedurer i Oracle Forms
- 9.1.1 Lägg till ett nytt objekt i ANSTÄLLDA Blocket
- 9.1.2 Skapa en procedur för att räkna andra avdelningsmedlemmar
- 9.1.3 Skapa en utlösare för att anropa proceduren
- 9.1.4 Spara, kompilera och kör formuläret
- 9.2 Skapa lagrade programenheter (procedurer) i SQL*Plus
- 9.3 Ytterligare lagrade procedurer och utlösare
- 9.3.1 Generera unika eller konsekutiva identifierare med hjälp av tabellen
- 9.3.2 Generera unika eller konsekutiva identifierare med en Oracle-sekvens
- 9.3.3 Kontrollera begränsningar hos klienten
- 9.3.4 Lägga till varningar (popup-meddelanden)
- 9.3.5 Automatisk formulärfråga
- 9.3.6 Fyll i objekt med standardvärden
- 9.3.7 Koppla funktionalitet till kommandoknappar
- 9.3.8 Skicka parametrar mellan formulär
- 9.4 Övning:Procedurer och utlösare
- 9.1 Skapa procedurer i Oracle Forms
- 10. Grunderna i Oracle Reports
- 10.1 Starta utvecklarverktyg under Windows
- 10.2 Oracle Reports Object Navigator
- 10.3 Skapa rapporter i Oracle-rapporter
- 10.4 Skapa en entabellsrapport
- 10.4.1 Ange datamodell och layout
- 10.4.2 Spara, skapa och köra rapporten
- 10.5 Övning:Skapa en rapport
- 10.6 Skapa en huvud-/detaljrapport
- 10.6.1 Ange huvud-/detaljdatamodell och layout
- 10.6.2 Spara och köra huvud-/detaljrapporten
- 10.7 Övning:Skapa en huvud-/detaljrapport
- 10.8 Parameterformulär i Oracle Reports
- 10.8.1 Skapa ett anpassat parameterformulär
- 11 Skapa menyer i Oracle Forms
- 11.1 Oracle Forms-menyhierarkin
- 11.2 Skapa en anpassad meny
2. Förutsättningar
Innan du följer den här handledningen måste en student ha ett giltigt användarkonto på en Oracle-server eller en lokal installation av en Oracle-databas. Kontakta din DBA eller systemadministratör för att få information om hur Oracle-servern är konfigurerad i din organisation.
Om du har en lokal instans av Oracle-databasen, använd inte SYSTEM-kontot (DBA) för att öva utveckling. Det finns en god chans att du kan skada
hela databasen av misstag. Du är mycket bättre av att använda SCOTT/TIGER-schemat eller (ännu bättre) skapa en separat användare (schema) för detta självstudiearbete och för att öva.
Ännu ett varningens ord. Oracle har designat Oracle9i, 10g och 11g som en tre nivå arkitektur. Detta innebär att databasen (Oracle9i, 10g eller 11g server) ska köras på en server, applikationsservern (Oracle9i, 10g eller 11g Application Server eller Oracle9iAS Containers for Java (OC4J) server som används här) körs på en andra server och klientapplikation (skriven i Oracle Forms and Reports till exempel) körs på en tredje maskin – vanligtvis via en webbläsare. Man kan få alla dessa komponenter att köra på samma maskin, men det kräver både en snabb processor och mycket RAM. Här är ett exempel:
| Tjänst/applikation | RAM förbrukas under körning |
|---|---|
| Oracel9i Database (minimal instans) | 300 MB |
| Oracle9i Forms Builder | 60 MB |
| Oracle9i Reports Builder | 120 MB |
| Oracle9i Forms Runtime webbstarter | 20 MB |
| OC4J-tjänst (Java) | 50 MB |
| Firefox 11 kör ett formulär | 65 MB |
| Oracle9i SQL*Plus | 12 MB |
| Totalt | ca. 630 MB |
Därför är det nödvändigt att ha minst 2 GB riktigt RAM-minne (inte swap-utrymme). 2 GB RAM kommer att ge betydligt bättre prestanda. Om du har mindre än 2 GB RAM-minne bör du skapa en växlingsfil (Virtuellt minne) på minst 2 GB.
Eleven ska också känna till Oracles SQL*Plus-verktyg och ska vara bekväm med att ansluta till ett databasschema, skapa tabeller, infoga och manipulera data (med SQL INSERT-, UPDATE- och DELETE-satser) och med att fråga tabelldata (med SQL SELECT-satser) .
Om du är ny på Oracle och letar efter en introduktion till SQL*Plus
besök min SQL*Plus-instruktionssida.
Den här handledningen bygger på att det finns några tabeller i elevens schema. Använd Oracle SQL*Plus-verktyget för att skapa tre tabeller med namnet EMPLOYEE , AVDELNING och BEROENDE med följande attribut. Obs:Detta schema förekommer ursprungligen i boken:
Ramez Elmasri och Shamkant B. Navathe, Fundamentals of Database Systems .
Andra upplagan. Addison-Wesley Pub Co, 1994.
| ANSTÄLLD Tabell | |
| Attribut | Datatyp |
|---|---|
| FNAME | VARCHAR(8) |
| MINIT | VARCHAR(2) |
| LNAME | VARCHAR(8) |
| SSN | NUMMER(12) |
| BDATE | DATUM |
| ADRESS | VARCHAR(30) |
| SEX | VARCHAR(1) |
| LÖN | NUMMER(7) |
| SUPERSSN | NUMMER(12) |
| DNO | NUMMER(2) |
| AVDELNING Tabell | |
| Attribut | Datatyp |
|---|---|
| DNAME | VARCHAR(15) |
| DNUMBER | NUMMER(2) |
| MGRSSN | NUMMER(12) |
| MGRSTARTDATE | DATUM |
| BEROENDE Tabell | |
| Attribut | Datatyp |
|---|---|
| ESSN | NUMMER(12) |
| DEPENDENT_NAME | VARCHAR(10) |
| SEX | VARCHAR(1) |
| BDATE | DATUM |
| RELATION | VARCHAR(10) |
>
Följande CREATE TABLE- och INSERT-satser kan användas för att skapa ovanstående tabeller och infoga vissa baslinjedata med Oracle SQL*Plus-verktyget. Observera att olika versioner av Oracle accepterar antingen 2-siffrigt eller 4-siffrigt årtal i datatypen DATE. Det verkar som att versionerna som börjar med Oracle8 och Oracle8i som standard accepterar 4-siffriga årtal. INSERT-satserna nedan bör formateras därefter.
CREATE TABLE employee
  (FNAME           VARCHAR2(15),
   MINIT           VARCHAR2(2),
   LNAME           VARCHAR2(15),
   SSN             NUMBER(12) NOT NULL,
   BDATE           DATE,
   ADDRESS         VARCHAR2(35),
   SEX             VARCHAR2(1),
   SALARY          NUMBER(7) NOT NULL,
   SUPERSSN        NUMBER(12),
   DNO             NUMBER(2) NOT NULL) ;

ALTER TABLE employee ADD CONSTRAINT pk_employee
PRIMARY KEY (ssn);

CREATE TABLE DEPARTMENT
  (DNAME          VARCHAR2(15),
   DNUMBER        NUMBER(2) NOT NULL,
   MGRSSN         NUMBER(12),
   MGRSTARTDATE   DATE) ;

ALTER TABLE department ADD CONSTRAINT pk_department
PRIMARY KEY (dnumber);

CREATE TABLE DEPENDENT
(ESSN                   NUMBER(12),
 DEPENDENT_NAME         VARCHAR2(15),
 SEX                    VARCHAR2(1),
 BDATE                  DATE,
 RELATIONSHIP           VARCHAR2(12)) ;

ALTER TABLE dependent ADD CONSTRAINT pk_dependent
PRIMARY KEY (essn, dependent_name);

ALTER TABLE dependent ADD CONSTRAINT fk_employee
FOREIGN KEY (essn) REFERENCES employee (ssn);

ALTER TABLE employee ADD CONSTRAINT fk_department
FOREIGN KEY (dno) REFERENCES department (dnumber);


INSERT INTO DEPARTMENT VALUES ('RESEARCH',       5, 333445555, '22-MAY-1978') ;
INSERT INTO DEPARTMENT VALUES ('ADMINISTRATION', 4, 987654321, '01-JAN-1985') ;
INSERT INTO DEPARTMENT VALUES ('HEADQUARTERS',   1, 888665555, '19-JUN-1971') ;

INSERT INTO EMPLOYEE VALUES
('JOHN','B','SMITH',123456789,'09-JAN-1955','731 FONDREN, HOUSTON, TX', 'M',30000,333445555,5) ;
INSERT INTO EMPLOYEE VALUES
('FRANKLIN','T','WONG',333445555,'08-DEC-1945','638 VOSS,HOUSTON TX', 'M',40000,888665555,5) ;
INSERT INTO EMPLOYEE VALUES
('ALICIA','J','ZELAYA',999887777,'19-JUL-1958','3321 CASTLE, SPRING, TX', 'F',25000,987654321,4) ;
INSERT INTO EMPLOYEE VALUES
('JENNIFER','S','WALLACE',987654321,'20-JUN-1931','291 BERRY, BELLAIRE, TX', 'F',43000,888665555,4) ;
INSERT INTO EMPLOYEE VALUES
('RAMESH','K','NARAYAN',666884444,'15-SEP-1952','975 FIRE OAK, HUMBLE, TX', 'M',38000,333445555,5) ;
INSERT INTO EMPLOYEE VALUES
('JOYCE','A','ENGLISH',453453453,'31-JUL-1962','5631 RICE, HOUSTON, TX', 'F',25000,333445555,5);
INSERT INTO EMPLOYEE VALUES
('AHMAD','V','JABBAR',987987987,'29-MAR-1959','980 DALLAS, HOUSTON, TX', 'M',25000,987654321,4) ;
INSERT INTO EMPLOYEE VALUES
('JAMES','E','BORG',888665555,'10-NOV-1927', '450 STONE, HOUSTON, TX', 'M',55000,NULL,1) ;

INSERT INTO DEPENDENT VALUES (333445555,'ALICE','F','05-APR-1976','DAUGHTER') ;
INSERT INTO DEPENDENT VALUES (333445555,'THEODORE','M','25-OCT-1973','SON')  ;
INSERT INTO DEPENDENT VALUES (333445555,'JOY','F','03-MAY-1948','SPOUSE');
INSERT INTO DEPENDENT VALUES (123456789,'MICHAEL','M','01-JAN-1978','SON');
INSERT INTO DEPENDENT VALUES (123456789,'ALICE','F','31-DEC-1978','DAUGHTER');
INSERT INTO DEPENDENT VALUES (123456789,'ELIZABETH','F','05-MAY-1957','SPOUSE');
INSERT INTO DEPENDENT VALUES (987654321,'ABNER','M','26-FEB-1932','SPOUSE');
|
3. Oracle 9i, 10g och 11g Developer Suite Tools
Oracle Developer Suite innehåller följande huvudkomponenter:
- Oracle 9i, Oracle 10g och Oracle 11g Forms – För design av datainmatningsformulär.
- Oracle 9i och Oracle 10g-rapporter – För att utforma rapporter.
- Oracle 9i, 10g eller 11g JDeveloper – För utveckling av Java-applikationer eller appletar
- Oracle 9i, 10g eller 11g Warehouse Builder och Discoverer – OLAP-verktyg för att
skapa datalager och OLAP-användargränssnitt - Oracle 9i, 10 eller 11g Designer – Oracles CASE-verktyg som inkluderar modellering
och kodgenereringsmöjligheter.
Den här handledningen täcker komponenterna för utvecklarformulär och rapporter.
I följande avsnitt kommer procedurerna för att köra Oracle Forms under MS Windows (XP/7) att ges.
3.1 Starta utvecklarverktyg under Windows
3.1.1 Oracle Developer Suite 9i (9iDS)
En typisk installation av Oracle Developer Suite skapar flera mappar under menyn Startprogram. De två huvudmapparna är båda namngivna efter Oracle Home du valde att installera 9iDS under. En kort guide för att installera 9iDS finns här:/installing-oracle-9i-developer-windows
Var särskilt uppmärksam på stegen efter installationen angående hur
Oracle9iAS Containers for Java (OC4J)-tjänsten körs och hur du installerar
JInit-plugin för din webbläsare.
De viktigaste 9iDS-programmen som representeras i den här handledningen finns under Oracle9i Developer Suite-hemmet och inkluderar följande objekt:

För att köra 9iDS Forms Builder under Windows, klicka på Start -> Program -> Oracle9i Developer Suite - Hem -> Forms Developer -> Form Builder
menyalternativ.
För att köra 9iDS Reports Builder under Windows, klicka på
Start -> Program -> Oracle9i Developer Suite - Hem -> Reports Developer -> Reports Builder menyalternativ.
3.1.2 Oracle Forms and Reports 11g
Installationer för Oracle 10g Developer och Oracle 11g Formulär och rapporter bör ha liknande Oracle Home startmenyalternativ. Till exempel installeras Oracle 11g Forms and Reports ovanpå Oracle Fusion Middleware (även kallad Weblogic Server) och har följande startmenyalternativ:

För att köra Oracle 11g Forms Builder under Windows klickar du på Start -> Program -> Oracle Classic Instance - Hem -> Utvecklarverktyg -> Forms Builder menyalternativ.
För instruktioner om hur du installerar och konfigurerar Oracle Forms and Reports 11g med Oracle Fusion Middleware / Weblogic Server, besök mina guider:
- Installera Oracle Fusion Middleware / Weblogic Server 11g
- Installera Oracle Forms and Reports 11g Release 2
3.1.3 Andra versioner av Oracle Forms and Reports
För äldre versioner av Oracle Developer kan startmenyn innehålla objekt som:Developer 2000 R2.1 , Utvecklare 2000 R2.0 , Devloper 6i och så vidare.
För Oracle9iDS-installationer i UNIX eller Linux, använd följande skript:
| Formulärbyggare | f90desm.sh |
| Reports Builder | rwbuilder.sh |
Obs! I din organisation kan Oracle Developer Suite installeras eller konfigureras något annorlunda. I synnerhet kan programmen grupperas under olika menyer. Vänligen kontakta din DBA eller systemadministratör, eller se eventuell lokal dokumentation för att lära dig hur du kör verktygen Forms and Reports Builder.
4. Huvudskärmen för Oracle Forms Builder
När lämplig menypost har klickats på (för Windows), kommer Oracle Forms Builder Object Navigator att visas. . Observera att Oracle Forms Builder-skärmen har förblivit praktiskt taget oförändrad mellan version 9i, 10g och 11g.
4.1 Oracle Forms Object Navigator
Efter start av Oracle Forms kommer huvudskärmen att visas.

Den här skärmen kallas Objektnavigator och visar alla formulärelement, datablock, menyalternativ, användardefinierade kodbibliotek, inbyggda procedurer och funktioner och databasobjekt (tabeller, vyer). Displayen är i form av ett hopfällbart träd. I allmänhet, klicka på ett + expanderar det aktuella objektet för att visa dess detaljer. Klicka på en – kommer att komprimera den aktuella listans detaljer.
Menyraden längst upp ger tillgång till nästan alla funktioner i Oracle Forms.
- Arkiv-menyn har alternativ för att skapa, öppna, spara och skriva ut formulär. Den här menyn innehåller också ett alternativ för att ansluta till databasen och alternativet Administration som används för att kompilera formulär och menykod. Det sista alternativet på Arkiv-menyn är alternativet Avsluta som avslutar Oracle Forms Builder.
- Menyn Redigera har alternativ för att klippa ut, kopiera och klistra in objekt, anropa en redigerare och ångra en operation.
- Menyn Visa växlar objektnavigatorns visning mellan visuella element och ägandeelement.
- Layout-menyn har objekt som styr objekt på ett formulär på samma sätt som ett ritpaket gör. Objekt kan ändras i storlek, flyttas, målas och på annat sätt manipuleras med hjälp av objekt på den här menyn.
- Programmenyn har objekt som styr formulärkompilering, generering och exekvering (Kör). Triggers, procedurer och annan PL/SQL-kod kan också skapas från denna meny. Menyalternativet Smarta utlösare visar de vanligaste utlösare enligt den typ av objekt som för närvarande är vald i objektnavigatorn.
- Debug-menyn har alternativ för att felsöka formulär när de körs. Den innehåller menyalternativ för att fastställa brytpunkter och för att stega över exekveringen av koden en rad i taget.
- Verktygsmenyn har alternativ för att växla mellan flera olika skärmar inklusive layoutredigeraren, menyredigeraren och objektnavigatorn. Det finns också flera guider som kan startas från den här menyn inklusive datablocksguiden, layoutguiden och LOV-guiden (Värdelista).
- Windows-menyn visar menyalternativ för vart och ett av de fönster du har öppnat. Som standard visas endast ett objekt – Objektnavigatorn.
- Slutligen kan hjälpmenyn användas för att visa hjälpämnen.
Som standard finns en knapprad på vänster sida av objektnavigeringsfönstret. Varje knapp duplicerar viss funktionalitet på menyerna. Till exempel, att klicka på den översta ikonen (en öppnad mapp) är detsamma som att dra ned Arkiv-menyn och välja alternativet Öppna. För att se vad en knapp kan göra om den trycks ned, placera muspekaren över knappen och ett kort meddelande kommer att visas som beskriver knappens funktion.
Som med tidigare versioner av utvecklare, i utvecklare 9.0, kallas ett formulär, rapport eller grafik i allmänhet som en modul . När man först startar Forms Builder skapas en standardmodul som heter:MODULE1
Innehållet i objektnavigatorn är uppdelat i sex huvudsektioner:
- Formulär – Innehåller formulärobjekt och alla deras underobjekt, såsom datablock, triggers, varningar, dukar, programenheter (procedurer och funktioner), parametrar och fönster. Mer än ett formulär kan vara öppet åt gången.
- Menyer – Innehåller menyobjekt och alla deras underobjekt såsom menyalternativ, parametrar och programenheter. Mer än en meny kan vara öppen åt gången.
- PL/SQL-bibliotek – Dessa är bibliotek med PL/SQL-kod (lagrade antingen i databasen eller i .plb-filer). Bibliotek kan delas mellan olika former och mellan olika utvecklare.
- Objektbibliotek – Dessa är bibliotek som innehåller en samling objekt (allt som kan visas på ett formulär).
- Inbyggda paket – Listar alla paket (PL/SQL-procedurer) som är tillgängliga som standard för alla formulär, rapporter, etc.
- Databasobjekt – Listar alla databasobjekt (tabeller, vyer, PL/SQL-bibliotek och lagrade programenheter) i användarens Oracle-databasschema.
När objekt skapas visas de under lämplig sektion. Sammanhangskänsliga menyer kan visas för varje objekt genom att klicka på ett objekt med höger musknapp.
4.2 Ansluta till databasen
Det första steget i att arbeta med något av utvecklarverktygen är att upprätta en anslutning till en Oracle-databas. Detta görs genom att dra ned Arkiv-menyn och välja menyalternativet Anslut.
Fyll i ditt Oracle-användarnamn och Oracle-lösenord (tryck på tabbtangenten för att flytta mellan fälten).
För fältet Databas anger du tjänstens namn för din Oracle-databas. Om du till exempel använder Personal Oracle Lite, skulle Databasen:vara ODBC:POLITE. Om du har en lokal databas som körs på samma dator, kanske du kan ansluta direkt till den genom att lämna det här fältet tomt. Om du arbetar i en klient/servermiljö där Oralce-servern finns på en annan dator, måste du konfigurera Oracle Net8-mellanvaran för att upprätta en anslutning till den servern. Du anger sedan Net8-tjänstens namn i fältet Databas. Alternativt kan du kontakta din systemadministratör för att lära dig tjänstnamnet för din Oracle-databas och ange den informationen i fältet Databas:.

Klicka på knappen Anslut för att slutföra anslutningen (I vissa versioner av UNIX är knappen märkt OK). Om användarnamnet eller lösenordet är felskrivet eller felaktigt kommer dialogrutan att visas igen. Var noga med att ange ditt Oracle-användarnamn och lösenord (inte din UNIX-värd eller ditt lokala nätverkslösenord).
Varje gång något av utvecklarverktygen körs kommer det första steget att vara att ansluta till en Oracle-databas på detta sätt.
5. Oracle Forms Design
Ett typiskt databasschema innehåller dussintals tabeller, var och en med flera kolumner med olika datatyper. Vi utvecklar applikationer (formulär, rapporter, menyer, etc.) för att göra jobbet att manipulera data i dessa tabeller lättare för användarna. I Oracle Forms fungerar ett formulär (eller datainmatningsformulär) som ett fönster in i databasschemat. Ett individuellt formulär fokuserar användarens uppmärksamhet på ett eller några av borden åt gången. Dessutom kan ett formulär ge uppmaningar så att användaren vet vilken typ av input som förväntas och hur data ska matas in och manipuleras. Dessutom kan vi programmera formulär med ytterligare affärslogik som kan hjälpa till att upptäcka dålig data eller misstag, göra automatiska beräkningar, föreslå lämpliga data som ska matas in och många andra användbara tekniker som kan säkerställa att data av hög kvalitet enkelt kan matas in i databasen.
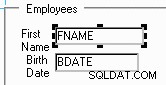
Som standard har varje formulär i Oracle Forms förmågan att fråga efter befintliga data i en tabell, ändra befintliga data och lägga till nya data (poster) i tabellen. Ett formulär byggs upp med ett eller flera datablock som motsvarar tabeller i databasen. Fält i datablocket motsvarar kolumner i databastabellen. Ett datablock liknar ett DataWindow-objekt i Sybase PowerBuilder eller ett bundet formulär i Microsoft Access. I följande figur visas en typisk form.

Detta formulär har två datablock, ett för tabellen ANSTÄLLDA och ett för tabellen BEROENDE. Dessa datablock är ordnade i en Master/Detalj inställning där en enskild anställd post (mastern) är associerad med en eller flera Dependents-poster (detaljerna). I denna databas är Anhöriga den anställdes make, söner och döttrar.
Som standard ger formulär även en knapprad och en meny. Dessa kan användas för att bläddra igenom posterna i ett block, navigera mellan block, ställa in och utföra frågor mot tabellerna, infoga, uppdatera och ta bort poster, rensa formuläret och avsluta formuläret. Slutligen, längst ner i varje formulär finns en statusrad som visar alla relevanta uppmaningar eller felmeddelanden och en indikation på posterna i det aktuella datablocket.
Det finns fyra huvudtyper av formulär som kan utformas.
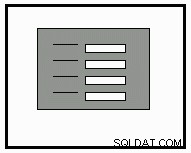 Single Block Form. Detta formulär innehåller ett enda datablock som motsvarar en enda databastabell. | 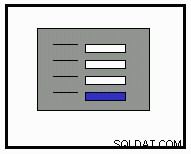 Enkelblocksformulär med uppslagsfält. Detta formulär innehåller ett enda datablock som motsvarar en enda databastabell med tillägg av ett eller flera fält som visar data från några andra tabeller. Sådan data "slås upp" när formuläret körs. |
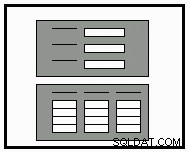 Master/Detaljformulär. Detta formulär innehåller två datablock som är ordnade i en master/detalj (en till många) relation. | 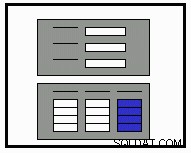 Master/Detaljformulär med uppslagsfält. Det här formuläret liknar Master/Detalj men har ytterligare uppslagsfält i master- och/eller detaljblocken. |
Det finns ytterligare varianter som en Master/Detalj/Detaljformulär med 3 block och så vidare. De fyra typerna som illustreras ovan är dock de vanligaste. I den här handledningen kommer alla fyra typerna att demonstreras.
I nästa avsnitt kommer den mest grundläggande singe-block-formen att introduceras.
6. Skapa och köra ett Oracle-formulär med ett enda block
I det här avsnittet kommer de grundläggande stegen för att skapa en grundläggande datainmatning och frågeformulär för en enskild databastabell att behandlas.
I allmänhet ett Datablock på ett formulär motsvarar en tabell i databasen. Detta kallas Bastabellen för datablocket. För varje tabell som visas i formuläret skapas ett nytt datablock. För det här exemplet kommer endast ett datablock att skapas för tabellen MEDARBETARE.
Ett block visas på en Canvas som finns i ett fönster . Det finns många alternativ för att styra flera kanvasvyer och flera fönster per formulär. I dessa exempel koncentrerar vi oss på ett enkelt arrangemang med en enda duk och ett enda fönster.
Det finns ett antal sätt att skapa ett datablock. Ett sätt är att manuellt definiera bastabellen och kolumnerna och deras positioner i formuläret. Även om detta är möjligt, kan det vara väldigt tråkigt.
Oracle Forms Builder tillhandahåller två huvudguider (program som vägleder utvecklaren i att utföra vanliga uppgifter) för att skapa datablock:
- Datablockeringsguiden guidar utvecklaren genom stegen för att välja en bastabell och kolumner.
- Layoutguiden guidar utvecklaren genom att arrangera bastabellen och kolumnerna i formuläret.
6.1 Skapa ett nytt block
För att skapa ett nytt block, dra ned Verktyg-menyn och välj menyalternativet Datablock-guiden. Följande dialogruta visas:

Klicka på knappen Nästa. Följande dialogruta visas:

Det finns två typer av datablock som kan skapas. Tabell/vy och procedurer. För det här exemplet väljer du Tabell/Visa och klickar på knappen Nästa.
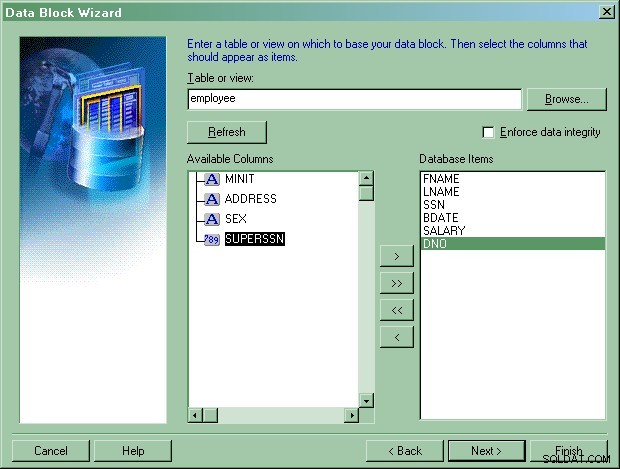
Nästa steg är att välja en bastabell och kolumner som kommer att tillhöra datablocket. Följande dialogruta bör visas:

För att associera en databastabell med blocket, klicka på knappen Bläddra... till höger om fältet Tabell eller Visa. Följande dialogruta dyker upp.

Se till att knapparna Aktuell användare och Tabeller är valda. En lista över dina tabeller visas. Om ingen lista med tabeller visas, se till att du har skapat tabellerna och infogat data enligt anvisningarna i Förutsättningar avsnitt 2. Om du fortfarande är inloggad på SQL*Plus, se till att du utfärdar ett "COMMIT;" uttalande för att utföra alla ändringar i schemat.
Markera namnet på databastabellen (ANSTÄLLD i detta exempel) och klicka på OK-knappen.
Guiden ska dyka upp igen med namnet på tabellen och en lista över tillgängliga kolumner visas. För att inkludera en kolumn i datablocket, markera kolumnnamnet och klicka på högerpilen. Namnet på kolumnen ska flyttas över till höger sida.
För det här exemplet väljer du FNAME, LNAME, SSN, BDATE, LÖN och DNO som i följande bild:

Klicka på knappen Nästa, en dialogruta visas där du kan namnge datablocket. I allmänhet är det bäst att helt enkelt använda namnet på tabellen som namn på datablocket enligt nedan:

Klicka på knappen Nästa en gång till och den sista dialogrutan för datablockeringsguiden visas:

I det här exemplet vill vi fortsätta till layoutguiden för att specificera hur det nya formuläret ska se ut. Se till att alternativet Skapa blocket, anrop sedan layoutguiden är markerat och klicka på knappen Slutför.
Datablocket kommer att skapas (som kan ses i objektnavigatorn i bakgrunden). Objekten som skapas inkluderar EMPLOYEE-datablocket som innehåller objekt för var och en av kolumnerna som valdes i det tredje steget i guiden.
När det nya datablocket och objekten har skapats visas den första dialogrutan i layoutguiden:

Klicka på knappen Nästa så visas följande dialogruta:

Layouten för ett datablock kan placeras på vilken befintlig duk som helst. I det här fallet finns det inga befintliga dukar så det enda tillgängliga alternativet är att skapa en ny duk.
Click on the Next button to display the following dialog box:

In this dialog box, the columns from a given base table on a data block can be added to the layout. Since we are laying out the EMPLOYEE data block, it is highlighted automatically. Move all of the Available Columns over to the Displayed Items side by clicking on the double right arrow and click on the Next button.
In this dialog box, the field labels, field sizes and field heights can be altered. Change the field labels as shown below and click on the Next button:

The following dialog box will appear:

There are two main styles for forms. A Tabular layout arranges the field labels across the top of the form with a number of records below as in a spreadsheet.
A Form layout places the field labels to the left of the fields. Generally only one record is displayed at a time.
For this example, choose a Form layout and click on the Next button.
In the following dialog box, type a title for the frame (around the data block) and check the option to include a scroll bar.
The number of records displayed for a Form layout should be 1. The number of records displayed in a Tabular layout can be more than 1.

Click on the Next button and the final dialog box for the Layout wizard will appear.

Click on the Finish button to create the layout. A new Canvas will be created with the new block and all of the form items added in the layout wizard.
At this point the Layout Editor should appear and the new form with the data block will appear.
6.2 The Layout Editor
To view the actual form and its blocks and fields, pull down the Tools menu and select the Layout Editor menu item (if it not already displayed).

In the Layout Editor, fields and labels can be moved around by clicking and dragging. Other text, lines and boxes, etc. can be added using the tool palette on the left side of the window.
Some common operations on the Layout Editor include:
- Move a field or a field label by clicking and dragging the item with the left mouse button.
- Change the text of a label by choosing the text tool button
 from the tool bar and then clicking on a label. To stop editing the label, click anywhere outside of the label text.
 - Add text to the block by choosing the text tool button from the tool bar and then clicking on a open area. Type the new text. To change the font, highlight the text, pull down the Format menu and click on the Font menu item.
To change the text color of a label, use the pointer tool to highlight a label and then click on the Text Color palette button  to choose the color.
 - Change the width of a field by clicking on the field. Then drag one of the handles (small black boxes around the field) to re-size the field.
For exampe, on the employee form, you may wish to make the FNAME field wider to accomodate longer first names. - Use the Zoom In tool
 to zoom in to the form (e.g., make everything appear larger). Or use the Zoom Out tool
  to zoom out of the form.
6.3 Displaying Properties
While in the Layout Editor, double clicking on an object will bring up that object’s properties . Optionally, clicking on an object with the right mouse button will bring up a small menu which has the Properties menu item on it. The following figure shows the properties for the FNAME item.

Each type of object has a slightly different set of properties. For example, double clicking on the EMPLOYEE data block in the Object Navigator (pull down the Tools menu and choose Object Navigator) will display that data block’s properties.

Some properties of interest for a data block include:
- WHERE Clause – specify a WHERE clause to filter the selection of rows from the base table.
- ORDER BY Clause – specify an ORDER BY clause to alter the displayed order of the records.
- Delete Allowed, Insert Allowed, Query Allowed and Update Allowed – toggle these properties to allow or prevent the action. For example, setting Delete Allowed to FALSE prevents users from deleting records from the corresponding base table using this form.
- There are numerous other properties that affect the fonts, colors, size and position of objects in the block.
6.4 Saving, Compiling and Running Forms
Forms can be saved in files in a directory of your choosing. The “source code” for a form is stored in a file with a .fmb extension. Compiled forms have a .fmx extension.
Under MS Windows, forms can be saved in a folder (subdirectory) on the local hard disk, on a file server or on a USB disk (thumb drive or memory stick). It is desirable to maintain separate subdirectories (folders) for forms associated with different projects. One significant item to be aware of is that Oracle Forms will have difficulty running any form saved in a folder that has spaces or punctuation other than the underscore character in the name. For example, it is common in Windows to just save files in “My Documents”. However, since this has a space in the name, the form will not run.
Therefore, if you are developing on a local machine, it is recommended that you at least make a simple directory such as C:\forms or E:\forms if using a USB disk and save all forms files there.
6.4.1 Saving a Form
To save a form, pull down the File menu and select the Save menu item.
Under MS Windows, this dialog box looks like:

Note that in your company or organization, forms and other files may have to be saved in a special directory. The above figure is simply an example.
It is critical that you do not save the file with spaces in the file name . In addition, you should save the files in a local directory where the directory name(s) have no spaces in the them. If you save the file in “My Documents” for example, or on the Windows desktop, you will be unable to run or test the forms.
Fill in a file name in the File Name: field. Be sure it contains no spaces and that it ends with .fmb
Click on the Save button to save the file. For this example, use the file name employee.fmb
To save this form on a USB disk in the E: drive, use the file name:E:\employee.fmb
To enhance portability of forms across different operating systems, use file names that begin with a letter, contain no spaces or punctuation (except for the underscore character), have all lower case letters and are relatively short.
Reminder: Do not use spaces in the names of the file or the names of any folders (directories).
If you are working on a form and wish to save it under a different file name, follow the same steps as above, only select the Save As menu item in place of the Save menu item. For example, if you have finished working on the Employee form and wish to save off a copy before adding some code or programming some program units, the Save As menu item can be used to save off a copy before proceeding.
6.4.2 Compiling/Building a Form
Before a form can be executed (run), it must be Compiled and Built . Compiling runs a PL/SQL compiler on all of the procedures and triggers in the form. Building (or compiling the file) creates the .fmx file that is then used to run the form.
To compile a form, first make sure the form is saved. Pull down the Program menu and select the Compile Module menu item.
If a form has errors (e.g., in the PL/SQL code, or if the database schema changes) they will be displayed in a window as they are encountered. A record of the compilation process, including error messages, is kept in a file with a .err extension. For example, if the form is named employee then the record of the compilation will be stored in employee.err
Alternatively, Oracle Forms defaults to automatically compiling the form each time it is executed (run) from the forms Builder as will be demonstrated in the next step. For more details on the default behavior, pull down the Tools menu and check the Preferences menu item.
6.4.3 Running a Form
As discussed in the introduction section, Oracle Forms from version 9i and up are intended to urn in a three tier architecture. The database acts as the back-end tier. The Oracle9iAS Containers for Java (OC4J) service acts as the middle tier and a web browser (Internet Explorer, Firefox, Chrome, etc.) takes on the role of the user-interface tier. Oracle Forms 11g runs using the Fusion Middleware system.
6.4.4 Running a Form using Oracle 9iDS
Unless this environment has already been established, a local client-side OC4J service may be used in place of the middle tier.
Before running a form, the OC4J service should be started. Use the Start Menu to navigate to:Start -> Programs -> Oracle9i Developer Suite - Home -> Forms Developer -> Start IC4J Instance
A Command prompt will open (in Windows) similar to the following:

Note that by default, OC4J runs on port 8888. If this conflicts with another service or if you have firewall software that prevents opening up such ports, you will need to change the configuration of either OC4J, your firewall software or both.
If you receive an error when running OC4J, it may be because another OC4J instance is already running. If you are uncertain, save your work and reboot the PC. Then run a single instance of OC4J.
With OC4J configured and running, and the form designed and saved, it can be executed. To run the form, pull down the Program menu and select the Run Form menu item. This will launch your default web browser which will then connect to OC4J (port 8888) on the local machine. Oracle’s JInitiator will load and the form should appear.

Use the various menus and items to query the form, enter new data and save new and changed data. Please read the section below on Query By Example to see how to query data from the underlying tables and populate the fields in the form.
If OC4J service is not running, an error message similar to the following will be displayed:

If you see error FRM-10142, make sure the OC4J Instance is running. Look in the Windows Start Menu folder where you started Forms Builder. There should be a menu item called:Start OC4J Instance. Run that program (a DOS box will appear) and make sure it looks similar to the example above. If the OC4J Instance gives errors, it may be because your computer has a personal firewall (such as that included in Windows XP Service Pack 2). Make certain you configure your personal firewall to allow local connections to port 8888.
If you have previously not installed the latest JInitiator, your browser will launch with the following message:

Click on the “Get the Plug-in” button and follow the instructions to install it. Note that the jinit.exe file is actually installed with Oracle9i Developer Suite.
Reminder:If you saved your form in a folder that has spaces in the name, or if your file name has spaces, the form will not load in the web browser. In such cases, you may see error:FRM-90928 Positional parameter after key on command line. If this occurs, simply use the “Save As” item on the File menu to save the form under a new name with no spaces. Then try to run the form again.
Technical Notes and Possible Errors:
- The height and width settings for the Java applet that displays the forms are set in the formsweb.cfg file located in \forms90\server directory under the Oracle9iDS installation home. Edit the formsweb.cfg file with a text editor and scroll down to Section 3) Values for the Forms applet parameters:
Change the width= and height= parameters accordingly and save the file. You may need to restart the OC4J server. Note that you can also set the width and height parameters to percentages. For example setting width=100% will cause the applet to use up the entire width of the web browser. - Error FRM-18125:Could not find the web browser appears if you do not have a web browser installed or your web browser is not found in the PATH. If you are certain you have a web browser installed, set its location in the Preferences section in the Forms builder (Edit -> Preferences -> Runtime tab).
- Error FRM-10142:The HTTP listener is not running on… appears if the OC4J is not running. Start the OC4J Instance.
6.4.5 Running Oracle Forms 11g
The process for running Oracle Forms using the 11g version is slightly different. Oracle Forms 11g requires an instance of Oracle Fusion Middleware / Weblogic Server to be running on the deployment machine. For developers this is typically the same computer they are using to run Forms Builder. During the installation of the Oracle Fusion Middleware / Weblogic Server, one or more Domains will be created. For example, the default name for the Oracle Forms and Reports domain will be ClassicDomain . The following assumes this default domain name is in use.
It is important to note that you can only run one Admin server at a time, so if the Admin sever for the Weblogic Server’s domain is running, it must be shut down before the Admin server for the ClassicDomain can be started (The classic error here from Java is “unable to obtain lock”).
Make sure the Admin Server for the ClassicDomain is running by Start Admin Server menu item as shown below:

When you run a form for the first time under the Weblogic Server, your form will be deployed in that server instance and made available on the default server port. During the default configuration that port is usually set to 7003 so your web browser will point to the Weblogic Server (which may be running on your local PC) at port 7004 and will request the /forms/frmservlet resource. The full URL will look like: https://127.0.0.1:7003/forms/frmservlet
Where 127.0.0.1 is the localhost IP address.
Oracle Forms 11g is also picky about the Java Runtime connected with your browser. It may request that a different version is used in order to display the running form. In my case I had JRE 1.7 installed but the forms servlet requested I install version 1.6.
There are dozens of other configuration steps to consider here and based on my research it seems many people have difficulties getting Weblogic Server and the appropriate Oracle Forms versions to talk to one another. so some patience will definitely be required. Below is an example of an oracle 11g Form running in a web browser.

6.4.6 Query By Example
When a Developer Form is first executed, no records will appear. That is, the blank form will appear with no data in the fields. This is similar to running a word processor where the opening screen is blank. From this blank or empty form, the user can immediately begin to enter new data records by simply typing them in.
However, in many cases, the user would first like to see if there are any records in the database. To do this, the user must query the database using the query capabilities that are built into every Oracle form. This will bring a copy of the records from the database into the form.
When a tool such as SQL*Plus is used, the user must form the SQL query by typing it directly in. In the case of embedded SQL, the SQL statements are programmed into the host language (such as “C” or Java) and automatically executed for the user. In the case of Oracle Forms, complex queries can be formulated and submitted to the database using a technique called Query By Example or QBE. In QBE, the name of the table or tables is fixed as are the names of the columns that will be returned from the tables. The user can supply their own criteria by supplying values for the fields. These values become part of the query that is submitted to the database on behalf of the user.
Querying a form in Oracle Forms is a two step process. Clicking on the Query button or choosing Enter Query from the Query menu places the form in Enter Query mode. In enter query mode, the form is cleared and the user can navigate in the various fields. Example values can be supplied as criteria for the query. For example, a user looking for all employees in the RESEARCH department might type a “5” in the DNO field while in enter query mode.
Clicking on the Query button a second time (or pulling down the Query menu and choosing Execute Query) executes the current query using any supplied data as criteria in a WHERE clause. If no criteria are supplied, then all records in the table will be displayed. Continuing the above example, supplying a “5” for the DNO field while in enter query mode would cause the following SQL query to be submitted to the database:
SELECT fname, lname, ssn, bdate, salary, dno FROM employee WHERE dno = 5;
Most of the commands on the menus and on the button bar can also be activated using special key combinations or function keys. For example, within the Java based forms display pressing the F11 function key places the form in Enter Query mode. Pressing the CTRL+F11 function key executes a query. (Note:Please check the Help menu to see if the keys in your system are the same). To see a list of keys and their functions, pull down the Help menu and choose the Keys option.
Once data has been queried, it is retrieved from the database and stored in a buffer in the associated data block on the form. This means that a local copy of the data now exists in the client’s memory. Appropriate locks are placed on the data so that the client maintains a consistent view of the data in the associated tables.
The user can navigate through the data in a block by pressing the up and down arrow keys to scroll between records. To change data in a form, the user can TAB to the field of interest, and type over the existing data.
To enter new data into the form, the user can scroll to the last record and then down once more to move to a blank record. Data can then be typed into the fields and the TAB key can be pressed to move between fields on the form.
To save both changed and new records on a form, pull down the Action menu and choose the Save menu item. Any records that have been changed are collected and submitted to the database as SQL UPDATE statements. Any new records are collected and submitted to the database as INSERT statements. These statements are submitted as a single logical unit of work. Thus if a failure occurs during any of the statements, the entire transaction will be rolled back.
If the user attempts to clear the block or exit the form and there are some changes that have not yet been applied to the database, they will be prompted to commit the changes before exiting or clearing the form. The block is cleared when the Enter Query mode is invoked. A block can also be cleared using the Clear Block and Clear Form menu items.
To exit from a running form, pull down the Action menu and select the Exit menu item. Warning:Do not simply close the web browser as this will leave a Java Applet process running and this will lock your form (.fmx file).
As a review, here are a few basic functions that can be performed by default in any Form:
| Forms function | Notes |
|---|---|
| Querying a form | To see all records in the table, simply “Execute Query” (via Query menu or by pressing F8 in Windows). To filter the record, “enter query” mode, specify the query parameters in the fields and then “Execute Query”. |
| Inserting new records | Scroll to the last record and then scroll once more to get a blank record. Type in data for each field and then commit these changes by pulling down the Action menu and choose the Save menu item. For master/detail forms (discussed below) first either query a master record or insert and save a master record (in the master data block), then navigate to the detail block and insert new records there. |
| Updating existing records | Query the database and scroll to the record of interest. Change the values in the fields and then save the changes. For master/detail forms, changes to the key in the master block may be prevented if detail records exist (thus insuring relational integrity). |
| Deleting records | Query the database and scroll to the record of interest. Pull down the Records menu and choose Delete record. Then save the changes. For master/detail forms, attempting to delete a master record when detail records exist typically results in an error. In such cases, all of the detail records should be deleted first and then the master record should be able to be deleted. |
| Exiting the Form | Pull down the Action menu and choose the Exit menu item. Existing in this way will release any Java processes that might lock up your forms files. |
6.5 Exercise:Creating a Single Block Form
For this exercise, create a simple data entry form for the DEPARTMENT table with the following characteristics:
- Select and display all of the columns in the DEPARTMENT table.
- In the layout wizard, use the Tabular layout and display 5 Records in the form. Add a scrollbar.
- In the Layout Editor, make the DNAME field a bit wider to accommodate longer department names.
- Change the Properties of the DEPARTMENT block so that that data is ORDER BY DNAME.
- Save the form under the file name:depart.fmb
The resulting form should look like the following:

Use the enter query mode and execute query functions to query the department table for a specific department name and/or number.
7. Creating a Master/Detail Form
In this section, the basic steps for creating a Master/Detail form are introduced. A Master/Detail form is a form that has two blocks arranged in a master/detail relationship.
7.1 The Master/Detail Relationship
The Master/Detail relationship is a common relationship between entities in a business. In an Entity-Relationship diagram, these are shown as “One to Many” relationships. In a physical database design, a single Master record references one or more detail records in another table. A record in the detail table will relate to exactly one master record in the master table. Another name for this relationship is called parent-child. Examples of this relationship include:
- A Customer Order with many OrderItems.
- A Department with many Employees.
- An Employee with many Dependents.
- A Company with many Branch Offices.
- A Recipe with many Recipe Steps.
- An Inventory location with many Inventory Items.
Oracle Forms implements the master/detail relationship using two data blocks. The first block corresponds to the master table and the second block corresponds to the detail table. There are two major functions in a Master/Detail form:
- Oracle Forms coordinates values between the two blocks through a series of form and block level triggers .
- Oracle Forms guarantees that the detail block will display only records that are associated with the current record in the master block.
Note that a Master/Detail form is simply one way of viewing the data in two related tables. Forms do not affect the schema in terms of creating, dropping or enforcing database level referential integrity constraints.
7.2 Steps to Create a Master/Detail Form
In this section, a set of step by step instructions for creating a Master/Detail form are given. The form will allow a user to query a given department in the company and then will display all of the employees in that company.
The schema used is the same one suggested in the Prerequisites section at the beginning of this tutorial. Notice that the DNO column in the EMPLOYEE table gets its values from the DNUMBER column in the DEPARTMENT table. In other words, to join the two tables in a query, one might specify a WHERE clause such that:EMPLOYEE.DNO =DEPARTMENT.DNUMBER.

7.2.1 Create the Master Block
In the Object Navigator, click on the Forms branch at the very top. Create a new form by pulling down the File menu and choosing the New menu item. Then choose Form from the flyout menu.
Using the same steps given in the prior section on 6. Creating a Form with a Single Block , create a new block named DEPARTMENT that contains all of the columns in the DEPARTMENT table. Briefly:
- Pull down the Tools menu and choose the Data Block wizard.
- Create a data block for a table/view.
- Specify the DEPARTMENT table and select all of the columns (DNAME, DNUMBER, MGRSSN and MGRSARTDATE).
- Create the data block and then go on to the Layout wizard.
- Apply the Department data block to a new canvas.
- Add all of the columns as Displayed Items.
- Change the labels to:
Dept. Name
Dept. Number
Mgr. Ssn
Mgr. Start Date - Choose a Form layout.
- Specify a frame title of “Departments” and select only 1 record to be displayed.
- Save the form as deptemp.fmb and then compile and run it to make sure it is working properly.
- Use the QBE features to retrieve only those departments with DNUMBER greater than 2. Then, do another QBE query to retrieve only those departments with the letter H in their name (try %H%).
After this first step, the deptemp form should look like the following:

7.2.2 Create the Detail Block
Now that we have the master block DEPARTMENT created, we can now create the detail block EMPLOYEE and associate it with the master block. Perform the following steps:
- Return to the Object Navigator (pull down the Tools menu and choose Object Navigator).
- In the Object Navigator, click on the Data Blocks branch of the DEPTEMP form (do not click on the department data block, however).
- Pull down the Tools menu and choose the Data Block wizard.
Note: If the DEPARTMENT data block (or any of its items) is still selected, activating the Data Block wizard will cause the existing block to be edited instead of creating a new block (which is what is required in this part of the tutorial). - Select the EMPLOYEE table and include the FNAME, LNAME, SSN, BDATE, SALARY and DNO columns.
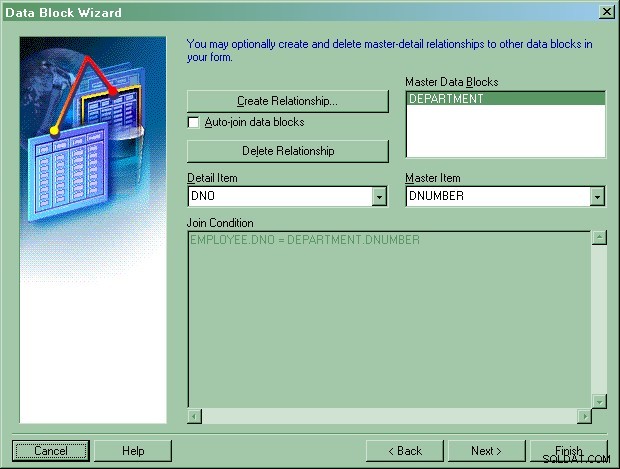
- Because at least one data block already exists in the form, the next step in the wizard will be to create a relationship between the existing data block (DEPARTMENT in this case) and the new block being created.
The wizard can construct the relationship based on table level constraints it learns from the database schema. For example, in the CREATE TABLE and ALTER TABLE statements given at the start of this tutorial, foreign key constraints were specified between DEPARTMENT and EMPLOYEE, and between EMPLOYEE and DEPENDENT. However, such relationships are not always implemented in table level constraints.
The developer can also specify the relationship manually. In this case, the relationship will be specified manually.De-select the Auto-join data blocks option.
Click on the Create Relationship button to list the available data blocks.
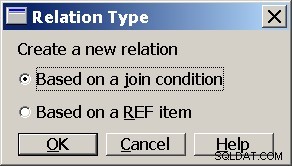
In the next dialog box Relation Type, choose Based on a join condition and click the OK button.
When the list of blocks appears, choose the DEPARTMENT data block.
Arrange the Detail Item (DNO) and Master Item (DNUMBER) such as that the join condition becomes:EMPLOYEE.DNO =DEPARTMENT.DNUMBER
- Name the data block EMPLOYEE.
- Create the data block and then call the Layout wizard.
- Be sure to choose the existing canvas (CANVAS4 in this example) and include all of the items except the DNO as displayed.
The DNO column (item) will still be a part of the EMPLOYEE data block, however, it will not be displayed to the user.

- Touch up the labels for the fields and choose the Tabular layout.
- Give the Frame Title as “Employees” and select 5 Records displayed with 0 distance between records.
- Save the form (it should already have the name deptemp.fmb) and then compile and run it. Note that after compilation, any errors encountered will be displayed.
The following figure shows the master/detail form running:

Notice that by scrolling the master block DEPARTMENT to a new department number (using the up and down arrow keys), the employees for that department are automatically queried and displayed.
To navigate between the Master and Detail blocks, use:
- To go to the next block:Press CTRL-PageDown or pull down the Block menu and choose Next
- To go to the previous block:Press CTRL-PageUp or pull down the Block menu and choose Previous
7.3 Relation Properties of a Master/Detail Form
There are a number of properties in a master/detail form that can be changed to suit particular behavior of the form. In the figure below, the Object Navigator has several new objects on it including Relations .
To view the properties for the DEPARTMENT_EMPLOYEE relation, open up the DEPARTMENT block and then open the Relations block by clicking on the + symbols. Then click on the DEPARTMENT_EMPLOYEE relation with the right mouse button and select Properties.
There are several interesting properties in the relations property sheet:

- Name – The name of the Relation. This is typically made up of the names of the blocks.
- Relation Type – The type of the relation:Join or Ref.
A Join relation uses the typical SQL join (in the Where clause) to bring the two tables (data blocks) together. The Ref relation type is used for abstract data types and object references. - Detail Data Block – The name of the detail data block specified when the detail data block was created.
- Join Condition – This is the join condition in effect for queries to the database. This was specified when the detail data block was created.
- Delete Record Behavior – Used to specify how the deletion of a record in the master block affects records in the detail block. It supports the following settings:
- Non-isolated:Prevents the deletion of a master record if associated detail records exist in the database.
- Isolated:Deleting the master record will not affect the associated detail records in the database.
- Cascading:Deletes the master record and automatically deletes any associated detail records.
- Coordination – Deferred – Indicates when detail records should be queried when a master record is queried.
- Yes:Form does not query the detail records until the user navigates to the detail block.
- No:Detail records are fetched immediately when a user queries the master record.
Deferred is sometimes set to Yes in cases where there are a lot of detail records for each master record. In such cases, a lot of data must be queried and delivered to the client each time a new record is displayed in the master block. When Deferred is set to Yes, the user can scroll down to the master record of interest and then navigate to the detail block (CTRL-PageDown) to query the related detail records.
- Coordination – Auto-query – Applied to deferred queries only
- Yes:the query is automatically executed when the user navigates to the detail block.
- No:the query must be executed manually by the user after they navigate to the detail block.
- Prevent Masterless operation – Specifies whether users are allowed to query or insert records in a detail block when no master record is in place.
- Yes:Users may not query or insert when no master record is in place.
- No:Users may query or insert when no master record is in place.
These settings are used to “tune” the overall performance of a master/detail form. As mentioned above, in cases where a large number of detail records are associated with each master record, it is a good idea to set coordination-Deferred to Yes to avoid unnecessary transfers of data between the server and client. This will also speed up the display of master records as the user can freely scroll through them without a pause to query and deliver the detail records.
7.4 Program Units in a Master/Detail Form
When a Master/Detail form is created, three basic Program Units (PL/SQL Procedures) are created by default. These procedures are used to coordinate the query and navigation of the detail records when the master record is changed (e.g., when the user scrolls to a different master record), updated or deleted. The procedures can be seen listed in the Object Navigator:

PL/SQL is Oracle’s procedural language extensions to SQL. To view the PL/SQL code for a Program Unit, click on the name of the program unit with the right mouse button and then choose PL/SQL Editor from the pop-up menu. The code for the CHECK_PACKAGE_FAILURE procedure is show here:

The CHECK_PACKAGE_FAILURE procedure checks to see if a prior form command or SQL statement was successful or if it failed.
Below is the PL/SQL code for the QUERY_MASTER_DETAILS procedure. The text after the — (two minus signs) are comments.
PROCEDURE Query_Master_Details(rel_id Relation,detail CHAR) IS oldmsg CHAR(2); -- Old Message Level Setting reldef CHAR(5); -- Relation Deferred Setting BEGIN -- -- Initialize Local Variable(s) -- reldef := Get_Relation_Property(rel_id, DEFERRED_COORDINATION); oldmsg := :System.Message_Level; -- -- If NOT Deferred, Goto detail and execute the query. -- IF reldef = 'FALSE' THEN Go_Block(detail); Check_Package_Failure; :System.Message_Level := '10'; Execute_Query; :System.Message_Level := oldmsg; ELSE -- -- Relation is deferred, mark the detail block as un-coordinated -- Set_Block_Property(detail, COORDINATION_STATUS, NON_COORDINATED); END IF; EXCEPTION WHEN Form_Trigger_Failure THEN :System.Message_Level := oldmsg; RAISE; END Query_Master_Details; |
The QUERY_MASTER_DETAILS procedure is executed whenever the user navigates to the detail block in a master detail form. If the Deferred Coordination property is set to false, then the detail block is automatically queried.
Finally, the CLEAR_MASTER_DETAILS procedure is called each time a new master record is retrieved (e.g., when the user scrolls to a different master record) or deleted. In this case, if any of the detail records have been inserted, updated or deleted, the changes must be saved into the database before the detail block can be cleared. If there are any outstanding changes to be saved, the user will be prompted to save those changes before the detail bock is cleared.
7.5 Extending Master/Detail Forms
Master/Detail forms can be extended to include additional levels of details. For example, consider a Customer listing with detail on Orders a customer has placed. For each Order, there are then many Items. An extension to the above example would be to include the DEPENDENTS of the employees as a details of the EMPLOYEES block. The steps outlined above can be repeated allowing several levels of detail to be added. Each additional level of detail will add a new block that is related to the level above it.
7.6 Exercise:Creating a Master/Detail Form
For this exercise, create a Master/Detail form using the EMPLOYEE and DEPENDENT tables. Employee will be the Master block and Dependents will be the Detail block. The join condition between the two tables is where the SSN column of EMPLOYEE is equal to the ESSN column of DEPENDENT.
The following is an outline of the steps:
- Create the Employee data block and include the FNAME, LNAME, SSN, ADDRESS and SEX fields on the form. Use the Form layout and only display one record at a time.
- Go back to the Object Navigator and select the “Data Blocks” tree. Make sure the EMPLOYEE block is not selected and run the Data Block Wizard again.
- Create the Dependents data block and include all of the columns.
For the master/Detail relationship, de-select the “auto” option, use a Join relationship, choose the EMPLOYEE data block as the Master and set DEPENDENT.ESSN =EMPLOYEE.SSN for the join relationship. - In the Layout Wizard for the Dependents data block, display all of the fields except the ESSN field . The ESSN field will remain part of the data block but it will not be visible on the form. Choose a Tabular style and display 4 up to records at once with 0 space between each record.
- Save the form using the name:empdepn.fmb
The completed form should look like the following:

Query the master block and practice navigating between the two blocks using the CTRL-PageDown and CTRL-PageUp keys.
While in the Employee block, scroll to the Employee named JENNIFER WALLACE, navigate to the Dependents block and add a new record for a SON named ANDREW born on 20-OCT-1962. Navigate back to the Employee block and attempt to scroll to another employee record. A prompt should be displayed to save the new Dependent record.
While in the Master block for Employees, scroll to an employee who has some dependents. Try to delete the Employee record and see if an error message appears.
Finally, alter the EMPLOYEE_DEPENDENT relation properties and set the Coordination-Deferred to Yes and then run the form. Notice now that the detail records will not be displayed automatically. Navigate to the Dependents block and hit the Execute query button (or pull down the Query menu and choose Execute). Notice that only those Dependent records matching the Employee are displayed.
8. List of Values (LOVs) and Non-Base Table Fields
It is cumbersome for a user to have to remember various codes and numbers while entering data into a data entry form. For example, in the Employee form, it might be difficult to have all of the department numbers memorized when inserting new employee data.
One solution to this problem is to make a list of appropriate values available when the user navigates to Department Number field (DNO). In Oracle Forms, these are called List of Values (LOVs). The next section will illustrate creating LOVs for fields. These examples are based on the single block Employee form created at the beginning of this tutorial.
To prepare for this part of the tutorial, close any forms you currently have open by pulling down the File menu and selecting the Close menu item.
Once all of the forms are closed, pull down the File menu and choose the Open menu item to open up the employee.fmb form that was created previously.
A List of Values is based on a Record Group . In Oracle Forms, a record group is a query that returns some collection of records. Record groups can be used to populate blocks or LOVs and they can be used in procedures. When the user navigates to an item with an LOV attached to it, the LOV key (F9 in MS Windows) can be pressed to call up the LOV. At that time, the query associated with the record group is executed and the results are displayed in a pop up window. Once the user makes a selection from the list, the value or values are returned to the form and placed in the appropriate fields.
In the example below, a record group and LOV for the DNO (department number) field in the Employee table will be created.
8.1 Creating a List of Values
Creating a List of Values requires 4 basic steps.
8.1.1 Create a new LOV Object
To create an LOV, click on the LOVs node in the Object Navigator. Then pull down the Edit menu and choose the Create menu item. A dialog box will appear asking if you would like to create the LOV manually or if you would like to use the LOV Wizard.

Choose “Use the LOV Wizard” and click the OK button. The first step of the LOV Wizard will appear as below:

The default is set to create a new Record Group based on a query. Make sure this selection is highlighted and then click the Next button.
In most cases, you will not have a record group created previously. However, one can be created on the fly at this point by specifying a query. In this example, enter the LOV query as follows:SELECT dnumber FROM department

Then click on the Next button.
The next step is to specify which columns in the record group will be returned to for use by the LOV. In this example, we only return DNUMBER so select that column as shown below and click Next.

The next step is to specify the display properties of the LOV columns and also to map the LOV item to the field on the form.

To map the LOV column to a field, click on the DNUMBER entry and then click on the “Look up return Item” button. Highlight the EMPLOYEE.DNO field and click on the OK button.

Note that if your LOV contains more than one item, at this time you would also map them as well (this is not the case with this example, but in the next example we will need to map two LOV columns). Click on the Next button.
Specify a title for LOV window (e.g., “List of Department Numbers”). At this point you may also specify the size and positioning of the LOV. For this example, leave them as the defaults and click the Next button.

The advanced properties relate to how the records should be fetched for the LOV. If there are many hundreds or thousands of possible records returned by the LOV, you may consider changing these options. Otherwise, for this example, simply click Next.

In this final step, the LOV is returning some columns and they were assigned to fields on the form in a previous step. At this point, we need to associate the LOV with a particular item on the form. For example, by assigning the LOV to the EMPLOYEE.DNO field, the user will be able to call up the LOV only when the cursor is positioned in the EMPLOYEE.DNO field. Choose EMPLOYEE.DNO and click the Next button.

Finally, click Finish to create the Record Group and the LOV.

In the figure below, the LOV has been created. A default name of LOV6 was given to both the LOV and to its associated record group. Depending on what other parts of this tutorial you have completed, the default name may be slightly different.

Save, Compile and Run the form. When entering new data, navigate to the DNO (Department number) field. Notice at the bottom of the form, a message appears:List of Values indicating a list of values is available for this field.
Under UNIX and under the Java based applet, the key to display the list of values is Control-l (hold down the control key (Ctrl) and press the letter L). To see the appropriate keys to press, pull down the Help menu and choose the Keys item.
Below is an example of the list of values for the DNO item on the Employee form.

8.2 Non-Base Table fields
In the previous example of adding a List of Values, the supplied list of appropriate values can be useful in cases where the values themselves are self-explanatory. However, in the prior example, the department numbers may not have meaning to the user.
It would be more helpful to include the name of the department both in the pop-up list of values and on the form. However, the department name is not part of the EMPLOYEE table or data block. Thus we need a way to display this information on the EMPLOYEE data block in a non base table field .
Adding this item and making it functional will take several steps:
- First the new item will have to be added to the EMPLOYEE data block. We’ll call this new item DEPTNAME.
- Next, the DEPTNAME field should be populated with the department name each time the value of the DNO field changes. A trigger will be created to handle this functionality.
- Finally, the list of values will be changed to include the Department name in the LOV.
8.2.1 Adding a New Item to an Existing Data Block
- Switch to the Layout Editor by clicking on the Tools menu and selecting the Layout Editor menu item.
- Click on the Text Item tool
 and create a new field on the EMPLOYEE block by clicking and dragging the mouse next to the DNO item.
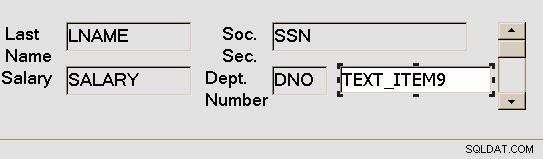
- Display the properties for the new Text Item by double clicking on it. Change its name to DEPTNAME. Change the following properties for DEPTNAME:
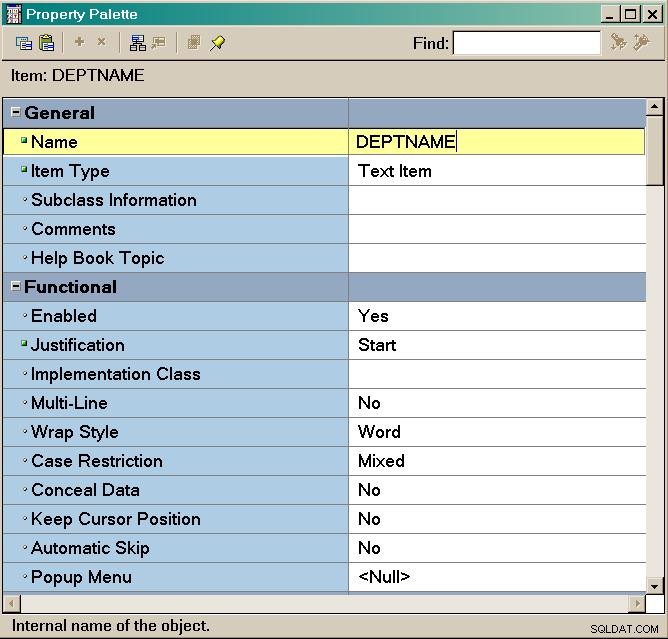
Enabled: Yes
Keyboard Navigable: No
Database Item: No
Query Only: No
Primary Key: No
Insert Allowed: No
Query Allowed: No
Update Allowed: No
- By setting Keyboard Navigable to No , we prevent the user from tabbing into this field. Since this field is not used for data entry or querying, this prevents the potential confusion.
- The Database Item property is set to No which indicates that this filed does not map to an actual column in the EMPLOYEE table.
- The remaining properties are all set to No to keep the field from participating in any of these activities:Delete, Insert, Update and Query.
At this point, the new item DEPTNAME has been added to the EMPLOYEE data block as a non-base table field.
Save the form at this point by pulling down the File menu and choosing the Save option.
8.2.2 Creating a Trigger
Next, a trigger will be created to populate the DEPTNAME field whenever the value of DNO changes. Triggers in Oracle Forms take one of four general forms:
- PRE- Trigger fires before an event is executed.
- POST- Trigger fires after an event is executed.
- WHEN- Trigger fires in place of the execution of an event.
- KEY- Trigger fires when a particular key is pressed.
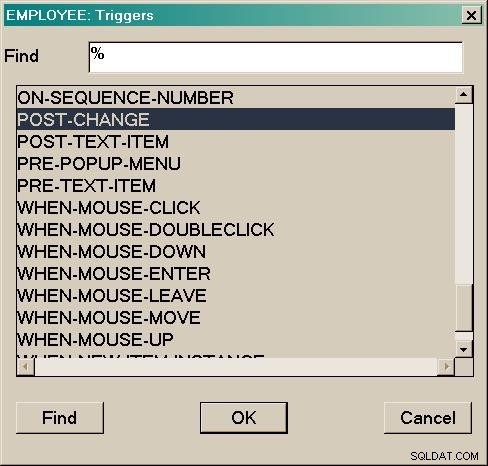
In this example, we would like to populate the DEPTNAME field with the appropriate department name just after the DNO field changes on the EMPLOYEE block. Thus we will use a POST-CHANGE trigger on the :EMPLOYEE.DNO field.
- Switch to the Object Navigator view by clicking on the Tools menu and choosing the Object Navigator menu item.
- Open up the EMPLOYEE data block and the DNO item.
- Click on the Triggers property and create a new trigger by pulling down the Edit menu and choosing the Create menu item.
- A list of possible trigger names appears. Choose the POST-CHANGE trigger and click on the OK button.
- When the PL/SQL editor appears, type the following PL/SQL code:
        -- Populate the non-base table field :EMPLOYEE.DEPTNAME
        -- using a value from the DEPARTMENT table.
        BEGIN
        SELECT DNAME
        INTO   :EMPLOYEE.DEPTNAME
        FROM   DEPARTMENT
        WHERE  DEPARTMENT.DNUMBER = :EMPLOYEE.DNO;
        END;
Items on a block are preceded by a full colon to differentiate them from columns in a table.
- Compile the trigger by clicking on the Compile button (this icon is in the upper left corner of the PL/SQL editor window).
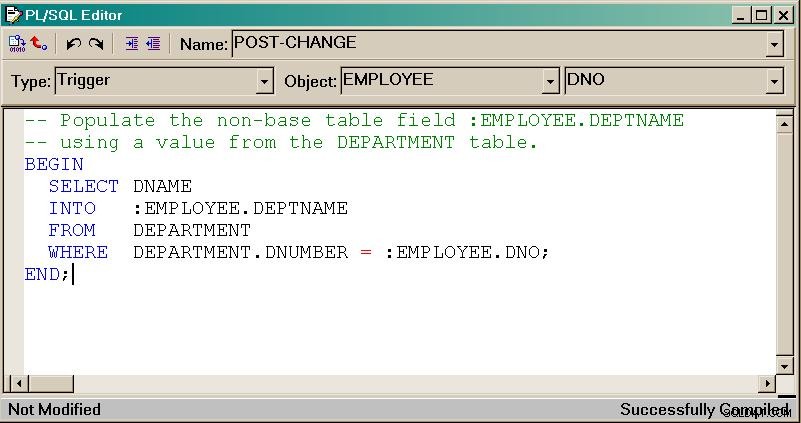
- Close the PL/SQL editor by clicking on the Close button.
Save, compile/build and run the form to test the functionality. Notice that when the EMPLOYEE block is queried, the associated department name now appears in the new DEPTNAME field. Each time the DNO field is changed, the POST-CHANGE trigger will fire and will fetch the appropriate DNAME column from the DEPARTMENT table and place it in the DEPTNAME field on the form.

8.2.3 Create a new List of Values with descriptions
Finally, a new list of values should be created to display both the department number and name when the user calls up the LOV.
If you completed the previous section on creating the simple LOV, use the Object Navigator to delete this LOV before proceeding with this section.
- From the Object Navigator, click on the LOVs for the EMPLOYEE form. Pull down the Edit menu and choose the Create menu item. Choose the LOV Wizard.
- Type the following SQL statement into the Query Text field:
SELECT DEPARTMENT.DNUMBER, DEPARTMENT.DNAME FROM DEPARTMENT
Then click on the Next button.
Include both the DNUMBER and DNAME columns from the Record Group in the LOV.
Map the DNUMBER LOV column to the :EMPLOYEE.DNO text item and map the DNAME LOV column to the :EMPLOYEE.DEPTNAME text item (created in the previous section). - Give a title for your list of values and return both DNUMBER and DNAME from the LOV.
- Finally, Save, Compile and Run the form. Note that displaying the LOV for the DNO item now causes both the department number and the name to appear.

8.3 Exercise:Creating an LOV and Non-Base table field
For this exercise, create a new, single data block form based on all of the columns in the DEPARTMENT table. Then add a non-base table field for the last name of the department manager and create an LOV to populate it:
- Create a new form called departmg.fmb that includes all of the columns in the DEPARTMENT table. In the layout wizard, use the Tabular layout and display 5 Records in the form. Add a scrollbar.
- In the Layout Editor, create a new text item called MGR_LAST_NAME in the DEPARTMENT data block. Be sure the DEPARTMENT block is selected when the new item is created. Change the properties of MGR_LAST_NAME so it is not a Database item.
Add a text label to this new MGR_LAST_NAME field. - Create a list of values called LOV_MGR based upon the query:
SELECT ssn, lname FROM employee
Map the employee.ssn column to the :DEPARTMENT.MGRSSN field.
Map the employee.lname column to the :DEPARTMENT.MGR_LAST_NAME field. - Create a POST-CHANGE trigger on the MGRSSN item so that when it changes, the following code will execute:
    SELECT lname
    INTO   :DEPARTMENT.MGR_LAST_NAME
    FROM   employee
    WHERE  employee.ssn = :DEPARTMENT.MGRSSN;
This will automatically populate the non base table field MGR_LAST_NAME on the form when the form is queried.
The form should look like the following:

9. Oracle Forms Program Units and Stored Program Units
Oracle Forms provides a mechanism to store procedures (called Program Units) written in the PL/SQL language within a form. Program Units can be used to add functionality that is not possible through Structured Query Language (SQL) or through the Oracle Forms interface. Some examples of Program Units were given in the discussion on Program Units in a Master/Detail Form. By storing a Program Unit within a form, many blocks in the form can take advantage of the same procedure which reduces code duplication and improves the maintainability of the code.
Procedures written in PL/SQL may also be stored within the Oracle Database itself as an object in the schema. Such Stored Program Units (also called Stored Procedures) are ideal for situations where highly standardized business rules or applications logic must be implemented across many forms or applications. In addition, procedures that require several queries be made to the database may be best implemented in the database as this reduces the network traffic and can significantly improve performance. A user may create stored procedures with the Oracle SQL*Plus command line tool. You may wish to first go through the Stored Procedures and Triggers section of the Oracle SQL*Plus Tutorial
Oracle Forms can make calls to both internal Program Units as well as to Stored Program Units. This flexibility allows application designers extensive control over the execution of applications and facilitates performance tuning.
In the following sections, examples of Oracle Forms Program Units and Stored Program Units will be given.
9.1 Creating Program Units in Oracle Forms
In this section, we will augment the EMPLOYEE form by adding a count of other members of a given employee’s department. To add this functionality, we will add a new field item to the EMPLOYEE block, write a Procedure in PL/SQL to gather the data and then write a Trigger that will call the Procedure each time a new Employee record is queried.
9.1.1 Add a new item to the EMPLOYEE Block
Add a new item on the EMPLOYEE block to store the count of other employees in the department. See the section on Adding a New Item to an Existing Block for details.
Call this field OTHER_MEMBERS . Be sure it is a non-database field and that a user will not be able to navigate there, insert, update or delete data in the field. Go to the Properties and check each of them:
Enabled: True
Navigable: No
Database Item: No
Query Only: No
Primary Key: No
Insert Allowed: No
Query Allowed: No
Update Allowed: No
Add a label to this field by switching to the Layout Editor, choosing the text tool and clicking next to the OTHER_MEMBERS field.

9.1.2 Create a Procedure to Count Other Department Members
In this step, create a Program Unit (procedure) in Oracle Forms to count the number of other members in the same department. For this procedure, we will pass in a parameter called IN_EMPLOYEE_SSN that will contain an employee’s social security number. The procedure will return a value in the parameter OUT_COUNT_OTHER_MEMBERS that will contain the number of other employees who are in the same department.
To create this procedure, switch to the Object Navigator and scroll down to the Program Units branch. Pull down the Edit menu and choose the Create menu item. A dialog box will appear asking you to name the new procedure. Type in the name OTHER_DEPARTMENT_MEMBERS and click on the OK button.
At this point, the PL/SQL editor will appear. Type in the following procedure body. An explanation of each part of the procedure is given afterwards:
-- Given an Employee's SSN, return the number of other employees
-- in the same department.
PROCEDURE OTHER_DEPARTMENT_MEMBERS (IN_EMPLOYEE_SSN IN NUMBER,
  OUT_COUNT_OTHER_MEMBERS OUT NUMBER) IS

TEMP_COUNT NUMBER;   -- Placeholder for count

BEGIN
  TEMP_COUNT := 0;     -- Initialize to 0

  --  Try and fill TEMP_COUNT with the count of other
  --  Employees in the department
  SELECT COUNT(*)
  INTO   TEMP_COUNT
  FROM   EMPLOYEE
  WHERE  EMPLOYEE.DNO =
  (SELECT EMPLOYEE.DNO
  FROM   EMPLOYEE
  WHERE  EMPLOYEE.SSN = IN_EMPLOYEE_SSN);

  -- See if we got a meaningful result
  IF (NVL(TEMP_COUNT, 0) <> 0) THEN
    OUT_COUNT_OTHER_MEMBERS := (TEMP_COUNT - 1 );
  ELSE
    OUT_COUNT_OTHER_MEMBERS := 0;
  END IF;
END; |
The procedure is written in three main sections. Any lines starting with — are comments and are ignored by Oracle forms.
The heading for the procedure definition indicates that one parameter, IN_EMPLOYEE_SSN, is a NUMBER data type and the procedure should expect a value to be passed in. The other parameter, OUT_COUNT_OTHER_MEMBERS, is also a NUMBER data type and a value will be passed back to the calling program through it.
To finish off the procedure header, the TEMP_COUNT variable is declared for use within this procedure only.
The BEGIN statement starts the body of the procedure. TEMP_COUNT is initialized to 0 and then a query is performed on the database to find the total number of employees in the same department as the employee whose SSN was supplied to the procedure.
The result in TEMP_COUNT is checked to see if it is a NULL value. If TEMP_COUNT is not NULL and it is not 0, then OUT_COUNT_OTHER_MEMBERS is set to equal TEMP_COUNT-1. Otherwise OUT_COUNT_OTHER_MEMBERS is set to 0.
The last END statement ends the body of the procedure.
Be sure to check to see that the procedure compiles by clicking on the Compile button. Any errors in the procedure will be highlighted. Some common problems include forgetting to use :=in an assignment statement (like the Pascal language) and leaving off the END IF to finish up IF … THEN statements.
When done, click on the Close button to close the PL/SQL editor.
9.1.3 Create a Trigger to Call the Procedure
Create a trigger to call the OTHER_DEPARTMENT_MEMBERS procedure. In the Object Navigator, open up the EMPLOYEE block and the SSN item. Highlight the Trigger branch for the SSN item, pull down the Edit menu and choose the Create menu item.
A pop up list of trigger names will appear. Choose POST-CHANGE and click on the OK button to open the PL/SQL editor for this new trigger. Type in the following code for the POST-CHANGE trigger on the SSN item:
      DECLARE
  	  return_count NUMBER;
        BEGIN
          -- Call the Forms Procedure to get the
          -- count of others in the department.
          OTHER_DEPARTMENT_MEMBERS(:EMPLOYEE.SSN, return_count);
          -- Assign the return count to the field on
          -- the EMPLOYEE block.
          :EMPLOYEE.OTHER_MEMBERS := return_count;
END; |
Again, click on the Compile button to be sure the trigger compiles correctly and then click on the Close button to return to the Object Navigator.
9.1.4 Save, Compile/Build and Run the Form
To this point, we have added a new non-base table field to the EMPLOYEE block, written a procedure (Program Unit) to count other employees in the same department and added a trigger to call the procedure each time a new employee record is queried.
To save you work, use the Save As menu item on the File menu and save this form under the name:emp_memb.fmb
Save, Compile/Build, and Run the form to check its functionality. Note that when scrolling to a new employee’s record, the OTHER_MEMBERS field is automatically populated with values indicating the number of other employees in the same department.

9.2 Creating Stored Procedures in SQL*Plus
In the previous example, we added a procedure (Program Unit) in Oracle Forms to perform a query on the database. The procedure is stored as part of the form’s source code and is compiled when the form is built. Upon examination, each call of this procedure produces:
- A local call from the POST-CHANGE trigger to the procedure passing an employee’s SSN.
- A remote access from the procedure to the database passing a SQL query.
- A remote return from the database containing a count.
- A small amount of processing in the procedure (IF … THEN).
- A local return from the procedure to the trigger.
In this exchange, the highest costs are incurred by the network traffic required to go back and forth between client and server (steps 2 and 3). The lowest costs are incurred by the local calls between trigger and procedure and the local processing (steps 1, 4 and 5).
In this example, the SQL Query in steps 2 and 3 does not return a significant amount of data. However, there are situations where, if a large amount of data were to be returned for each query, such queries would severely impact performance.
One solution to this problem is to move the queries and as much processing as possible “closer” to the data in the database. Thus our example for this section will be
to implement the OTHER_DEPARTMENT_MEMBERS procedure in the Oracle database. To achieve this, we will need to use Oracle SQL*Plus (a command-line tool) to create a stored procedure.
Log in to SQL*Plus and enter the following CREATE PROCEDURE statement. Alternatively, save this statement in a text file and execute it using the START command in SQL*Plus.
CREATE PROCEDURE OTHER_DEPARTMENT_MEMBERS
 (IN_EMPLOYEE_SSN IN NUMBER,
  OUT_COUNT_OTHER_MEMBERS OUT NUMBER)  AS
  -- Given an Employee's SSN, return the number of other employees
  -- in the same department.
TEMP_COUNT NUMBER;   -- Placeholder for count

BEGIN
  TEMP_COUNT := 0;     -- Initialize to 0
  --  Try and fill TEMP_COUNT with the count of other
  --  Employees in the department
  SELECT COUNT(*)
  INTO   TEMP_COUNT
  FROM   EMPLOYEE
  WHERE  EMPLOYEE.DNO =
    (SELECT EMPLOYEE.DNO
    FROM   EMPLOYEE
    WHERE  EMPLOYEE.SSN = IN_EMPLOYEE_SSN);

  -- See if we got a meaningful result
  IF (NVL(TEMP_COUNT, 0) <> 0) THEN
    OUT_COUNT_OTHER_MEMBERS := (TEMP_COUNT - 1 );
  ELSE
    OUT_COUNT_OTHER_MEMBERS := 0;
  END IF;
END; |
After typing in this statement, be sure to RUN the command in the SQL*Plus buffer by typing RUN or by typing the forward slash /
Note:While creating a stored procedure, you may receive an error similar to the following:
ORA-01031: insufficient privileges
This indicates the DBA has not granted you the authorization to create stored procedures. Please contact your DBA to obtain this authorization.
To see if the procedure compiled correctly, look in view USER_ERRORS as follows:
SQL> SELECT * FROM user_errors;

no rows selected
If the message no rows selected appears, then no errors were found in the trigger.
Another alternative is to use the SQL*Plus command called show errors . After submitting a trigger or a stored procedure, any errors found during compilation can be displayed using the show errors kommando.
In some versions of SQL*Plus, the show errors command will not work due to a lack of buffer memory on the client computer. An error message may appear as in the
following example:
SQL> CREATE PROCEDURE test AS 2 BEGIN 3 SELECT SYSDATE INTO :temp FROM dual; 4 END; 5 / Warning: Procedure created with compilation errors. SQL> show errors buffer overflow. Use SET command to reduce ARRAYSIZE or increase MAXDATA. No errors. |
If the buffer overflow message appears, set the ARRAYSIZE variable to a lower number such as 2 with the following command:
SQL> SET ARRAYSIZE 2
Then use the show errors command as described:
SQL> show errors Errors for PROCEDURE TEST: LINE/COL ERROR -------- -------------------------------------------- 3/23 PLS-00049: bad bind variable 'TEMP' |
To see what stored procedures you have created, query the USER_SOURCE view in the data dictionary.
The only major difference between the stored procedure created in the database schema through SQL*Plus and the procedure created in Oracle Forms is the way the header is formatted. Creating a stored procedure uses the following syntax:
CREATE PROCEDURE OTHER_DEPARTMENT_MEMBERS
 (IN_EMPLOYEE_SSN IN NUMBER,
  OUT_COUNT_OTHER_MEMBERS OUT NUMBER)  AS
Contrast this with the procedure done in Oracle Forms:
PROCEDURE OTHER_DEPARTMENT_MEMBERS
 (IN_EMPLOYEE_SSN IN NUMBER,
  OUT_COUNT_OTHER_MEMBERS OUT NUMBER) IS
Once the OTHER_DEPARTMENT_MEMBERS procedure (Program Unit) has been created in SQL*Plus, it is stored as an object in your schema and will remain there until a DROP PROCEDURE OTHER_DEPARTMENT_MEMBERS statement is issued. Any Oracle Form, Report or other procedure can make calls to OTHER_DEPARTMENT_MEMBERS as if it were a local procedure.
To see the stored procedure in action, open the emp_memb.fmb form and remove (delete) the Program Unit (procedure) OTHER_DEPARTMENT_MEMBERS from it. Save the form, compile, generate and run it.
The POST-CHANGE trigger on :EMPLOYEE.SSN will automatically make a call to the stored procedure version of OTHER_DEPARTMENT_MEMBERS located in the schema.
To view the available Stored Program Units from within Oracle Forms, switch to the Object Navigator and open up the Database Objects tree. From there, a list of schemas (users) will appear. Scroll down to your username and open it up. Then open up the Stored Program Units tree. A list of your stored procedure should then appear.
9.3 Additional Stored Procedures and Triggers
There are countless ways in which stored procedures and triggers can be used to enforce business rules and to process data in an application. In this section, a few of the most commonly used triggers and procedures are described.
9.3.1 Generating unique or consecutive identifiers using the table
Many of the keys used in tables are based on a number sequence. For example, in our DEPARTMENT table, the DNUMBER is an integer that should increase for each new department. To automatically generate a new DNUMBER, create a query to capture the largest current DNUMBER value and add 1 to it. Then assign this new value to the DNUMBER item in the DEPARTMENT data block. A trigger to do this could be created at the block level and should execute before any new record is inserted into the database. A PRE-INSERT trigger on the DEPARTMENT data block would be used for this example:
BEGIN
  SELECT MAX( dnumber ) + 1
  INTO :department.dnumber
  FROM  department;
END;
A PRE-INSERT trigger executes just before the INSERT statement for a new record is sent to the database.
9.3.2 Generating unique or consecutive identifiers using an Oracle Sequence
One problem with the above method is that many users working on the same form to insert new records will run into concurrency problems. For each new record to be inserted, a full table scan must be done to find the largest identifier.
One solution to this problem is to use an Oracle Sequence. An Oracle Sequence is a schema object that keeps track of a simple integer and automatically increments this counter when it is accessed.
For example, in our DEPARTMENT table, the DNUMBER is an integer that should increase for each new department. To automatically generate a new DNUMBER, create an Oracle Sequence using the SQL*Plus tool:
CREATE SEQUENCE department_seq
INCREMENT BY 1
START WITH 1
MAXVALUE 99999
NOCYCLE;
The above department_seq sequence will begin counting from 1 and increment by 1 until it reaches 99999. After that, accessing the sequence will produce an error. This is reasonable since it is highly unlikely an organization will ever have more than 99999
departments.
The next step is to assign the next value of the sequence to the DNUMBER item in the DEPARTMENT data block. A trigger to do this would be created at the block level and should execute before any new record is inserted into the database. A PRE-INSERT trigger on the DEPARTMENT data block would be used for this example:
BEGIN
  -- Get the next value for DNUMBER from the
  -- department_seq sequence.
  SELECT department_seq.nextval
  INTO :department.dnumber
  FROM  dual;
END;
The dual table is a dummy table that appears in every Oracle schema. It contains exactly one record (row). We can use it in a SELECT…INTO statement to consistently return a single value.
The nextval accessed in the sequence will return the current sequence value and then automatically increment it to the next value.
A PRE-INSERT trigger executes just before the INSERT statement for a new record is sent to the database.
Oracle Sequences are not applicable for master/detail forms such as purchase orders where an item number needs to be assigned in the detail table. For example, purchase
order items are typically numbered:1, 2, 3... . The next PO will also number the items 1, 2, 3, ... . An Oracle Sequence is designed to deliver unique identifiers for primary keys and should not be used for such item numbers.
9.3.3 Checking constraints at the client
In any database system, it is always desirable to constrain the values certain columns can take on. It is possible to add constraints to the database tables themselves in order to enforce constraints, however, the enforcement only takes place when a
transaction reaches the database. In addition, many constraints on the data that involve values of data from other tables may not be easily implemented as table constraints.
Many types of constraints on data can be checked in the client using triggers. For example, in an EMPLOYEE data entry form, we may want to enforce a constraint that no employee can act as their own supervisor. Thus for any record, SSN may not equal SUPERSSN. To implement such a constraint, add the SUPERSSN item to the EMPLOYEE form (or simply create a new form from scratch using the wizard that includes both SSN and SUPERSSN columns) and then create a WHEN-VALIDATE-ITEM trigger on the SUPERSSN item in the EMPLOYEE data block:
BEGIN
  IF (:SUPERSSN = :SSN) THEN
    MESSAGE('Employees may not supervise themselves!');
    RAISE FORM_TRIGGER_FAILURE;
  END IF;
END;
The FORM_TRIGGER_FAILURE will cause the execution of the item validation to be halted and the user will have to change the SUPERSSN before moving on to another item.
9.3.4 Adding Alerts (Pop-up Messages)
In the previous example, the MESSAGE procedure is used to display the error along the status bar at the bottom of the Forms window. A better approach may be to force the user’s attention to the problem. This can be accomplished by creating a pop-up dialog box that forces the user to read the message and click an OK button (or some other button). In Oracle Forms, this is called an Alert.
To set up an Alert:
- Use the Object Navigator to display the Alerts area. Pull down the Navigator menu and choose Create. Click on the default name that is given for the new alert (something
like ALERT4) and rename it:SUPERVISOR_ALERT - Bring up the Property Palette for this Alert and fill in the following properties:
Title: Supervisor Alert Message
Message: Employees may not supervise themselves!
Alert Style: STOP
Button 1 Label: OK
Leave the Button 2 Label and the Button 3 Label blank
Default Alert button: Button 1
Leave all of the other properties with their defaults and close the Property palette. - Change the above WHEN-VALIDATE-ITEM trigger on the SUPERSSN item in the EMPLOYEE data block to:
DECLARE
return_alert NUMBER;
BEGIN
  IF (:SUPERSSN = :SSN) THEN
     return_alert := SHOW_ALERT ('SUPERVISOR_ALERT');
     RAISE FORM_TRIGGER_FAILURE;
  END IF;
END;
The SHOW_ALERT procedure calls up the specified alert and obtains the return value (based on the button the user clicks on) to assign to a local variable called return_alert .
Below is an example of the Alert in action:

In general, Alerts may provide several different buttons for the user to click on. For example, to confirm exiting a form, a POST-FORM trigger might invoke an “Are you sure you want to Exit” Alert with “Yes” and “No” buttons. Or, to confirm deleting a record, a PRE-COMMIT trigger might invoke an “Are you sure you want ot delete this Employee?” Alert with “Yes” and “No” buttons. Based on the return_alert value, either a commit or rollback might be issued.
9.3.5 Automatic Forms Query
As discussed earlier in the tutorial, by default, when a form runs, the underlying table data is not automatically queried and displayed. It is up to the user to execute a query, for example, by pulling down the query menu and choosing Execute.
To automate this process, create a WHEN-NEW-FORM-INSTANCE trigger that navigates to the master data block and then issues the EXECUTE_QUERY built-in procedure. For example, assuming the master block is named “EMPLOYEE”, the following code will cause a query to be executed immediately after the form opens:
BEGIN
  GO_BLOCK('EMPLOYEE');
  EXECUTE_QUERY;
END;
9.3.6 Populate items with default values
There are many cases where default values can be suggested for certain data items based upon values already supplied in other data items. The method here is to use a POST-ITEM
or WHEN-VALIDATE-ITEM trigger to populate another field, only if the other field is currently blank. For example, to populate the SUPERSSN data item of the EMPLOYEE block based upon the MGRSSN of the employee’s department, the following WHEN-VALIDATE-ITEM trigger code might be used on the DNO data item:
BEGIN
  IF :SUPERSSN IS NULL THEN
    SELECT department.mgrssn
    INTO   :employee.superssn
    FROM   department
    WHERE  department.dnumber = :employee.dno;
  END IF;
END;
Note that the IF statement uses :SUPERSSN IS NULL to check to see if any value has been supplied for SUPERSSN. If nothing was typed into the SUPERSSN data item, then its value is NULL. If the user types anything at all into the SUPERSSN data item, then the IF statement will evaluate to false and no value will be suggested.
9.3.7 Attaching functionality to command buttons
Command buttons can be added on a form to carry out functions such as exiting a form, committing/saving changed records and so on. The basic command button object contains properties for the button Label (the text provided on the button itself). Additional properties include visual attributes including the ability to display a bitmap image in place of the button’s normal appearance.
Once a button has been physically placed on a form, functionality is added but writing a WHEN-BUTTON-PRESSED trigger. As one might expect, this trigger executes when the user clicks on the button. So, for example, to create a button to exit the form when the user clicks on it the WHEN-BUTTON-PRESSED trigger might look like:
DECLARE
  return_alert NUMBER;
BEGIN
  return_alert := SHOW_ALERT ('EXIT_ALERT');
  IF (return_alert = alert_buttin1) THEN
    EXIT_FORM;
  END IF;
END;
The above code assumes there is an Alert called EXIT_ALERT with two buttons:“Yes” and “No”. If the user clicks on the first button (“Yes”) then the EXIT_FORM procedure is called and the form will exit (close). If the user clicks on any other button, then the Alert will close and the form will remain open.
9.3.8 Passing parameters between forms
There are many occasions that require the passing of data from one form to another. One such example is when we query a certain record on one form and then wish to call up another form with the same record automatically retrieved. In general, data values can be passed between forms using GLOBAL variables (treat :GLOBAL as a block available in all forms) or by using Parameter lists. In the example, below, the parameter list features will be used to demonstrate how data can be passed from one form to another.
For this example, we wil make use of two forms:A basic EMPLOYEE form with all fields and the EMPLOYEE/DEPENDENT master/detail form (created in a previous exercise –
the file name should have been empdepn.fmb ).
The idea is to place to button on the EMPLOYEE form that when pressed, will call the EMPLOYEE/DEPENDENT form and automatically query the dependents for the employee being viewed on the EMPLOYEE form. The main steps are:
- On the EMPLOYEE form, create a button and label it “Query Dependents”.
Create a WHEN-BUTTON-PRESSED trigger with the following code (comments are enclosed in the code):DECLARE -- Declare pl_id as the identifier for the parameter list pl_id ParamList; BEGIN -- See if that parameter list already exists. If so, destroy it pl_id := Get_Parameter_List('tmpdata'); IF NOT Id_Null(pl_id) THEN Destroy_Parameter_List( pl_id ); END IF; -- Create a fresh parameter list */ pl_id := Create_Parameter_List('tmpdata'); -- Add a new parameter to this list called EMPLOYEESSN -- Assign this parameter the current value of the :SSN field Add_Parameter(pl_id, 'EMPLOYEESSN', TEXT_PARAMETER, :SSN); -- Now run a new form called 'empdepn' (must be in the same -- directory as the employee form we are now editing.) -- Pass along the identifier of our parameter list (pl_id) Run_Product(FORMS, 'empdepn', SYNCHRONOUS, RUNTIME, FILESYSTEM, pl_id, NULL); -- Note: In newer version of Forms, you may need to call -- formsid := FIND_FORM_OBJECT('empdepn'); -- view_forms := RUN_FORM_OBJECT(formsid, pl_id); -- or if running a Report from a form you may need to call: -- reportid := FIND_REPORT_OBJECT('myreport'); -- view_report := RUN_REPORT_OBJECT(reportid, pl_id); -- Note that 'myreport' must be created under the Reports entry in the -- Object Navigator in Forms END;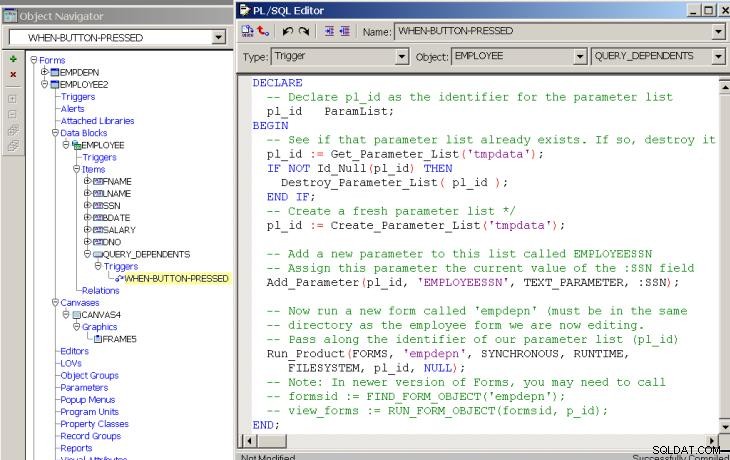
Note:In 9iDS, you may need to use either RUN_REPORT_OBJECT or RUN_FORM_OBJECT .Important note:You may also have to include the full path of to the file name of the form you are launching with the Run_Product function call. Till exempel:
 Run_Product(FORMS, 'd:\myfiles\empdepn', SYNCHRONOUS, RUNTIME,
     FILESYSTEM, pl_id, NULL);
If you receive error FRM-40010 Cannot read form empdepn.fmx then you will need to include the full directory path to where your forms are located. Make sure the path does not contain spaces (such as “My Documents “).
- Compile and save this form.
- Now open up the empdepn (EMPLOYEE/DEPENDENT) form.
- Using the Object Navigator, create a new PARAMETER called EMPLOYEESSN. This parameter will automatically be assigned a value based on the parameter list passed to the form by the above RUN_PRODUCT procedure call.
- Create a new trigger called WHEN-NEW-FORM-INSTANCE. This trigger will execute whenever the form is first run.
DECLARE
-- Declare a forms block identifier
blk_id Block;
BEGIN
  -- Obtain the block ID of the EMPLOYEE block.  This is the
  -- Master block in the empdepn master/detail form.
  blk_id := Find_Block('EMPLOYEE');
  IF NOT Id_Null(blk_id) THEN
    -- Check to make sure our parameter has a value. If this form
    -- were executed by itself, then the parameter will be null.
    -- If this form is called from EMPLOYEE then the parameter will
    -- be passed along and assigned to: PARAMETER.employeessn
    IF (:PARAMETER.employeessn is not null) THEN
        -- Since we have a parameter, use it to alter the WHERE Clause
        -- property so that it becomes WHERE ssn=:PARAMETER.employeessn
        SET_BLOCK_PROPERTY(blk_id,DEFAULT_WHERE,'ssn=' || : PARAMETER.employeessn);
        -- Navigate to the EMPLOYEE block and execute a query automatically
        GO_BLOCK('EMPLOYEE');
        EXECUTE_QUERY;
    END IF;
  END IF;
END;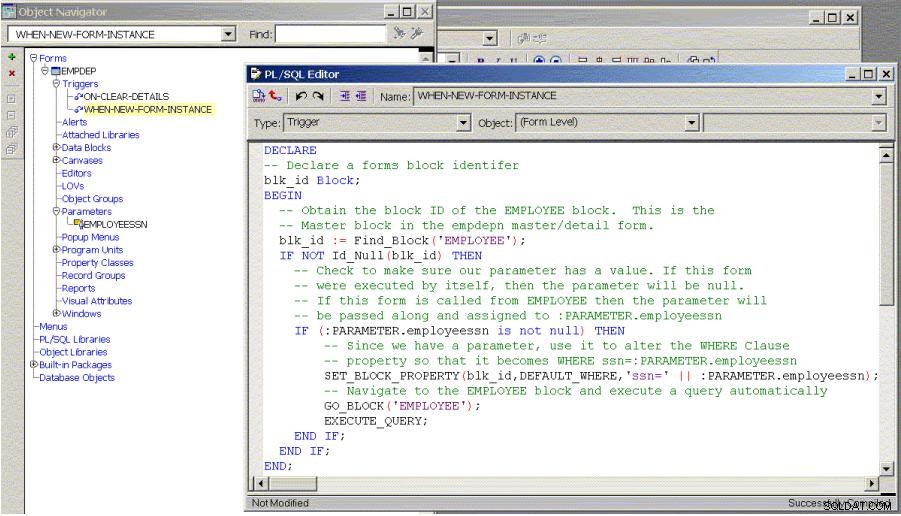
- save and Compile the empdepn form.
- Now run the EMPLOYEE form, query an employee record and click on the “Query Dependents” button. The empdepn form should appear with the dependents automatically queried.
The above examples are just a few of the great many things one can do with Oracle Forms. The on-line help that ships with Forms contains many example forms and example pieces of code (see the Forms PL/SQL Reference) that go far beyond the simple techniques demonstrated above.
9.4 Exercise:Procedures and Triggers
The following are some suggested exercises using various combinations of triggers and procedures:
- Use a simple Department data entry form and create an Oracle Sequence (using SQL*Plus) that will generate new Department numbers for the DEPARTMENT table. Add the
requisite PRE-INSERT trigger code to insert a unique DNUMBER each time a new department record is created. - Add a WHEN-NEW-FORM-INSTANCE trigger to the above Department form that will automatically query the DEPARTMENT table when this form is opened.
- Use a simple Employee data entry form and create an alert that displays a warning if an employee’s salary is larger than their supervisor’s. In a WHEN-VALIDATE-ITEM trigger, run a query to check if the employee’s salary is greater than their supervisor’s and if so, show the alert.
- Use the Employee/Dependent Master/Detail form you created in exercise 7.6 and put in some validation code that will check to make sure if a DEPENDENT is a SON or DAUGHTER, then the DEPENDENT’s BDATE must be less than the EMPLOYEE’s BDATE. If this is not the case, show an alert.
- After you learn how to create Reports (see the next section) create a simple DEPARTMENT data entry form with a button that, when pressed, will run a report for that department (show all employees for example) by passing along the DNUMBER as a parameter.
Note that you will need to use some code in your button similar to the following:DECLARE reportid REPORT_OBJECT; view_report VARCHAR2(100); report_result VARCHAR(30); rep_status VARCHAR2(20); -- Declare pl_id as the identifier for the parameter list pl_id ParamList; BEGIN -- NOTE: In order to launch a report from Forms, you must have the Reports server -- running on your local machine. -- At a DOS prompt type: rwserver -install localhost autostart=yes -- This will install a reports server for your machine (localhost) and start it up. -- Next, create a Reports Object in Forms Object Navigator. -- This is named "MYREPORT" for this example. This reports -- object will have properties including the path to the actual -- report file (.rdf file) you want to run. pl_id := Get_Parameter_List('tmpdata'); IF NOT Id_Null(pl_id) THEN Destroy_Parameter_List( pl_id ); END IF; -- Create a fresh parameter list pl_id := Create_Parameter_List('tmpdata'); -- Add a new parameter to this list called MYDNUMBER -- Note that in the report being called (empreport.rdf) the -- report query should use :MYDNUMBER in the WHERE clause -- as in SELECT * FROM employee WHERE dno = :MYDNUMBER -- Assign this parameter the current value of the : DNUMBER field Add_Parameter(pl_id, 'MYDNUMBER', TEXT_PARAMETER, : DNUMBER); -- Now execute the report object. This object must be created -- in the Object Navigator under REPORTS (just below "Record Groups") report_result := RUN_REPORT_OBJECT('MYREPORT', pl_id); -- Check on the report status and loop until it is done rep_status := REPORT_OBJECT_STATUS(report_result); WHILE rep_status in ('RUNNING','OPENING_REPORT','ENQUEUED') LOOP rep_status := report_object_status(report_result); END LOOP; -- When the report is done, open up a new window and display it IF rep_status = 'FINISHED' THEN WEB.SHOW_DOCUMENT('https://localhost:8888/reports/rwservlet/getjobid' || substr(report_result,instr(report_result,'_',-1)+1) || '?' || 'server=localhost','_blank'); END IF; END;
10. Oracle Reports Basics
We now turn our attention to another Developer tool called Oracle Reports. Oracle Reports is part of the Oracle 9i Developer Suite and Oracle 10g Developer Suite. The Oracle 11g version of Reports was rolled into the Oracle 11g Reports Services that is part of Oracle Fusion Middleware.
The Oracle Reports Builder allows the developer to create sophisticated reports in a variety of layouts and contains many customization features. In this section, the basic steps for creating a simple report and a Master/Detail report will be given.
10.1 Starting Developer tools under Windows 2000/XP/7
A typical installation of Developer creates several folders under the Start Programs menu.
To run Oracle9i or Oracle 10g Reports Builder under Windows, click on the Start -> Programs -> Oracle9i Developer Suite – Home -> Reports Developer -> Reports Builder menu item.
Under UNIX, run the rwbuilder.sh script.
An initial screen will appear:

Click on the Cancel button to proceed directly to the Object Navigator.
10.2 The Oracle Reports Object Navigator
The Oracle Reports main screen is called the Object Navigator (similar to Oracle Forms) and can be seen in the following figure:

The main sections of the Object Navigator are:
- Reports which include:
- Data Model – Contains information about queries used for a report.
- Web Source – A web page or web service that returns a data set.
- Paper Layout – Contains information about how a paper or screen a report is formatted including headers, footers, margins, fonts, etc.
- Paper Parameter Form – Contains information about the initial screen that is displayed when a form first runs.
- Report Triggers – PL/SQL code that can be executed before, during or after a report has been executed.
- Program Units
- Attached Libraries
- Templates – Existing templates that can be used to create new reports.
- PL/SQL Libraries – Libraries of PL/SQL code.
- Debug Actions – Actions the debugger is scheduled to track.
- Stack – The current state of execution of a procedure.
- Built-in Packages – The built-in packages already in the database.
- Database Objects – Tables, sequences, views, etc.
As with Oracle Forms, the first step in using Oracle Reports is to Connect to an Oracle server. This is accomplished by pulling down the File menu and selecting the Connect menu item.
Fill in your Oracle Username and Oracle Password (press the tab key to move between the fields).
For the Database field, type in the service name for your Oracle database. For example, if you are using Personal Oracle Lite, the Database:would be ODBC:POLITE. Contact your system administrator to learn the service name for your Oracle database and provide that information in the Database:field.
Click on the Connect button to complete the connection (Under some versions of UNIX, the button is labeled OK). If the user name or password is mistyped or incorrect, the dialog box will be re-displayed. Be sure to provide your Oracle username and password (not your UNIX host password).
10.3 Creating Reports in Oracle Reports
Creating reports follows a 4 step process:
- Define the Data Model – This step specifies which queries should be run on the database including how multiple queries are related and how they are grouped. This step must be done by hand. Queries that have been created elsewhere can be imported into Oracle Reports.
- Define the Layout – This step specifies the layout of the report including the overall orientation of query results and the suppression of repeating groups. There are a number of default report layouts that can automatically be applied to a data model.
- Create and/or Customize the Parameter Form – If some user input is required in order to run the report, then a parameter form must be customized. All reports have a default parameter form.
- (optional) Create any triggers or program units that will be executed with the report.
Oracle Reports version 3.0, 6i and 9iDS all support a wizard that takes the developer through all of these steps. This approach will be demonstrated next.
10.4 Creating a Single-Table Report
In this section, we go through the steps for creating a report that views the contents of a single table.
10.4.1 Specify the Data Model and Layout
The first step is to specify the data model and layout of the report. We will use the Report wizard to accomplish this. From the Object Navigator, pull down the Tools menu and choose Report wizard…
The first screen for the reports wizard will appear as below:

The first option is to decide the type of report to be created. Oracle Reports can be created to display on a web page (inside of a web browser), or by using the more traditional Oracle Reports runtime. The latter is called the “Paper Layout”. For this example, both types of layouts will be created. Make certain the “Create both Web and Paper Layout” option is selected and click the Next button.
The next step in the wizard prompts for the style of the report and for the Report Title.

The eight layout choices include:
- Tabular – Simple table with column headings at the top and data records in consecutive rows below.
- Form – Column headings on the left hand side with data values next to them on the right.
- Mailing Label – No column headings and records grouped into repeating sections sized to print directly to a sheet of mailing labels.
- Form Letter – Arbitrary placement of data items within a text body.
- Group-Left – A Master/Detail/Detail style where the master records are grouped on the left hand side with details to the right.
- Group-Above – A Master/Detail/Detail style where the master records appear above the detail records.
- Matrix – Column labels on both the left and the top with data values in the middle. Similar to a spreadsheet.
- Matrix with Group – A combination of Master/Detail (Group-Above) and Matrix.
For this report, type in “Employee Report” as the title, choose the Tabular Layout and click on the Next button.
10.4.1 Specify the Data Model and Layout – Continued
The next step is to specify the Type of query the report will be based on.

The five choices are:
- Express Server Query – a query based on a stored Oracle Express Server (OLAP)
- JDBC Query – A Query posed to a JDBC (Java DataBase Connectivity) Source
- SQL Query – A traditional SQL query to an Oracle database
- Text Query – A query posed against a text data source
- XML Query – A query posed against an XML data source (the Document Type Definition (DTD) of the XML data source is also required to use this type of query).
For this example, choose the “SQL Query” and click the next button.
The next step is to specify the query that will form the basis of the report. In this case, type the following query in the SQL Query Statement:text box:
SELECT FNAME, LNAME, SSN, SALARY, DNO FROM EMPLOYEE ;

For future reference, one could also invoke the graphical Query Builder at this step, or choose to import a SQL query from a text file.
Once the SQL SELECT statement is entered, click on the Next button to move to the next step. Note:If you did not Connect to the database, you will be prompted for the Username, Password and Database.
In the next wizard dialog box, specify which columns from the SQL Query will be displayed in the report output. To specify all columns, click on the double right arrow to bring all of the Available Fields to the Displayed Fields side.

Click on the Next button to move to the next dialog box.
In the next step, aggregate functions can be applied to the fields on the report. For this example, we will display the average salary as well as a count of employees. Highlight the SALARY field and click on the Average knapp. Then highlight the SSN field and click on the Count knapp.

The next dialog box allows you to change the field labels and display widths for various fields in the report.

As a final step, a design template can be applied to the report. Design templates include specifications for fonts, colors and layout of the report. For this example, choose the “Blue” predefined template and then click on the Finish button.

After a short delay, the Reports Live Previewer will appear showing the report.

It is possible to make changes to the layout of the report (fonts, colors, positions of headings and titles, etc.) by using the tool palettes and tool bars. When you have finished touching up the report, close the Reports Live Previewer and the Object Navigator will reappear. To edit the report again, pull down the Tools menu and choose Report Editor.
10.4.2 Saving, Generating and Running the Report
To save a report, pull down the File menu and choose the Save option. This is similar to saving an Oracle Form. The source code for Oracle Reports are saved in files with an .rdf file name extension. Compiled and generated reports are saved with a .rep extension.
For this example, save this report as employee.rdf
Note that report files can also be saved as static HTML or XML files as well as Java Server Pages (.jsp) files.
Once the report is saved, it can be run by pulling down the Program menu and choosing the Run Web Layout or Run Paper Layout menu item. The Paper Layout option will display the current report directly within a window inside of Reports Builder as was seen at the end of the report wizard. The Web Layout will take the current report with a snapshot of the data as it is now in the database and save it to an HTML file. The default web browser will then be launched to display the file. This is shown in the figure below:

As the report is running, an Activity screen will appear giving an indication of the processing that is currently underway.

The Activity will go through 3 stages:Client Activity while the queries are prepared, Server Activity when the queries are executed and finally Client Activity as the report is formatted. When this is finished, the report will appear on screen.
10.5 Exercise:Creating a Report
For this exercise, create a report to display all of the records in the DEPARTMENT table including a join with the EMPLOYEE table to display the last name of the department manager.
- Start up the Report wizard. Use “Departments” as the title and enter the following SQL Statement as the query:
SELECT dnumber, dname, mgrstartdate, mgrssn, lname, salary FROM department, employee WHERE department.mgrssn = employee.ssn;
- Summarize the report with an average of the Salary column.
- Save the new report as departmg.rdf
The finished report should look something like the following:

10.6 Creating a Master/Detail Report
In this section, the steps for creating a report that views the contents of two tables in a Master/Detail (one to many) relationship are given. From this example, more complex reports can be implemented based on the SQL query given as a basis for the report.
To avoid any confusion, first Save and Close any existing reports before proceeding.
10.6.1 Specify the Master/Detail Data Model and Layout
As in the single-table report, we begin by specifying the data model and layout for the Master/Detail report by using the Report Wizard.
Invoke the wizard by pulling down the Tools menu and choosing Report wizard . Following these steps to complete the wizard:
- Choose both Web and Page Layouts
- For the Report Title use:Departments and Employees
- For the Report Style , choose Group Above .
- Choose a SQL Statement and the SQL Query:
SELECT DNAME, FNAME, LNAME, SALARY
FROM DEPARTMENT, EMPLOYEE
WHERE DEPARTMENT.DNUMBER = EMPLOYEE.DNO
- Designate the DNAME field as a Group field (Level 1). Click on the DNAME field and then on the right arrow button.
- Display all fields in the report.
- Choose Average Salary as a Totals field. Click on the SALARY field and then click on the Average button.
- Touch up the fields and labels as follows:
Fields and Totals   Labels
DNAME               Department Name
FNAME               First Name
LNAME               Last Name
SALARY              Salary
AvgSALARYperDNAME   Average:
AvgSALARYperRep     Average For all Employees:
- Use the Blue pre-defined template.
From this point, click on Finish to display the Live Report Preview:

10.6.2 Saving, Generating and Running the Master/Detail Report
At this point, the report can be saved and Execute (Run).
For this example, save the Master/Detail report as dept_emp.rdf
10.7 Exercise:Creating a Master/Detail Report
In this exercise, a master/detail report will be created that displays each EMPLOYEE record, with a group of DEPENDENT below.
- Create a new Report using the wizard. Give a title:“Employees and Their Dependents”
- Select the Group Above report type and use the following SQL query:
SELECT  employee.fname, employee.lname,
employee.bdate AS EmpBdate,
employee.sex AS EmpSex, dependent.dependent_name,
dependent.bdate AS DepBdate,
dependent.sex AS DepSex, dependent.relationship
FROM    employee, dependent
WHERE   employee.ssn = dependent.essn;
Note the use of column aliases (AS) to differentiate the bdate and sex columns.
- Select the lname, fname, empsex, empbdate fields as the “Group 1” fields. These should all be from the EMPLOYEE table.
- Select all fields to display in the report and do not select any fields for the calculate totals step.
- Touch up the report in the live previewer to fit on one screen.
- Save the report as file:empdepen.rdf
The report should look similar to the following when completed:

10.8 Parameter forms in Oracle Reports
For each of the Oracle Reports examples thus far, all of the records in the respective tables were returned as part of the report. However, there may be situations where only a subset of the database records are required. In these cases, we would like to prompt the user to enter some criteria that can be used to filter the report. In Oracle Reports, a Parameter Form fulfills this role.
Parameter forms are simple Oracle forms that prompt the user for some information before a report is executed. This information can become part of the WHERE clause in the report query and is used to filter the records returned in the report. Parameters in Oracle Reports can either be filled in by the user on a parameter form or can be filled in automatically by passing the parameters in from another Oracle Forms form (see the example of parameter passing in the previous section on Oracle Forms).
In the following example, a simple parameter form is automatically created by Oracle Reports to restrict a query on the EMPLOYEE table by showing only employees in a given department number (DNO) supplied by the user.
- Create a new report using the report wizard. Specify “Employees” as the report title and use a Tabular report layout.
- Use the following SQL query exactly as written. Note the use of the full colon in the WHERE clause.
SELECT *
FROM   employee
WHERE  employee.dno = :DNO_PARAMETER;
In the above query, :DNO_PARAMETER is the name of a run time parameter . When the report is executed at run time, the user will supply a value for this parameter thus completing the WHERE clause for the query.
Clicking on the Next button will produce the following alert:
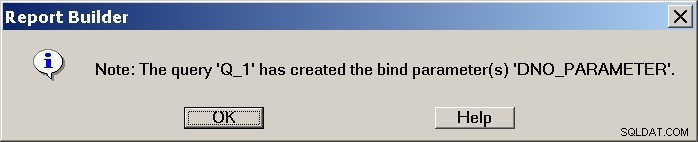
- Choose all of the columns (fields) for display in the report. Do not choose any fields for summary information.
- When the report wizard is finished, the report and parameter form (based upon the parameters given in the SQL query) will be created. As the live previewer is running, the new parameter form will be displayed:
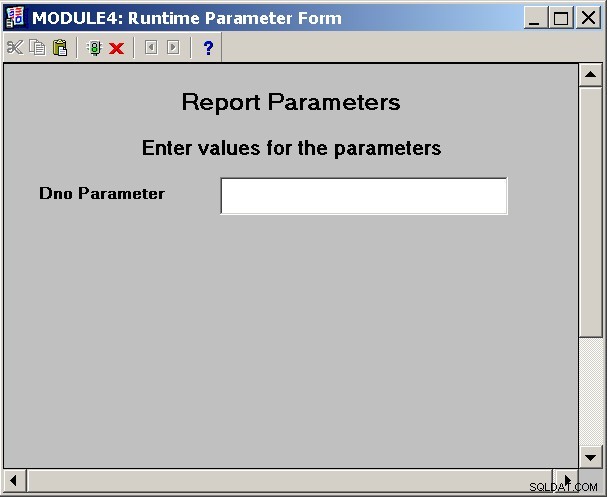
For this example, choose department 5 (type the number 5 in the field) and press the enter key. Notice that only employees in department 5 are displayed in the live previewer.
10.8.1 Building a Custom Parameter Form
At this point, whenever the report is run, a default parameter form showing the DNO_PARAMETER will be displayed. However, it is possible to create a custom parameter form as shown in the following steps.
- Switch to the Object Navigator, pull down the Tools menu and choose the
Parameter Form Builder . This is shown below: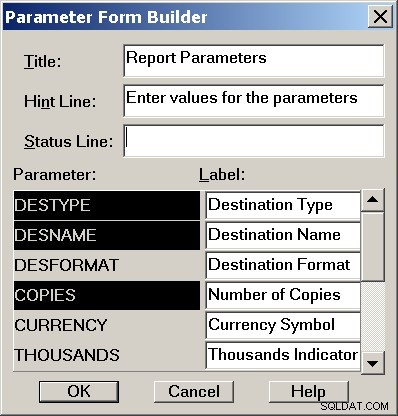
A number of built-in system parameters are displayed and can be highlighted by clicking on them with the right mouse button. Note that at the bottom of this list is the
DNO_PARAMETER and it should already be selected. - For this example, in addition to the DNO_PARAMETER also select the DESTYPE, DESNAME and COPIES parameters. Then click the OK knapp. A new parameter form will be automatically created.
- Save the report as empparam.rdf . When the form is executed (pull down the Program menu and choose Run Report ), the new parameter form will be displayed as shown below:

In the above example, 1 copy of the report will be sent to the printer named “HP LaserJet 4000 Series”. The report will only show employees in department 4.
Other Destination Type options include Screen, File and E-mail.
Parameter forms can be highly customized to include list of values user prompts and other user-friendly features. The techniques used for Oracle Forms can be easily applied to parameter forms in Oracle Reports.
11. Creating Menus in Oracle Forms
Please note I have only done a basic update of this section to reflect the new features of 9iDS. Therefore, the following section has no figures, has not been tested and may not work at all. Because Forms and Reports now run as web services, they can involved directly from any web page by specifying the appropriate URL. However legacy Oracle Developer applications may still use the Oracle Menu system built into Oracle Forms so this is why I am leaving these materials in place below.
Note:The properties for Menus in different versions of Forms seem to change with every minor revision. Please keep in mind, the version of Forms you are working with may differ slightly from what is shown in this tutorial.
Thus far, we have covered the basics for creating forms and reports using Oracle Developer. Some advanced features such as using stored procedures (Program Units) have also been introduced.
In a complete Database System, the applications consist of many forms and reports that might be used by a number of users. Access to forms and reports is typically accomplished through menus . In Oracle Developer, menus can be created to guide users into forms and reports of interest. Menus are designed as part of the Oracle Forms Builder.
In Oracle Forms, every form runs with one of the following:
- The default menu which includes the Action, Edit, Block, Field, Record, Query, Window, Help menus. The structure of the default menu cannot be changed.

- A custom menu that you define as a separate module and then attach to the form for runtime execution.
- No menu at all.
The default menu is part of the form module. However, custom menu modules are separate from form modules. So, when a single-form application runs using a custom menu, there will be two executable files:
- an .FMX form module
- an .MMX menu module
In a multi-form application, Multiple forms can share the same menu, or each form can invoke a different menu.
To explicitly specify the default menu in Forms:
- Select the name of the form/module in the Object Navigator. Click with the right mouse button and choose Properties from the pop-up menu.
- In the Menu Module property, type DEFAULT&SMARTBAR to get the default menu and a button bar below it.
If you want the form to run without a menu, leave the Menu Module property blank.

To explicitly specify the default menu in older versions of Developer:
- Select the name of the form/module in the Object Navigator. Click with the right mouse button and choose Properties from the pop-up menu.
- In the Menu Module property, type DEFAULT.
If you want the form to run without a menu, leave the Menu Module property blank.

The default menu is suitable for control over the current form being executed, however, it does not contain custom menu items pertaining to a specific application. In the following section, the steps to create a custom menu structure will be introduced.
11.1 The Oracle Forms Menu Hierarchy
The Oracle Forms menu hierarchy contains three object categories:
- Menu modules – Like form modules, a menu module can contain its own items (menus and menu items), program units and other objects.
- Menus – Including main menus, individual menus, and submenus
- Menu items – The items the user can select from a menu (or submenu). Menu Items are generally used to launch forms, reports or other programs.
11.2 Creating a Custom Menu
Designing a custom menu requires five basic steps:
- Creating a menu module
- Creating menus and menu items
- Assigning commands to menu items
- Saving and generating (Compiling) the menu module (creates the .mmx file)
- Attaching a menu module to a form
11.2.1 Creating a Menu Module
The first step in designing a custom menu is to create a menu module. There are several ways to create a new menu module:
- Pull down the File menu, highlight the New menu item and then select the Menu menu item.
- Navigate down to the Menus subtree in the Object Navigator, pull down the Edit menu and choose the Create menu item.
A new menu module will be created and a default name will be assigned. Click on this default menu name and assign it a more meaningful name such as mymenu.
11.2.2 Creating menus and menu items
Creating menus and menu items can be accomplished using the Menu Editor . To activate the menu editor, first highlight the name of your menu, then pull down the Tools menu and click on the Menu Editor item.

The main menu items go across the top of the screen. To add a new menu across the top, click on the Build Across icon on the toolbar:
Sub-menus and menu items appear below each one. To add a new sub-menu or menu item, click on the Build Down icon on the toolbar:
To change the name of a menu or menu item, click in the menu object and over-write the name that appears there.
Using the icons, create and re-label several menus and menu items to appear as follows:

Once this is completed, the basic menu structure will be in place. The next step is to add functionality to each menu item.
11.2.3 Assigning Commands to Menu Items
The default behavior for clicking on any menu is for that menu’s items to be displayed. The next step is to assign commands to each of the menu items so that when a user clicks on a menu item, a form, report or SQL*Plus script is executed.
To assign a command to a menu item:
- Select the desired menu item in the Menu Editor. Click with the right mouse button and choose Properties to bring up the properties of that menu item.
Note:The pop-up menu may show Property Palette - The properties of interest here are:
- Command type: Indicates what kind of command should be run:Form, Report, PL/SQL, other menu. In general, the PL/SQL command type is used to launch Oracle Forms and Oracle Reports. The specific Form and Report command types are maintained for backwards compatibility only.
- Menu Item Code (or Command Text ):The text of the actual command to run.
To run a form from the menu item, choose Command Type PL/SQL. Double click on the Menu Item Code (or Command Text ) property and type in the PL/SQL editor:
BEGIN
  RUN_PRODUCT(FORMS, 'employee', SYNCHRONOUS, RUNTIME, FILESYSTEM, '', '');
END;
RUN_PRODUCT is a PL/SQL built-in function that runs another Oracle Developer product. The parameters to RUN_PRODUCT are:
- Product:FORMS or REPORTS
- Document/Module:name of the file in single quotes (Note that you may also provide an explicit path to the .fmx file here)
- Command Mode:SYNCHRONOUS or ASYNCHRONOUS
- Executable Mode:RUNTIME
- Location:FILESYSTEM or DATABASE
- Parameter List:A list of parameters to pass to the form or NULL
- Display:Type of display to show the product on. Can be NULL to indicate the current display. Note:Starting with Forms 5.0, (which uses PL/SQL version 2.3) you may not use NULL in the call to RUN_PRODUCT here. You must use two single quotes (indicating a zero length character string).
Compile this code by clicking on the Compile button. Then close the PL/SQL editor.
Repeat the above steps for each menu item.
A final menu item should be created to Exit the application. Call the menu:Exit Application and enter the following PL/SQL code:
BEGIN EXIT_FORM; END;
EXIT_FORM is a built-in procedure that exits the current form.
A View of the complete mymenu is show below:

11.2.4 Save and Generate the Menu Module
At this point, all of the menu structure has been created and commands for each menu item have been specified. The menu module must now be saved to a file (with a .mmb extension) and Generated or Compiled.
To save the menu module, make sure the name of the menu is highlighted, pull down the File menu and choose the Save menu item. Specify a file name with a .mmb extension. This is the “source code” for the menu. For this example, use the file name mymenu.mmb .
| Pre-Oracle9iDS | Oracle 9iDS |
|---|---|
| To generate or compile the menu module, pull down the File menu, click on the Administration menu item and choose Generate from the flyout menu. In some versions of the Forms Builder, the menu item might be called Compile File. | To generate or compile the menu module, pull down the Program menu and choose Generate Module. |
Generating or compiling a menu module results in a file with a .mmx extension. In this example, the generated menu module becomes:mymenu.mmx
11.2.5 Attaching a Menu Module to a Form
A custom menu must be attached to a form in order to be displayed. Typically, a form with no data entry on it is used as the main screen to host the custom menu.
The following steps are different depending on the version of Forms being used.
| For Oracle Forms version 4.5 | For Oracle Forms version 6i (and later) |
|---|---|
|
|
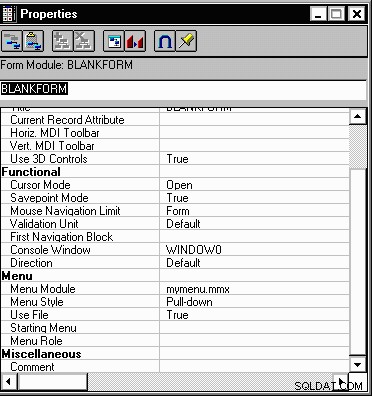
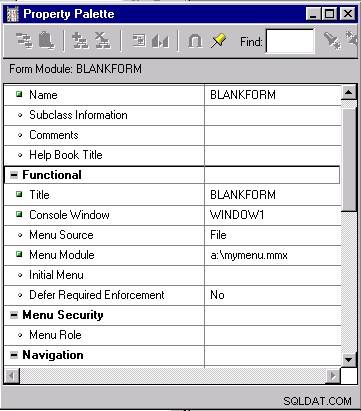
Notice that when running this blank form, the default menu is replaced by the mymenu Menu Module.

The blank form that is used to host the menu need not be blank. You may wish to use the Layout Editor to place some graphics and a title of the application on the canvas.
Another use for this space would be for some simple instructions the user can read to get started with the database application.
Please feel free to use these tutorials for your own personal use, education, advancement, training, etc. However, I kindly ask that you respect the time and effort I have put into this work by not distributing copies, either in whole or in part, for your personal gain. You may not under any circumstances download, cache or host copies of these tutorials on your own servers. Use of these tutorials for commercial training requires a special arrangement with the author or authors.