Denna handledning innehåller alla steg som krävs för att installera MySQL 8 på Ubuntu 18.04 LTS. Samma steg kan följas för andra versioner av Ubuntu.
Anteckningar :För att kunna följa det här inlägget måste du helt ta bort den tidigare installationen av MySQL-servern installerad med installationsprogrammet om det redan är installerat på systemet. Du kan följa Hur man tar bort MySQL helt från Ubuntu för att helt ta bort den tidigare installationen som gjorts med installationsprogrammet.
Du kanske också är intresserad av andra MySQL-specifika handledningar inklusive hur man installerar MySQL 8 på
Steg 1 - Ladda ner MySQL APT Repository
Sedan MySQL 8 ingår inte i de officiella arkiven för Ubuntu 18.04 måste vi ladda ned dess Debian-paket . Den nuvarande officiellt tillgängliga versionen av MySQL på Ubuntu 18.04 är 5.7.26 . Använd kommandot nedan för att ladda ner det senaste APT-förrådet.
# Download MySQL APT Repository
wget –c https://dev.mysql.com/get/mysql-apt-config_0.8.13-1_all.deb
Det kommer att ladda ner det officiella Debian-paketet för att installera MySQL 8.
Steg 2 - Installera MySQL Repository
Använd det nedan nämnda kommandot för att börja installera MySQL-förvaret med hjälp av förvaret som laddades ner av oss i föregående steg.
sudo dpkg -i mysql-apt-config_0.8.13-1_all.deb
Den kommer att be om att välja bland de tillgängliga alternativen som visas i Fig. 1. Behåll standardalternativet markerat och tryck på Enter för att starta installationen.

Fig 1
På nästa skärm kommer installationsprogrammet att be om att välja vilken MySQL-version som ska installeras enligt fig. 2. Behåll mysql-8 markerat och tryck på Enter.
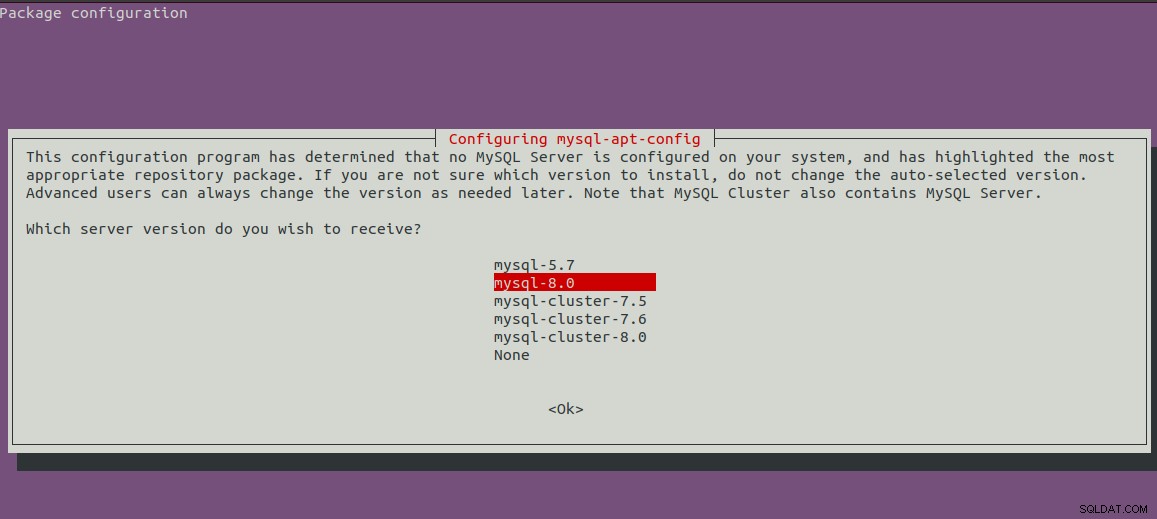
Fig 2
Den kommer att visa den första skärmen med den valda versionen av MySQL. Tryck nu på nedåtpilen och nästa piltangent för att gå till OK-alternativen som visas i fig 3.
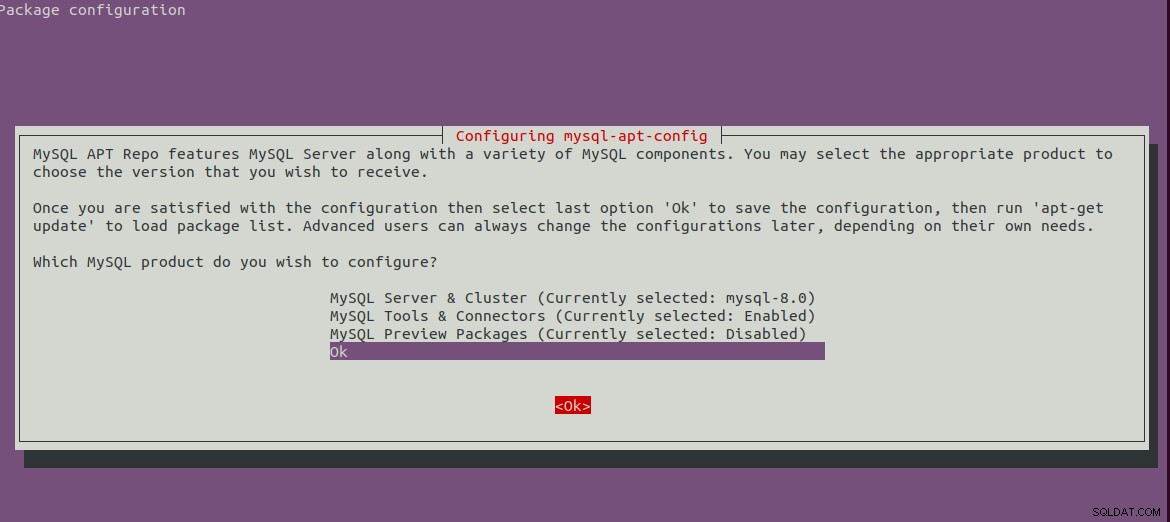
Fig 3
Tryck på Enter för att starta installationen. Det kommer att visa nedanstående meddelanden efter att installationen är klar.
bravo@pc1:/setups/database$ sudo dpkg -i mysql-apt-config_0.8.13-1_all.deb
Selecting previously unselected package mysql-apt-config.
(Reading database ... 200223 files and directories currently installed.)
Preparing to unpack mysql-apt-config_0.8.13-1_all.deb ...
Unpacking mysql-apt-config (0.8.13-1) ...
Setting up mysql-apt-config (0.8.13-1) ...
Warning: apt-key should not be used in scripts (called from postinst maintainerscript of the package mysql-apt-config)
Steg 3 - Uppdatera systemarkiv
Uppdatera nu systemförråden med kommandot som nämns nedan.
sudo apt-get update

# It must show MySQL 8 repos
bravo@pc1:/setups/database$ sudo apt-get update
Hit:1 http://repo.mysql.com/apt/ubuntu bionic InRelease
Hit:2 http://in.archive.ubuntu.com/ubuntu bionic InRelease
Hit:3 http://in.archive.ubuntu.com/ubuntu bionic-updates InRelease
Hit:4 http://in.archive.ubuntu.com/ubuntu bionic-backports InRelease
Hit:5 http://security.ubuntu.com/ubuntu bionic-security InRelease
Get:6 http://repo.mysql.com/apt/ubuntu bionic/mysql-8.0 Sources [962 B]
Get:7 http://repo.mysql.com/apt/ubuntu bionic/mysql-8.0 i386 Packages [7,472 B]
Get:8 http://repo.mysql.com/apt/ubuntu bionic/mysql-8.0 amd64 Packages [7,463 B]
Fetched 15.9 kB in 3s (5,556 B/s)
Reading package lists... Done
Det kommer att uppdatera systemcachen för att få uppdateringar om de senaste versionerna av de tillgängliga paketen.
Steg 4 - Installera MySQL Server
Efter att ha uppdaterat systemcachen kan vi börja installera MySQL-servern och klienten med kommandot som nämns nedan.
# Install MySQL Server 8
sudo apt-get install mysql-server mysql-client
Tryck på Y för att bekräfta och fortsätta med installationen. Med detta installeras MySQL som vi gör med standardpaketet som är tillgängligt på Ubuntu-förråd. Installationen kommer också att be om att välja
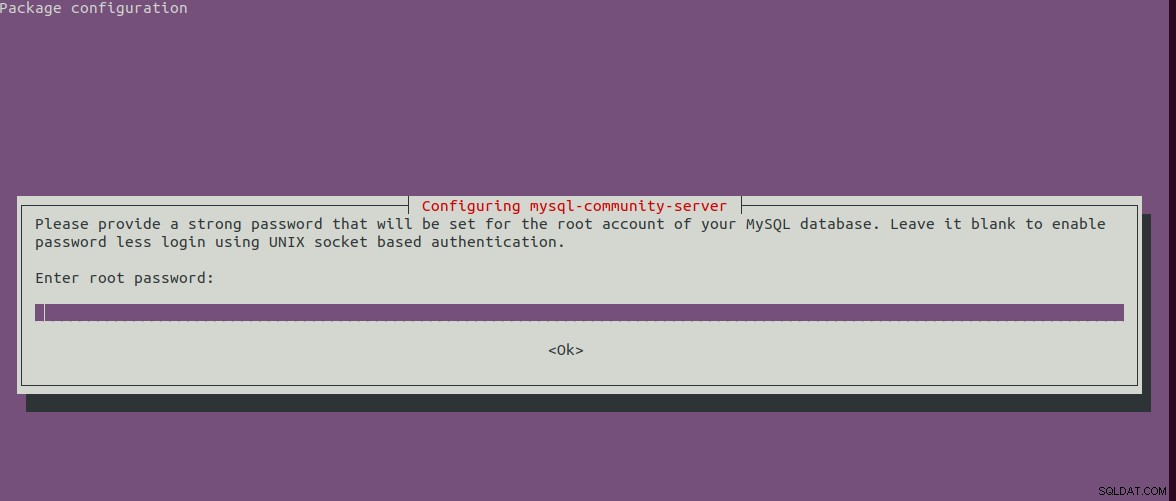
Fig 4
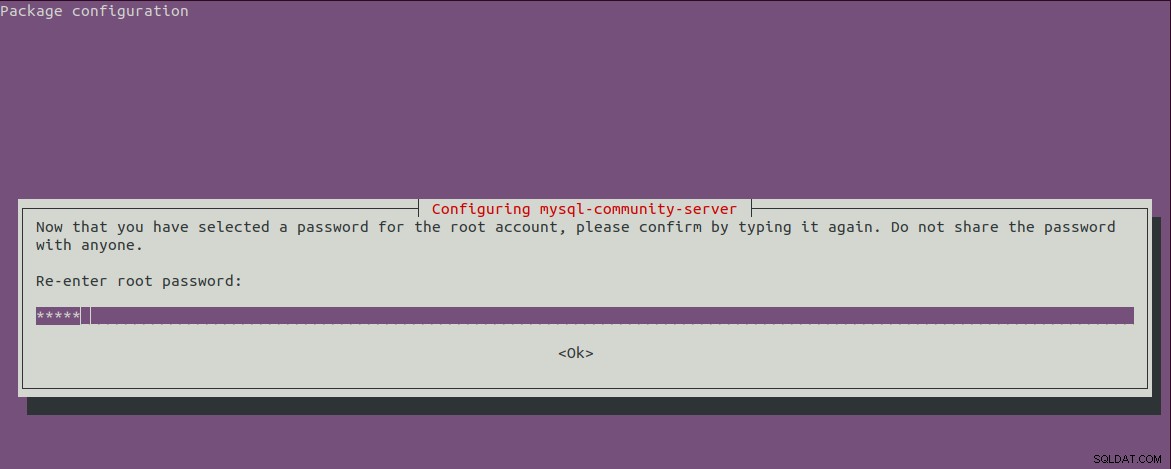
Fig. 5
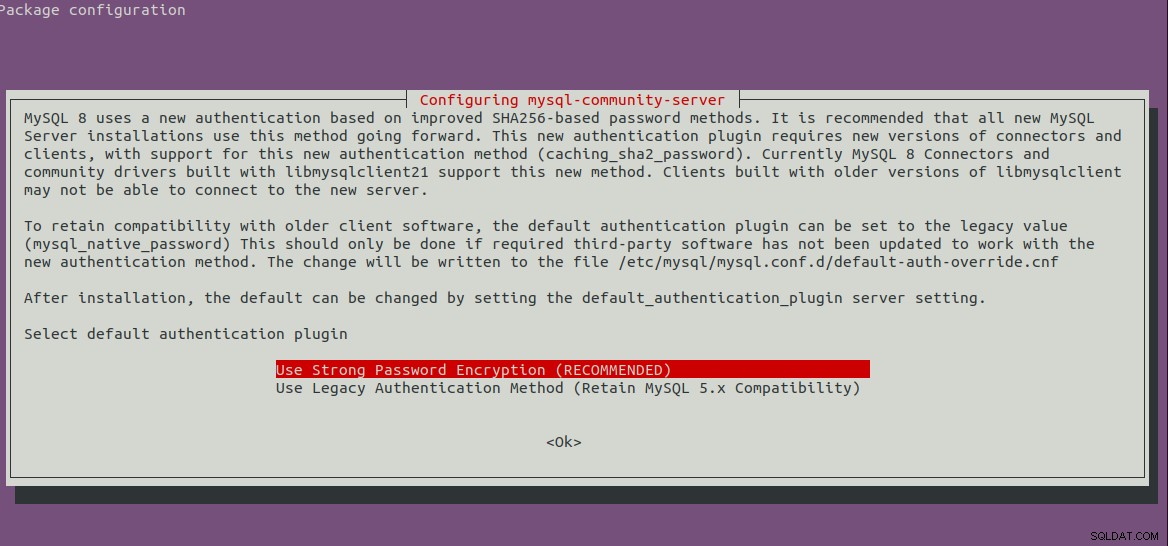
Fig 6
Steg 5 - Säker MySQL-installation
Vi måste också säkra installationen med kommandot som nämns nedan.
sudo mysql_secure_installation
Det kommer att be om att ställa in root-lösenordet och några säkerhetsfrågor. De fullständiga stegen som jag följt är som visas nedan.
bravo@pc1:/setups/database$ sudo mysql_secure_installation

Securing the MySQL server deployment.

Enter password for user root:

VALIDATE PASSWORD COMPONENT can be used to test passwords
and improve security. It checks the strength of password
and allows the users to set only those passwords which are
secure enough. Would you like to setup VALIDATE PASSWORD component?

Press y|Y for Yes, any other key for No: y

There are three levels of password validation policy:

LOW    Length >= 8
MEDIUM Length >= 8, numeric, mixed case, and special characters
STRONG Length >= 8, numeric, mixed case, special characters and dictionary                  file

Please enter 0 = LOW, 1 = MEDIUM and 2 = STRONG: 1
Using existing password for root.

Estimated strength of the password: 25
Change the password for root ? ((Press y|Y for Yes, any other key for No) : n

 ... skipping.
By default, a MySQL installation has an anonymous user,
allowing anyone to log into MySQL without having to have
a user account created for them. This is intended only for
testing, and to make the installation go a bit smoother.
You should remove them before moving into a production
environment.

Remove anonymous users? (Press y|Y for Yes, any other key for No) : y
Success.


Normally, root should only be allowed to connect from
'localhost'. This ensures that someone cannot guess at
the root password from the network.

Disallow root login remotely? (Press y|Y for Yes, any other key for No) : y
Success.

By default, MySQL comes with a database named 'test' that
anyone can access. This is also intended only for testing,
and should be removed before moving into a production
environment.


Remove test database and access to it? (Press y|Y for Yes, any other key for No) : y
 - Dropping test database...
Success.

 - Removing privileges on test database...
Success.

Reloading the privilege tables will ensure that all changes
made so far will take effect immediately.

Reload privilege tables now? (Press y|Y for Yes, any other key for No) : y
Success.

All done!
bravo@pc1:/setups/database$
Ovanstående steg tar bort testdatabasen och anonyma användare. Det tillåter också fjärrinloggning för att säkerställa att servern är tillgänglig lokalt antingen med 127.0.0.1 eller localhost .
Använd kommandot nedan för att kontrollera om MySQL-servern körs.
bravo@pc1:/setups/database$ systemctl status mysql
● mysql.service - MySQL Community Server
   Loaded: loaded (/lib/systemd/system/mysql.service; enabled; vendor preset: enabled)
   Active: active (running) since Thu 2019-08-15 10:40:47 IST; 4min 45s ago
     Docs: man:mysqld(8)
           http://dev.mysql.com/doc/refman/en/using-systemd.html
  Process: 28669 ExecStartPre=/usr/share/mysql-8.0/mysql-systemd-start pre (code=exited, status=0/SUCCESS)
 Main PID: 28708 (mysqld)
   Status: "Server is operational"
    Tasks: 38 (limit: 4915)
   CGroup: /system.slice/mysql.service
           └─28708 /usr/sbin/mysqld

Aug 15 10:40:45 bravo systemd[1]: Starting MySQL Community Server...
Aug 15 10:40:47 bravo systemd[1]: Started MySQL Community Server.
Steg 6 - Kontrollera version och åtkomst
Kontrollera versionen av servern som installerats av oss och se även till att servern är tillgänglig med det root-lösenord som konfigurerats av oss.
# Check version
sudo mysql --version
mysql  Ver 8.0.17 for Linux on x86_64 (MySQL Community Server - GPL)

# Login
sudo mysql -u root -p
Steg 7 - Viktiga kommandon
Det här avsnittet visar några av de viktiga kommandona för att starta, stoppa och starta om servern.
# Check server status
sudo service mysql status

# Stop server
sudo service mysql stop

# Start server
sudo service mysql start

# Restart server
sudo service mysql restart
Steg 8 - Använda lösenordsinsticksprogram
Om du har valt att använda lösenordspluginalternativet för bakordskompatibilitet med version 5.7, kan det krävas att du ansluter till MySQL-servern med kontot med
# Login to MySQL

# Check password plugin of root user
SELECT user,authentication_string,plugin,host FROM mysql.user;

# Note the password plugin of root user
+------------------+-------------------------------------------+-----------------------+-----------+
| user             | authentication_string                     | plugin                | host      |
+------------------+-------------------------------------------+-----------------------+-----------+
| root             |                                           | auth_socket           | localhost |
+------------------+-------------------------------------------+-----------------------+-----------+

# Change password plugin of root user to native
ALTER USER 'root'@'localhost' IDENTIFIED WITH mysql_native_password BY '<pw>';

# Apply changes
flush privileges;

# Check password scheme of user
SELECT user,authentication_string,plugin,host FROM mysql.user;

# Note the password plugin of root user
+------------------+-------------------------------------------+-----------------------+-----------+
| user             | authentication_string                     | plugin                | host      |
+------------------+-------------------------------------------+-----------------------+-----------+
| root             | *E5C4F73D963132CEF9BB4PA79LA818C08BAQC300 | mysql_native_password | localhost |
+------------------+-------------------------------------------+-----------------------+-----------+

# Change to new and recommended password plugin
ALTER USER 'root'@'localhost' IDENTIFIED WITH caching_sha2_password BY '<pw>';

# Apply changes
flush privileges;

# Check password scheme of user
SELECT user,authentication_string,plugin,host FROM mysql.user;

+------------------+------------------------------------------------------------------------+-----------------------+-----------+
| user             | authentication_string                                                  | plugin                | host      |
+------------------+------------------------------------------------------------------------+-----------------------+-----------+
| root             | $A$005$THISISACOMBINATIONOFINVALIDSALTANDPASSWORDTHATMUSTNEVERBRBEUSED | caching_sha2_password | localhost |
+------------------+------------------------------------------------------------------------+-----------------------+-----------+
Så här kan vi installera den senaste versionen av MySQL-servern, dvs MySQL 8 på Ubuntu 18.04 LTS.
